Ryan's Hennarot 318is (s54, slicktop conversion, MT2)

Collapse
X
 
  • Time
  • Show
Clear All
new posts

  • rjmcdermott81
    replied
    On a more fun note. I've had an opportunity to drive the car at a little bit more of it's potential. I still haven't taken it over 5k rpm intentionally because I want to take it easy on the new bearings BUT this thing is terrifying.

    It spins the wheels on command in 1st, 2nd, and 3rd. I'm still a bit of afraid of getting on the throttle coming out of turns for fear of spinning the car and driving it with "sport mode" on is just looney.

    I may find a more permanent solution for the sport button but for now I just put the button that Andrew includes with the harness in a hole in the center console. I've had this button stuffed in the glovebox this whole time and didn't even think it did anything.

    Instead of sport button. It should be called the OH SHIT button. Throttle is crazy responsive.

    Leave a comment:


  • rjmcdermott81
    replied
    No oil pressure at startup

    So....I've been without my car for a few weeks. Figured I would document the issues in case anyone else experiences the same. At RADwood I had to start/stop the car a lot while we were waiting for them to slot us in. That, combined with having my gauges actually mounted for the first time instead of just bouncing around on the trans tunnel.

    That's when I noticed that my oil light was staying on a little long during startups and the pressure wasn't building immediately... The longer the the car sat the longer it would take. It looked like this:
    - Restarting immediately after running - instant
    - After 1 hour - 2 seconds
    - Overnight - 4-5 seconds
    - Several days - 5-7 seconds

    I have both the idiot light and an electric gauge mounted on a T off of the oil filter housing. Both reported the same info. After a bit of research I found two possible causes:
    1. Bad check-valve in the oil filter housing. This seemed really unlikely because people say that this is very very very rare.
    2. Loose o-ring on the oil pickup tube. I found this on a couple of forums causing the same symptoms.

    Needless to say, I didn't have the constitution to drop the subframe and oil pan in my driveway on jackstands. I took it over to Terry Sayther in Austin. These guys are so awesome. They've worked on all my e30s and they're enthusiasts.

    To trouble shoot the problem they first ruled out the OFH by measuring the level in the OFH before starting it over several days. Even with the oil level at the top they still saw the delayed oil pressure. Unfortunately that meant dropping the pan. With the pan off they found three possible causes:
    1. Loose o-ring on the oil pickup tube
    2. Wear marks on the teeth in the oil pump
    3. Higher clearances on the main bearings - .051mm (spec is .019-.052mm)

    They also checked one of the rod bearings I installed and the clearance was at the bottom end of spec.

    So...I had them replace the oil pump, main bearings, and o-ring on the pickup tube... I'm guessing the issue was the stupid o-ring but I couldn't put it back together without addressing the mains and oil pump.

    Here are the videos:

    Startup before the fix after sitting overnight: https://youtu.be/azTyu1h2s3A

    Startup after sitting for 5 days after the fix: https://youtu.be/FuoTzQdrqEo

    Also, my oil pressure at warm idle went from 12.5psi to 25psi, likely because of the new mains are now at 0.030mm. If I had to do it again...I would have just changed those when I was doing the rod bearings. The bearings were only $175 and you can roll them in without taking the crank out. It's more complicated than that, but it would have been worth figuring out.

    Leave a comment:


  • rjmcdermott81
    replied
    RADwood Austin was pretty killer.


    Leave a comment:


  • Staszek
    replied
    Originally posted by rjmcdermott81
    Ya mine must have come from a US spec car because they had the cutouts. To be honest, I didn't realize there were different versions and had no idea these cutouts were different from the stock sidemarker cutouts until I went to test fit the markers. I like them now that it's done, but had I known I would have just filled these in before I painted them to save me a bunch of trouble.
    Got ya, either way it looks great!

    Leave a comment:


  • rjmcdermott81
    replied
    Originally posted by Staszek
    I may have missed it in your thread but did your MT2 kit have cut outs already for side markers? Mine where were euro with no side marker openings.

    Ya mine must have come from a US spec car because they had the cutouts. To be honest, I didn't realize there were different versions and had no idea these cutouts were different from the stock sidemarker cutouts until I went to test fit the markers. I like them now that it's done, but had I known I would have just filled these in before I painted them to save me a bunch of trouble.

    Leave a comment:


  • Staszek
    replied
    Originally posted by rjmcdermott81
    Last push. I think I will still have lots of buffing/polishing to do but I'm aiming at getting it presentable without rushing it and making mistakes.


    I don't know why I hadn't bought one of these to start. Best $35 ever spent


    You can see it's progressing but still a lot more work to get all the sanding scratches out


    I also had to ditch the 3D printing idea for the sidemarker surrounds. Just ran out of time. I bought thin sheets of ABS on Amazon. It is easy to cut with a box cutter and you can form it with a heat gun. I cut it into the right shape, painted it with SEM black, and then used 3M tape to mount them. I would love to have the OEM pieces but these will do...and it was only $20.


    I may have missed it in your thread but did your MT2 kit have cut outs already for side markers? Mine where were euro with no side marker openings.

    Leave a comment:


  • kid8
    replied
    Looking good dude! Excited to see it tomorrow.

    Leave a comment:


  • rjmcdermott81
    replied
    Last push. I think I will still have lots of buffing/polishing to do but I'm aiming at getting it presentable without rushing it and making mistakes.


    I don't know why I hadn't bought one of these to start. Best $35 ever spent


    You can see it's progressing but still a lot more work to get all the sanding scratches out


    I also had to ditch the 3D printing idea for the sidemarker surrounds. Just ran out of time. I bought thin sheets of ABS on Amazon. It is easy to cut with a box cutter and you can form it with a heat gun. I cut it into the right shape, painted it with SEM black, and then used 3M tape to mount them. I would love to have the OEM pieces but these will do...and it was only $20.


    Leave a comment:


  • rjmcdermott81
    replied
    Wing install

    Leave a comment:


  • rjmcdermott81
    replied
    Originally posted by Jokester
    are the quarter panels being sanded in the photos?

    I see orange peel and a dull finish which seems like you’re correcting some of the paint.
    Oh ya for sure. I sanded all the orange peel and I’m slowly polishing it back. I’m prioritizing getting it all back together since that process is pretty straightforward but crazy time consuming...

    Leave a comment:


  • Jokester
    replied
    are the quarter panels being sanded in the photos?

    I see orange peel and a dull finish which seems like you’re correcting some of the paint.

    Leave a comment:


  • industrious
    replied
    Hennarot, one of the best red colors out there. nice work!

    Leave a comment:


  • rjmcdermott81
    replied
    I got the skirts and door pods mounted this weekend. Honestly, without drilling templates (I searched everywhere and couldn't find them) this wasn't easy. My lack of experience probably didn't help, but I'm happy with the way they turned out. It took me about 9 hours to get these things buttoned up.

    Doing some test fitting:


    All mounted up:


    Leave a comment:


  • rjmcdermott81
    replied
    Originally posted by Mike36
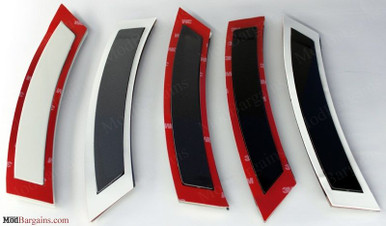
    I've been thinking about have something like this done for the side markers. A side marker delete:

    ModBargains.com offers the Lowest Prices Online for parts, wheels & accessories from BMW, Audi, VW, Porsche, Camaro's and more. Buy Online NOW or call 714-582-3330 to Save $$$.


    Seems easier and cleaner than making a holder like OEM. Also which 3D printer did you end up buying?

    I purchased an Anet A8 printer on Amazon. It's cheap ~$170 but it is completely DIY. It shows up in a hundred pieces and then you watch youtube videos with zero words to build it. If you are serious about it reach out to me and I can give you the full rundown on what to get. You really need to add a raspberry and other parts which bring the price up to $250. I still don't have it completely set up. Too focused on other parts of the car.

    Leave a comment:


  • Erik
    replied
    Insane work! 👌

    Leave a comment:

Working...