-
Piston #4 is just all scratched up on the sides like 4 of the other pistons were. It could have been something nasty the engine ingested, really dirty oil, sand and grit sucked in through the K&N filter that was on the car before, or it could be the rods sticking on the wrist pins that allowed the pistons to get cocked a bit. I dunno. The #6 piston is newer than the rest and it looks fine. So whatever was causing it did not occur after the #6 piston was installed. The #6 cylinder does have a scratch in it like the others though.
Yeah, now it is a question as to what I can do with it. It will come down to money and availability of parts and if those scratches can be honed out. That one scratch is probably about .2mm deep but I don't have anything to measure it with.Leave a comment:
-
What is on the sides of piston #4? Was that something that the engine ingested? I would have bet my paycheck the rings were broken. I've had cylinders look like that and when I pulled the pistons the rings just fell off in 2-3 pieces. Perhaps the scratches look worse in the photos. Good luck with the project.Leave a comment:
-
Even my rebuilt motor that I rebuilt 30k ago has carbon builup on the pistons - valves good, but pistons were pretty black. Pretty sure it's just the nature of an M20.
you may have to bore out that block and use custom pistons to get rid of that nasty scoring. That's what I would do.Leave a comment:
-
i would say pistons are fine, if u want i have a full set out of my parts car...pm me for details.Leave a comment:
-
Well, there are no broken rings. They all seem fine to me. I only checked ring gaps on the #1 piston so far, but they were within spec.
But, there is plenty of other goofiness to go around.
Something here is wrong, can you spot it? One of these things is not like the other...


Yep, one of the end cap bolts is a different type. It was the only one like that. It was on the #5 piston and that was the cylinder with the biggest scratches. Coincidence?

All the pistons except the #6 showed scratching on one side. It was the same side on all of them. This is the #5 and it was the worst. None of the others really had that gouging above the rings like this one did.

All the pistons shown above. You can see how the scratching is on one side of each piston but not evident on the other side.
The end caps and rods were not all lined up in the same direction either. It was a bit of a mishmash as to which direction the numbers would be aligned. It says in the manual that they should all point the same direction.
I also noticed that when I slid the rod back and forth on the pin, it would bind up. It took a lot to unbind it. They would all spin and I don't feel any slop axially, but you couldn't slide the rod back and forth. The #6 piston assembly did allow the rod to easily slide back and forth on the rod pin.
The #6 had been replaced separately later on. The PO had told me that they had found a piece of metal of some sort in that cylinder so they replaced that piston. This was after the original rebuild that another owner had done.

The crank seems to look OK though.
It looks like whomever rebuilt this engine before either started with junk and left it that way, or had no clue as to what they were doing. I suspect that with the mismatched alignment of the end caps and rods and the weird rod bolt and the sticking piston pins, that there was an out of balance condition in the engine causing things to slap around.
Anybody else have any ideas?
What is the prognosis for those pistons? I suspect that all of them should be replaced and probably the block too. What a waste. Stupid people who shouldn't ever touch a wrench, and I end up with a car maintained by one of them. :(Leave a comment:
-
broken ring if you ask me...causing some scoring. Time for a fresh teardown and rebuild...
I would definetly add a catch can, and route all possible oil vapors to outside the engine..it will keep the intake manifold very clean and free of the gunk. Those scratches look deep..I dont know if the block can still be honed out enough to get rid of them (do these blocks have cylinder liners??)
If you do not want it to be a stroker, your best bet is to find another M20 out of a low mileage car, tear it down, do the seals in it, pull the intake off and get it cleaned out, and just do a gasket set and away you go....Last edited by itsbrokeagain; 08-10-2008, 09:45 AM.Leave a comment:
-
Oops, I didnt see the orientation of the block in the pic. Good callLeave a comment:
-
-
IMO those are wristpin gouges ... but im not sure how high up in the block that the piston will travel in a m20 to make a gouge that highLeave a comment:
-
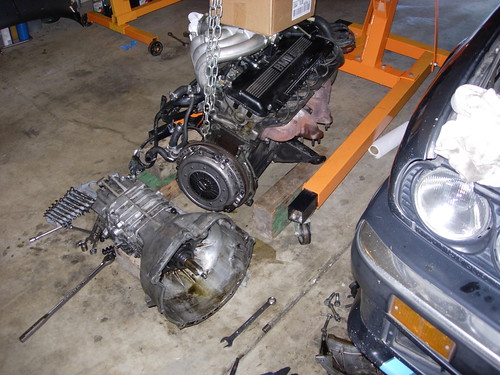
The engine is out and I have stripped most everything off that needs to come off.
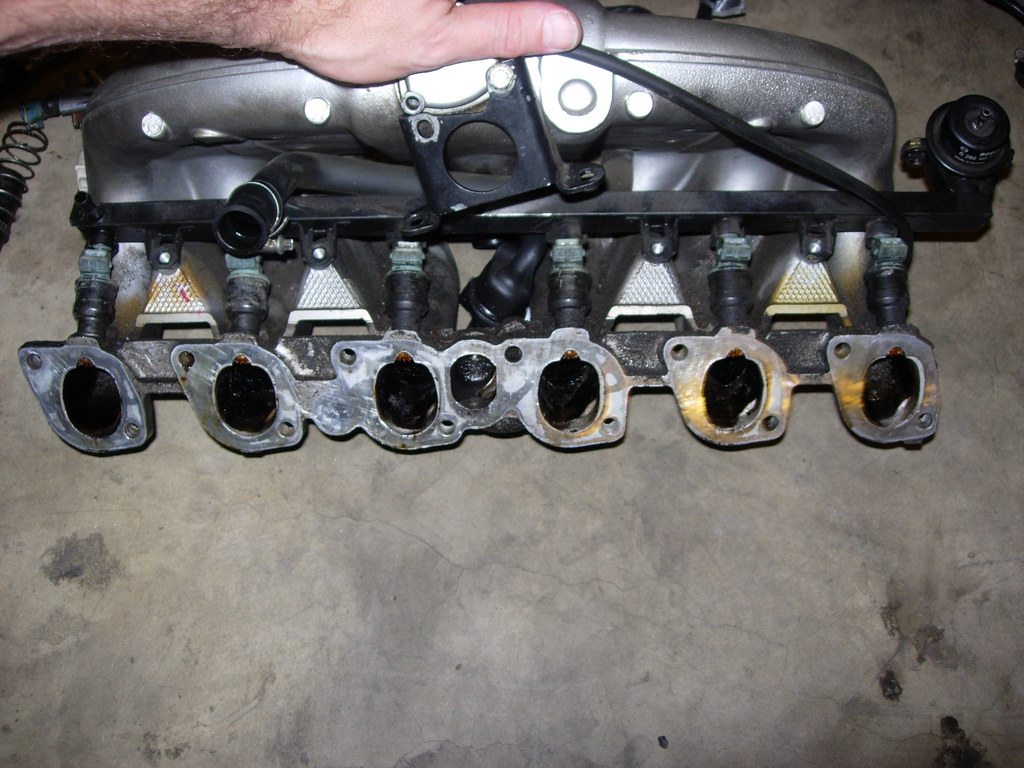
When I pulled off the intake manifold, I could really see the mess that was there. I know these engines will suck some oil into the manifold, but I think this is a bit extreme.
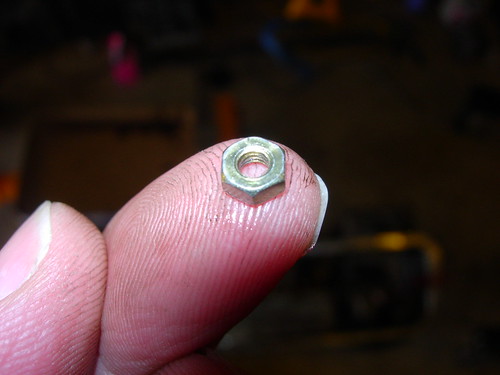
When I dropped the oil pan, I found a tiny nut in the bottom. It wasn't there when I did the pan gasket a few months ago. Anybody know where it came from?
It would get worse...
I pulled off the timing belt and other accessories on the front of the engine. When I pulled off the cam shaft sprocket, you could see where some of the oil on the exterior was coming from. Let this be a reminder to all that when you replace your timing belt, you should replace the cam shaft seal too.

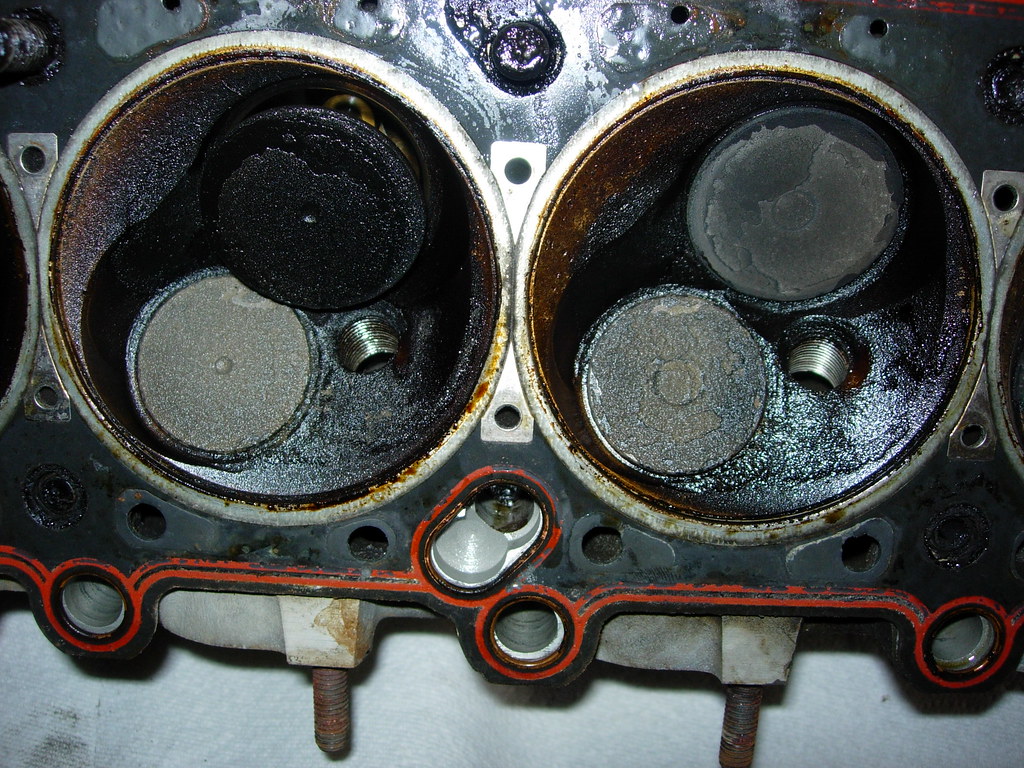
It was pretty ugly when I pulled the head off. The tops of all the pistons were caked with baked on oil. The head was in a similar condition.

When I took a look at the cylinder walls, I was disappointed to see some ugly vertical scratches. This is the worst one, but all of the cylinders showed some scratching. Anybody know what could have caused this? Does it look like it is repairable?
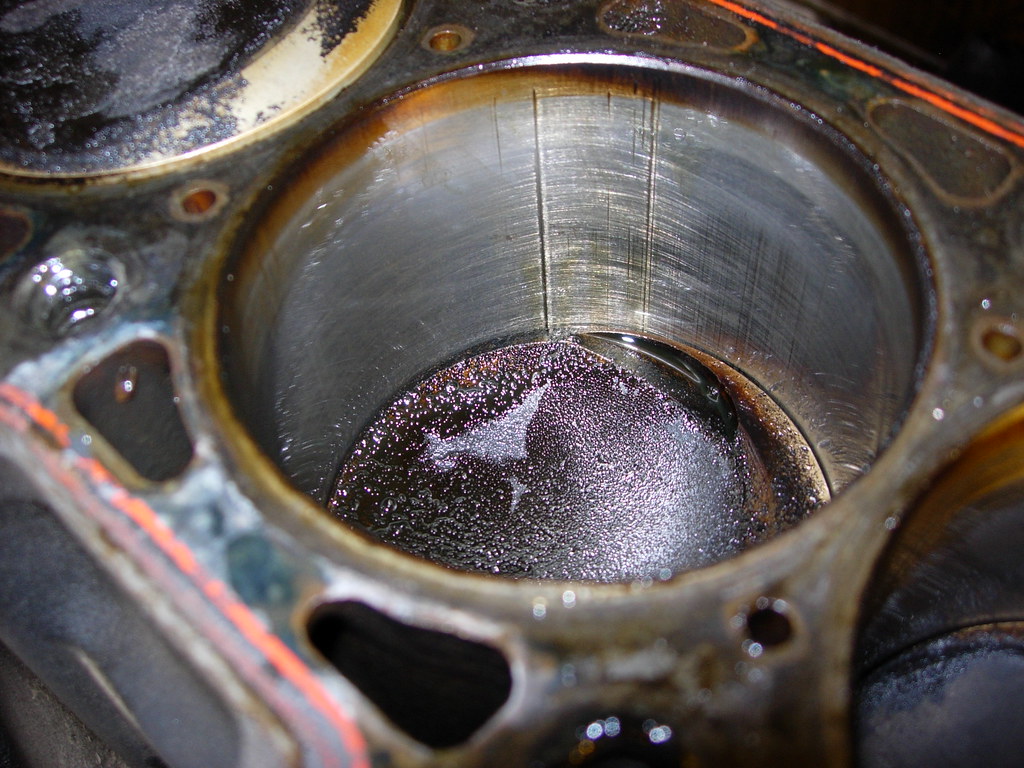
You can see where somebody had the cylinders honed at some point. The engine was supposedly rebuilt, but it looks like it may have been done as cheaply as possible. You can sort of see what looks like the original factory hatching, but it is mostly gone.
It is really hard for me to tell since I haven't worked on this type of engine before, but have these cylinders been sleeved?

Thanks for any comments.Leave a comment:
-
I just finished reading through your blog, I enjoy your writing style quite a bit. I think that I also enjoyed it because I have done many of the same jobs recently and have encountered many of the same snags. Best of luck with the engine and the job, I hope that neither holds any large surprises.Leave a comment:
-
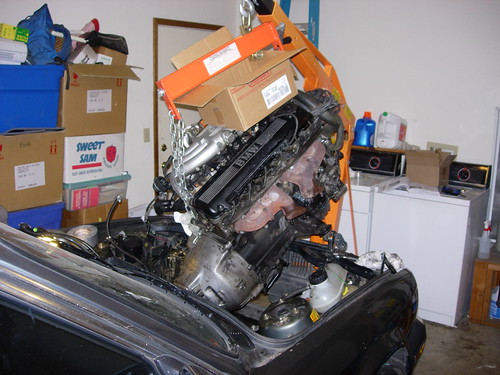
Thanks. The engine is still on the hoist tonight, but I needed to clean up the garage and get the car out of the way. I buttoned things up and then noticed the driver's side window was down. Oops. No power. I hooked up the battery and still no power. I had unhooked the main power line in the engine bay, so when I hooked that back up, I got power to the windows again. I didn't want to leave it outside with the window down. There is still a decent stereo in the car and I didn't want some kid getting any ideas.
Some things are difficult to do on your own. But, you just have to take your time and make sure your stuff is all lined up and you have a backup plan if things go wrong.
Funny, in that last picture, you can see my ghetto power steering rack bypass hose. I just modified one of the power steering lines with the right fittings and looped it around from the inlet to the outlet. It seems to work. It saved me from trying to find the right size bolts to plug the thing up permanently. :-D
There is definitely some oil leaking out of the valve cover. But there is also oil in the transmission bell housing. The rear main seal was replaced when I had the new clutch put in, so it shouldn't be leaking. With the out of balance flywheel, it could have ruined the seal though. But, I am hoping that it is just oil from the valve cover leaking down into the bell housing.Leave a comment:
-
Very nice job you have done there. It's quite impressive that you've done it all on your own, and with such great speed. Hopefully your little issues get solved quickly. O yeah, and best of luck with the employment situation.Leave a comment:
-
The engine is now out of the car. It took me way longer than it should have and I had a few setbacks and things that I did wrong (like not draining the block of coolant), but overall, things went pretty well.
I took the engine and transmission out as a unit. You have to angle the hoist at a pretty steep angle to get it to work. But, it does come out pretty easily. I had the car up on my ramps to get enough clearance under the car to swing the transmission down. You have to have it up enough to get to the driveshaft and shifter anyway.
It looks like lining up the drive shaft when putting it back in will be a pain. I may actually need a helper for that part. Or, I may have to drop the center support bearing to get some clearance. Anybody have any tips?
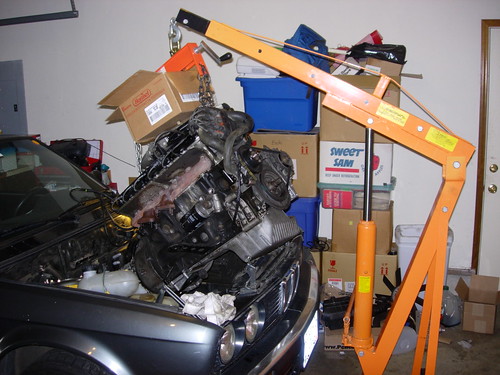

Now I will start taking the engine apart. I don't know exactly what is wrong yet, but I suspect I will find it when it is all in pieces.
I hope I will be able to get it all put back together properly.:mrgreen:Leave a comment:


Leave a comment: