The Delphin Rat

Collapse
X
 
  • Time
  • Show
Clear All
new posts

  • Hallen
    replied
    Well, the engine is back in the engine bay... finally. It is not completely hooked up yet, obviously. I ran into some pains with the clutch slave cylinder, but I'll get it back in place soon. All the electrics need to be hooked up still of course. But, it is mostly back in.

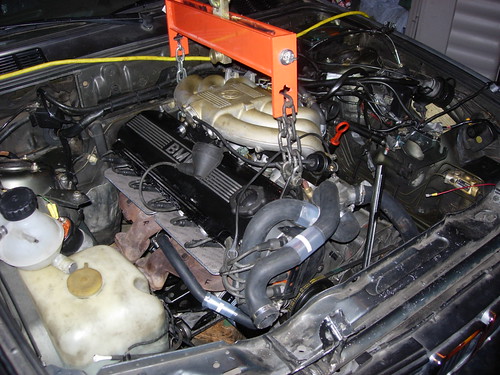
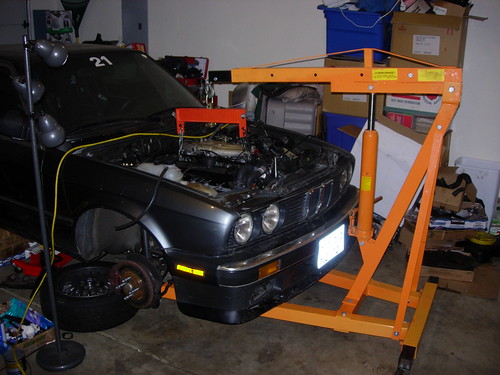
    It was a pain to get it dropped in with the transmission attached because I was working by myself. It took a lot of fiddling. It's the first time this engine has been in the car in about 9 months.

    I won't have time to work on it tomorrow so I'll have to keep poking away at it this week.


    Leave a comment:


  • Hallen
    replied
    Just a quick update. I've gotten a lot of stuff back on the engine while I was waiting on the intake manifold to get here. It's all pretty easy stuff, very straight forward.

    When the manifold arrived, I was disappointed. It was the older intake manifold off of a eta. It has the smaller tubes.


    I also found what looks like a crack in the transmission bell housing, but now I am starting to think it might be a casting mark. Anybody seen this before?


    I also picked up a cheap VDO gauge and sender for oil pressure. I have an adapter coming for the oil pressure switch outlet that will allow me to hook up a hose to the sender and attach the pressure switch too. It's nice to have the idiot light as a backup.

    Leave a comment:


  • Hallen
    replied
    OK, very good. That is basically what I was thinking about doing after I saw the results of my most recent attempts. It isn't a high priority for me, but it is great to know that using bolts along the bottom has worked for others. Having the lip up a bit higher is good because it is so low now that I can't load the car on a trailer because the lip catches on the ramps.

    Leave a comment:


  • NC325iC
    replied
    i did basically what unhcll said, but my mounting brackets were broken anyway (had a full set) so i took the top metal bar and drilled out the studs and used thos 5 holes drilled the valence and bumper at those locations and used the bar as one big washer basically. having the bar there makes it nice and even across the whole width

    Leave a comment:


  • UNHCLL
    replied
    Here is my suggestion (and what I did on my 325is when I had that same setup):

    1) compress the bumper
    2) mark the alignment of the airdam on the underside of the bumper once compressed
    3) remove airdam & bumper
    4) drill 3 small holes in the top lip of the airdam, aligned with an identical hole in the alu. bumper.
    5) insert small bolts/washers/nuts to hold airdam tight to bumper across full width
    6) reinstall

    Leave a comment:


  • Hallen
    replied
    Originally posted by UNHCLL
    Factory.
    That "flimsy" 1.5" wide piece of steel is also from the factory.
    If your hangers aren't broken, consider yourself one very lucky person. They are NLA and easy to destroy.
    Thanks for the info. I couldn't see them on realoem at all.

    Those D shaped brackets are steel and so is that 1.5" wide strip across the top and running the full length of the bumper. This strip is welded to the D brackets. The biggest problem I see with it is that the back, lower point on the D is connected to some flimsy sheet metal in front of the oil cooler. One of the mount point is cracked and about to detach.

    I might be able to bend the D brackets a bit and make things fit a bit more snug, but I don't know if it will work. It is already a very tight fit to get the upper lip of the spoiler between the bumper and the metal strip.

    Leave a comment:


  • UNHCLL
    replied
    Originally posted by Hallen
    Does anybody know if those brackets used for the spoiler are factory or custom? It isn't a big deal, I am just curious.
    Factory.
    That "flimsy" 1.5" wide piece of steel is also from the factory.
    If your hangers aren't broken, consider yourself one very lucky person. They are NLA and easy to destroy.

    Leave a comment:


  • Hallen
    replied
    The good news is that a manifold is on the way to me now. It might make it here by tomorrow but should be here by Friday.

    One person suggested that the manifold could have gotten hung up on the mounting studs and wasn't sitting flat on the head. This is a strong possibility. I though I had it all the way down, but admitedly, did not actually check that before I started tightening it down. Anyway, the good news is it isn't really costing me too much time and not a lot of money either.

    Does anybody know if those brackets used for the spoiler are factory or custom? It isn't a big deal, I am just curious.

    Leave a comment:


  • Hallen
    replied
    Below is a full post from the blog. There are a couple of other updates that are on the blog but that I neglected to post here.


    Sights and Sounds

    Sights
    Since I was still waiting on some parts to get here, I decided that I would take care of a minor problem on the car that had been bugging me for a while. There is a large gap between the bottom of the bumper and the top of the front spoiler.


    You can see the gap in this photo. It splits the license plate.

    The previous owner said that he just hadn’t had time to adjust it after he had done the “bumper tuck". A bumper tuck is when you compress the bumper damper (or “shock") all the way which allows the metal portion of the bumper to tuck into the trim more. This makes the dreaded “diving board” bumpers less ugly. After this process was over, the PO just didn’t spend the time necessary to get the spoiler lined up. Or so I thought.
    I figured it would be pretty easy to fiddle with it and get it to line up better. Well, as usual, nothing seems to go according to plans. I got the spoiler off of the car easy enough. But then I was presented with something that I didn’t really expect to see. It looked to me like some custom brackets had been made for the spoiler. They actually look pretty good, solid anyway. But there was no way to really adjust them. They are also mounted on some relatively flimsy sheet metal at the point where the most stress is applied and the brackets just don’t quite fit for what they are supposed to do.


    So, I ended up spending most of the day futzing around with it until I got it about as good as I could get it. I reduced the gap by at least half. It is a solid improvement, but I don’t think I will be able to do much more with it. Given some more motivation, I might be able to put a bend in the brackets to allow the spoiler to fit better. But even then, I am not sure it will work. The sheet metal that the bottom of the brackets are attached to is not really strong enough to hold up the spoiler. I wonder what the real brackets and mounting hardware looks like on these cars?


    The gap is still there, but not as bad

    The gap is about half of what it was

    Sounds
    I had most of the parts that I needed to put the intake manifold back onto the engine. So I started at that today. Again, it should have been a short job, and basically, it was.
    I have been waiting for a couple of washers that are supposed to go with a tube assembly that connects the manifold to the engine case. I suppose the tube is there for crankcase ventilation, but I don’t really know for sure. I just know that it was a slow leak for oil before. I didn’t have the washers, but I did have the O rings. I figured that it would be OK to install without the washers.
    It was a bit of a trick to figure out how to get the tube on while I was sliding the intake manifold into place. But it turned out to be pretty easy. The tube has a spring on it that keeps the tube pressed up into the intake manifold. With the tube pushed all the way into the crankcase and the spring fully compressed, it had plenty of clearance for the manifold to slide in.
    I went to torque the nuts that hold the manifold onto the head. The manual does not cover this procedure at all… which is a bit odd. It does cover removing and installing the throttle body, twice, but not the intake manifold. The nuts were M8 size so I decided to use the standard torque for that size of nut which is 22nm or about 15 ftlbs.
    I got to the very last nut on the rear of the engine when I heard it. It was one of those sounds that you know are not good. It was just a light “pop” sound. I stopped tightening the nut and took a look. I already knew what I would find, but like a traffic accident, you just have to look anyway.
    There was a dandy crack running through the mounting flange and up into the injector port hole. Not good. This pretty much finishes this intake manifold. It can’t be used now.


    It’s the white line going from the injector port on down


    It doesn’t look so bad after I took the manifold off. But it is still there.


    So, that pretty much brings me to a halt until I can find a new intake manifold. I don’t think it will be too hard to find, but we’ll see. I don’t think I used too much torque but maybe I did. From what I have found, I was OK with the torque value that I used. If this thing was going to crack, honestly, I am glad it happened now and not after I had got up to the track.

    Leave a comment:


  • Hallen
    replied
    Well, I am back at it. No pictures or anything major to post this time though.

    I have had a break with working on the car because work has been very busy and the track season is over. So I have all winter to mess around with the car.

    Also, my job situation has been resolved so things are nice and solid there once again. It is quite a relief.

    You can read the full details on the blog (direct link to the post): Back At It

    I have had the block worked on a bit... I just had it honed. However, now that I have more time and can be a bit more liberal with the money, I am considering other things. A friend who built high performance engines for a living is back in town after a military deployment and is willing to take a look for me. We'll see how it goes.

    Also did a bit of other work on the car... and managed to screw things up yet again. ;)


    The link to the top posts:

    Leave a comment:


  • Hallen
    replied
    Originally posted by NitroRustlerDriver
    Were the cylinders bored once before? Piston slap is usually caused by the pistons being too small of diameter in relation to the diameter of the cylinders. Maybe the previous owner had it bored and then used stock size pistons?
    Yeah, that is a possibility.

    I know that the engine was "rebuilt" by a previous owner, but I don't really know what exactly was done. It was definitely honed though. The car has 260k miles on it so it wouldn't surprise me if the bore had gotten too big for stock pistons. If they just honed it and installed the same pistons, they yeah, there probably would be a problem.

    Hopefully when the machine shop gets the precise measurements done, we will know a bit better how to proceed.

    Leave a comment:


  • AndrewBird
    replied
    Were the cylinders bored once before? Piston slap is usually caused by the pistons being too small of diameter in relation to the diameter of the cylinders. Maybe the previous owner had it bored and then used stock size pistons?

    Leave a comment:


  • Hallen
    replied
    The block and head got dropped off at the machine shop this morning. We'll see how the measurements come out. I suspect that the score marks were responsible for a lot of the oil loss. The measurements should tell though.

    I am prepared to go to over sized pistons if I need to. I found a set from MaxSil on BavAuto for $500 that includes rings and pins. That is a heck of a lot less than the $160 per piston that I found other places or the $190 per for OEM or the $140 per for over sized ones I found on Pelican.

    Leave a comment:


  • eyagel
    replied
    didnt get it?

    Leave a comment:


  • Hallen
    replied
    Originally posted by eyagel
    tell u what..ill give u the pistons. just pay shipping
    Thanks!

    Sent you a PM.

    Leave a comment:

Working...