
damn, I'm not sure how I missed this thread for 3 months but I'm glad I found it. Excellent work!
-
-
^ SAME!
Awesome build! really enjoyed reading this thread. I can't WAIT to see those wheels on your car!! They are SICK!
Keep up the good work.Comment
-
awesome thread, I am the process of redoing my 325e sedan right now and your pics are worth gold to me :-) Thanks!Comment
-
So it's been a while. Let's blame memorial day weekend for the lack of updates. Several items have been going on with the car in preparation for it's journey next week. That's right, it goes on a trailer to Louisiana to my family's barn for its first weekend of body work. As a result some parts needed to come off the car and some needed to go back on. Couple that with a fairly significant event and the planting of a couple of trees for the wife, it was a good weekend. On to the stream of consciousness dialog....
So I got a new dashboard. The prices still seem to be rising and I found a pretty good one. It's much better than the original one but I'm glad to get this item off of my list.
Here are the two dashes:

So many sad cracks in the original dash...

Creative but effective shipping container...

In addition to the dash, I also acquired an is lip that my car so desperately needed.

Much better.

I also got some nylon pry bars which made trim removal incredibly easy. I find these to be a worthwhile investment, especially when it's less than 20 bucks or so.

I continued to remove the remainder of the driver's side trim.

Patience is the key here. Some minor bends were introduced but should be fixed easily.

At this point, the wife and I took the opportunity to use Memorial Day weekend to go back to Dallas and visit friends and family. It was nice to go back and see everyone and even talk to a couple of E30 enthusiasts, including the previous owner of the car. Hi to Todd and Eric if you're reading.
I also took the opportunity to shoot some pictures of my Dad's project 911. I mention this because this should have a similar level of quality in paint as I am taking it to the same location he did. In addition, the interior has some of the features I'm looking to incorporate into the 318is. Specifically the alcantara trim work, the carpet in the back and some of the items on the door cards. On to the pictures....

Car was originally silver, repainted red and finally Porsche alpine white. We will be using a PPG paint system and I can get specifics when we start the process next weekend.

As I understand it, this project was to be a hybrid of the 911 RS and Ruf Yellowbird styling. Ruf bumpers are front and rear with an RS ducktail in back.

Personally, I'm a fan of the GT3 style center exhaust.
Now the important bits...

The interior door panel has had all of it's handles removed. The pull strap releases the door and the grab bar is used instead of the handle. I would like to do something similar though I will probably retain the standard E30 door release lever.

The carpet is called Perlon. It's quite thin and fuzzy. I'm not sure how I will lay it out in the back of the car but I would like something similar.
There are also some scraps of alcantara left over so I hope to integrate it into the interior as well.
Moving on to this week...
While I was gone, my muffler arrived. I elected to go with a Vibrant 2.5 in to 3 inch tips out back. This muffler is pretty. I got it so I would have an idea of how much of the rear valance I would need to trim to get the tips to fit.


I haven't decided on my intermediate muffler yet but I will say that e30polak's sound clips were a big help in the selection of this muffler. I am excited to hear what it will sound like.
I also removed the rubber mat on the firewall to help facilitate painting.

Put the wheels on...


Took the front bumper off and put the hood back on...


And for the first time in 6 months, put her back on her wheels...


My suspension settings are all out of whack...

But considering that there is no interior or engine in the car, it sits pretty damn low. I have .5 to .75 left to go on the adjusters if I deem it necessary. I would expect the front to come down at least another .75 to an inch which will be just right.


Next week will be a significant update with all the bodywork going on. Updates will be large but less often with the car in another state. In the meantime I will work on getting the engine ready to go and intersperse those updates in between the bodywork.
For those considering the C3 motorsports coilover kit, big thumbs up from me. It looks good. The car had been up in the air for so long, I forgot what it looked like and sat like on the ground. I am very pleased so far.
Until then, I'll keep you all posted...-Josh
Check out my build thread...
http://www.r3vlimited.com/board/showthread.php?t=131055
Need parts? Support the community!

http://www.gutenparts.com

http://www.blunttech.comComment
-
-
That´s an impressive project you have there :)
Keep up the good work ;)Comment
-
I love you. I love your car. Nice to see a straight forward project thread. would love to see this if you ever bring it to texas when done.
p.m. sentComment
-
I wanna see some painting happen!!!! ;)Comment
-
nice work, subscribedsigpic
'89' E30 with Euro S50B30Comment
-
Josh, the progress looks great. I'm sure you are anxious to get the body work done with. For me that is the last thing I would want to be doing. I am in the process of doing a complete respray on my car. I did all of the body work, installed a new valence, drivers fender and hood as well as shaving the hood roundel, windshield sprayers and door locks off the doors. It's in primer now, and should be sprayed shortly.
What kind of set up do you have at the barn for spraying? Or are you just doing the body work there and having it sprayed by someone else? I made a makeshift booth out of PVC and plastic sheeting with a couple box fans for exhaust and three HVAC filters for the intake. Here are a couple pictures of it:
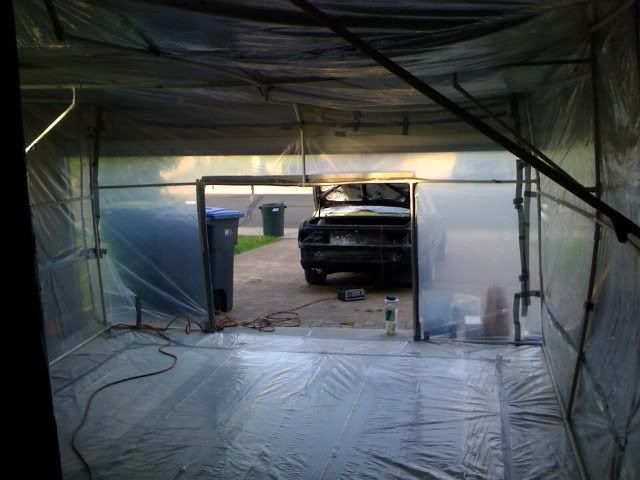
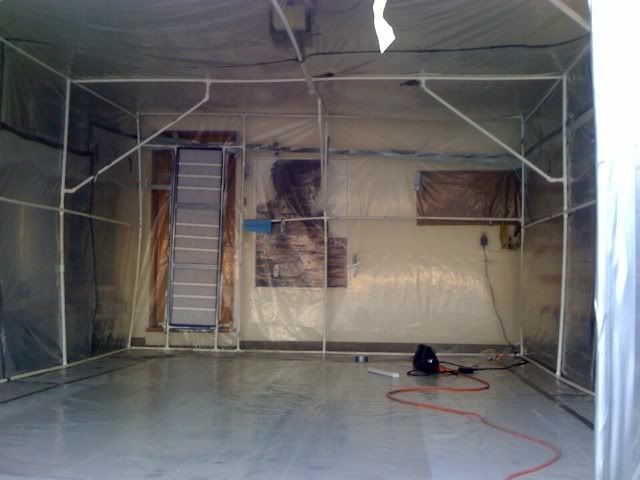
And here is how it sits as of now:

I don't know if I said this yet, but body work sucks ass. I wish you luck.
Comment
-
Damn. Dont know how I missed this thread but good work. Looking forward to new updates.sigpic
1990 E30 325ic (sold for more than I paid for it after 5 Years)
1995 E30 325e (in progress)
1987 E30 325is (totaled)
1990 E30 325i
1991 E30 318is M50 PWR
1996 E36 328ic
1997 Z3
2006 F150 Super Crew 5.4L 6.5' bed The work horse (need something to drag all these old BMW's home for resurrection.)Comment
-
Jizzzzzzzz
Looks awesome man, can't wait to see it.1985 325e 2.8 Turbo VEMSComment
-
Gigantor Updatetorzz
This past weekend involved transporting the car to my family's barn in Louisiana for the beginning of bodywork and paint. As you might imagine, there were many pictures taken....around 300 or so. I'll break these posts up to what happened by day and try and put some of the good pictures up.
And now, on to the show....
I rented a trailer from U-Haul last thursday and got it home with little issue. Getting the car on the trailer though proved to be a little complicated without an engine in it but a ratcheting winch made the job relatively painless. It also helped when my wife came home that she was able to help push the car on trailer and help cinch it down. The next day, we set off for our half day of work with the car and trailer in tow.


Going over the straps one last time...


A little fuel for the truck and then we're off!

Not a long drive at around 4 hours but the trailer did require your attention. Regardless, boredom took over in the cab of the truck and the camera apparently needed to be used.
SURPRISE!

She got her revenge...

And the car was just fine.
We met up with my folks in Breaux Bridge and continued on to the family barn. We would unload the car into the barn, drop off our stuff and head in to Lafayette to go visit my Grandparents.
Here's the barn:


And after backing her off the trailer, in her home for the next few months...


This pretty much concludes the first day. Exciting? No not really but I was just glad to have the car moved in one piece and even more excited to get rid of the trailer. The next day would begin very early in the morning....-Josh
Check out my build thread...
http://www.r3vlimited.com/board/showthread.php?t=131055
Need parts? Support the community!
http://www.gutenparts.com
http://www.blunttech.comComment
-
Gigantor Updatetorzz - Day 2
We got up at 6 in the morning to get an early start. We needed to purchase materials, so we went in to Breaux Bridge and stopped at a local lawnmower shop/paint store. Yes, only in the country would you need to combine those two. Fortunately, it was run by some great cajuns who are friends of the family. Even more important was the fact that they sold PPG products. After picking up some primer and sealer (detailed later) and my bank account left whimpering, we decided to return to the barn and begin the body work in earnest. Paint materials are expensive guys, especially for the nice stuff. My family has done 2 cars with the same material, in the same barn and they both came out great. I'm hoping for similar results.
The work on the car began with disassembly of parts I had not reached yet.

We decided to divide the work so that more could get accomplished. My father would work the hammer and dolly in the front of the car. I would work the back of the car and my wife got the sad task of sanding the paint on the car. She was a real trooper and in reality sanded the entire car and did an excellent job of it. We would get a hammer in her hands before the day was through so she could have more fun though...;)


New front valances are expensive in my opinion (for a new one) so I had my father see what he could do with my existing, crunched one.


A pickax was employed quite effectively to pull some of the dents but I didn't get any pictures of it! We tried to be resourceful with our tools!
Looking better...


Work continued on the sides of the car. I am fortunate that the body is in pretty good shape with some glaring exceptions. We were able to make good time for our 12 hour day.
Pin stripes removed...


Did I mention my wife sanded the whole car? I know she reads this so I need to mention it as often as possible. :p

De-Badged the car but was smart enough to take some measurements and pictures...


At this point, we should probably look at the massacre I was either fixing or making worse. There was a lot of filler on the rear valance. So much that the body lines were blended out. I tried to fix as much as I could with the help of hammer and dolly and a stud welder/ silde hammer combination.


Feel free to make fun of my knee pads but they were awesome...except for the painful removal of leg hair.

How 'bout we get that pick ax and fix those bumper receivers?


It worked surprisingly well. Everything is still rumpled back there but it's loads better than it was.
At this point I needed to grind off the studs so it looked less like a porcupine.


At this point, we all made a group decision to try pulling the rear fenders to ensure I had enough room for my 245's. OK, realistically, we wanted to just pound the fender lip flat but it managed to flare the edge out slightly so we kept going. My wife did the majority of the flaring until her hammer wouldn't move the metal any more. At that point, the 4 lb sledge came out....
My father started out...

But she quickly jumped in....


And i got stuck with the job of putting the springs back in (checking for clearance at full compression)

not quite there...

better...

While they were working that angle, I decided to make a larger exhaust opening for my vibrant muffler. I decided a half inch on either side would look nice so I got cutting...

I rolled the edges around the opening for additional stiffness but the flange length is not the same as factory. I was pretty disappointed in my error but it will not be something you can really see. My disappointment was replaced with enthusiasm upon seening the muffler in its place...


The remainder of the day was spent masking the car so that we could lay down some primer and begin some body work. We taped off the areas with texture (Front valance and sides) and will hit those at a later date.


ok, i lied, we did a little the next morning...


The next day involves painting!-Josh
Check out my build thread...
http://www.r3vlimited.com/board/showthread.php?t=131055
Need parts? Support the community!
http://www.gutenparts.com
http://www.blunttech.comComment
-
Gigantor Updatetorzz - Day 3
I managed to sleep fairly well but was admittedly sore the next morning. My uncle was driving in to shoot the car since he's the talented one. Out job was to get everything ready for him. He dropped in around nine in the first project car completed in the barn...his AMC AMX.

Gratuitous side shot for JasonC if he's reading...


My family is a tad eclectic when it comes to cars. They are huge AMC and Jeep fans. While I have owned a Jeep, I can't say AMC's did much for me but I think his AMX looks pretty damn good. Now, assuming he's reading this thread I got that out of the way. :p
We proceeded to clean the car and the area and prepare the paint.


Test out the spray...

And lay down some primer...


1st coat of primer....finished!

After taking a break and catching up with my uncle, we returned to the car and proceeded to start working the shallow dents with some plastic filler. My father up front, my uncle on the sides and I got stuck with the rear.


Believe it or not that is way less filler than before! Probably 90% of our time and material was spent back here.


hard to believe what this corner originally looked like. looks much nicer now.

Getting straighter...

It's always a good time when air tools come out. though i sanded by hand for quite a long time before this was employed. I'm hoping this wasn't for me to build character or something. I'm too old for that.


we're still keeping the character body lines but it still needs a lot of work. seeing the back of vlad's 318is he just painted made me jealous. We'll get it there though.


We threw on another coat of primer...


Starting to look better.
At this point we got out the K36 sealer. Everyone I've talked to says that this stuff is great. At a minimum we need to seal the car while we are gone but this provides an excellent surface for blocking the car. It's thick stuff and pricey but the cars I've seen it used on look very, very nice.

The color is much lighter than the primer and we had a few issues with the paint coming out too dry towards the end. Fortunately that all gets sanded off but nonetheless left my uncle disappointed. I'll let the pictures speak for themselves.


not a good place to stand with the camera...


We put 2 coats of K36 on and after it flashed, pulled all the tape off to see what we had.


And that brings us up to today. Next trip is for some time in July to finish up the body work and start blocking the car. As i've said before, the updates will be farther apart now but I do have an engine to prep for the swap and convert to OBD-I so I'll include that here when I start that up.
Thanks for reading.-Josh
Check out my build thread...
http://www.r3vlimited.com/board/showthread.php?t=131055
Need parts? Support the community!
http://www.gutenparts.com
http://www.blunttech.comComment


Comment