Announcement

Collapse
No announcement yet.

Alignment Settings Advice

Collapse
X
 
  • Filter
  • Time
  • Show
Clear All
new posts

    Alignment Settings Advice

    Hello Guys,

    Well the car is in the shop getting a Z3 rack and after I'll need an alignment again. I wanted to get some suggestions from you guys on what settings to dial in (Camber / Toe / Etc). My goal is to have a dedicated autocross setup and perhaps a more road friendly setup I can switch to via front camber plate adjustment.

    My suspension specs are as follows.

    GC Coilovers, Koni SA, GC Race camber plates, Spring Rates 550/750, IE 22mm front adjustable sway, Unlinked rear sway. Front/rear strut bars.

    Tires/Wheels - 225/45 15x8

    I do not have the rear weld on adjustables though.

    The course I'm usually on is somewhat rough and bouncey and I find that with the s52 and oilpan setup I sometimes slap the skid plate under braking on rough areas. So I'd also like to hear to ride height suggestions. Do you guys think doing a corner weight balance is worth it without the weld in rear adjusters?

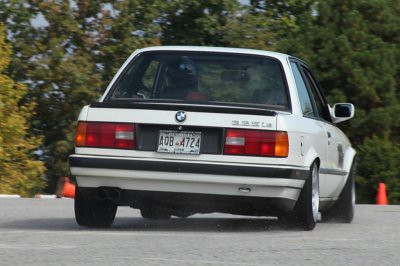
    I attached a video of one of my runs if that helps. You can see why I'm excited to get a Z3 rack :)


    Thanks in advance Greg.
    sigpic
    1991 318is S52
    1987 325i Vert
    1991 325i
    2011 e70 X5

    Need Anything E30? -> http://www.gutenparts.com/

    #2
    Nice! The car looks like it handles pretty well, although I find it pretty hard to judge by autocross vids, just too much going on at once. Do you know how much camber you had before? I would run the rear swaybar personally if you have adjustable rear end links, I think the car looks a bit pushy, but barely.

    For autocross I run about 3.5 degrees of camber in the front, with 1/8" toe out. Both of those are a little much for the street, and if you are trying to dial out camber for the street, you'll be changing the toe as well. Just get some toe plates and do it yourself, once you do it a few times you'll know pretty much how many turns you'll need to do.

    As for corner weighting, it is worth doing, regardless of your rear end adjustablility as long as you have adjustble sway bar links.
    - '88 m54 coupe

    <3

    Comment


      #3
      Originally posted by Jb325is View Post

      As for corner weighting, it is worth doing, regardless of your rear end adjustablility as long as you have adjustble sway bar links.

      Thanks for the info! The settings last year were roughly 3.5 up front, can't remember the toe off the top of my head. Now with the rear sway, did you just the stock sway with adjustable links? Which brand did you go with and did you find a sweet spot with them at a certain setting?
      sigpic
      1991 318is S52
      1987 325i Vert
      1991 325i
      2011 e70 X5

      Need Anything E30? -> http://www.gutenparts.com/

      Comment


        #4
        I've always had an aftermarket bar, but always set to full soft. I've run a few times with no bar and didn't like the push, some people do. I think that the bar helps a lot with inside tire lift

        With the end links you always want to make sure they are adjusted free (you can twist them with your fingers), so the sway bar is not bound. If you tried to scale a car with non-adjustable sway bar links (or adjustable links that are out of adjustment), the changes you'd make would bind the swaybar and throw off the numbers.

        Also, one thing you can do at an autocross rather easily to change the handling is raise or lower the rear. Raising the rear will help you rotate the car on turn in (lowering will do the opposite) and if you adjust the LR/RR equally you won't mess with your cross-weights at all.
        Last edited by Jb325is; 11-13-2014, 05:38 PM.
        - '88 m54 coupe

        <3

        Comment


          #5
          Originally posted by GThomas View Post
          Hello Guys,


          My suspension specs are as follows.

          GC Coilovers, Koni SA, GC Race camber plates, Spring Rates 550/750, IE 22mm front adjustable sway, Unlinked rear sway. Front/rear strut bars.

          Tires/Wheels - 225/45 15x8

          I do not have the rear weld on adjustables though.


          Nice, you have the same exact suspension setup I have, spring rates included, although I'm running ST sway bars with adjustable links front and rear. I'm also running 225/45 Rivals on 15x8" wheels.

          I'm still playing with setup and alignment (I did weld in AKG rear adjustable camber/toe plates) or I'd offer some advice!

          I do have about 3.5 degrees of camber in the front and maybe 2.5 to 3 in the rear (I have it written down). Also, went with a little toe out in the front and zero toe in the rear IIRC. I will say that my car seems notably more ready to oversteer than yours does, even with less power than you have.
          '89 BMW 325is Zinnoberrot / '88 VW Jetta GLI 16v Tornado Red / '89 VW Jetta GLI 16v Tornado Red / '89 VW GTI 16v Bright Blue Metallic / '91 BMW 325i Black / '91 BMW 325i Sport Black / '92 VW GTI 16v Black / '92 VW GTI 16v Montana Green / '01 Audi A4 Avant TQM Silver Metallic / '01 VW Jetta GLX VR6 Black

          Comment


            #6
            Originally posted by Cinnabar325is View Post
            Nice, you have the same exact suspension setup I have, spring rates included, although I'm running ST sway bars with adjustable links front and rear. I'm also running 225/45 Rivals on 15x8" wheels.

            I'm still playing with setup and alignment (I did weld in AKG rear adjustable camber/toe plates) or I'd offer some advice!

            I do have about 3.5 degrees of camber in the front and maybe 2.5 to 3 in the rear (I have it written down). Also, went with a little toe out in the front and zero toe in the rear IIRC. I will say that my car seems notably more ready to oversteer than yours does, even with less power than you have.
            How do like the Rival's? I found them to be hard to stay at a good temp, psi was 31f 30/29r. Thinking about switching to the new rs3's for next season.
            sigpic
            1991 318is S52
            1987 325i Vert
            1991 325i
            2011 e70 X5

            Need Anything E30? -> http://www.gutenparts.com/

            Comment


              #7
              I've been very happy with the Rivals, I was running 33lb front and rear. Honestly I didn't have any complaints with temperature. We run at a variety of locations, with greatly differing surfaces and so I don't have a good idea how they compare across ambient air temps because the surface was never consistent.
              '89 BMW 325is Zinnoberrot / '88 VW Jetta GLI 16v Tornado Red / '89 VW Jetta GLI 16v Tornado Red / '89 VW GTI 16v Bright Blue Metallic / '91 BMW 325i Black / '91 BMW 325i Sport Black / '92 VW GTI 16v Black / '92 VW GTI 16v Montana Green / '01 Audi A4 Avant TQM Silver Metallic / '01 VW Jetta GLX VR6 Black

              Comment


                #8
                I was running 3.5* front 2.5* rear, 0 toe front and 1/8" toe in at the rear. Suspension is j-stock springs and dampers, sways 21F/18R, though I liked it better with the rear sway unhooked. I previously had IE3's and billie sports and liked the rear sway set on soft with those.
                88 325is - S52 powered

                Originally posted by King Arthur
                We'll not risk another frontal assault, that rabbit's dynamite!

                Comment


                  #9
                  Here is write up I made on the easy way to take preload out of M3 style front sway bar links.

                  I think it works for any brand of adjustable end links. It works for the rear too, just change the words.

                  Ground Control sway bar end links.

                  Intended to fit only the make and model of the car stated on the invoice


                  The following is for a right handed person, swap sides if you are left handed:

                  Always use two wrenches to tighten the end link studs to the existing holes in the strut and sway bar. Do not use power tools to spin the bearing stud until it tightens. This will void any warranty, and is easily recognized. The stainless stepped washer remains up against the stud, and the small gold washer is placed on the other side of the bracket or sway bar.

                  After installing both Ground Control sway bar links, and using the two wrenches to tighten the bolts that hold it to the sway bar and strut:


                  Start by actually setting the passenger side link length permanently. You will not adjust the length of this side. Make sure the rod ends are parallel when tightening the jam nuts. This operation should probably be done with car in the air. This link should be as long as possible, with about 0.250 minimum clearance from the sway bar to the top of the control arm.

                  Again, use two wrenches to tighten the jam nut, do not twist the rod end until it stops and then tighten the jam nut. This will force the ball loose, and the rod end will not last as long.

                  Now for the drivers side, set the length the same as the passenger side, but do not tighten the jam nuts. For consistency sake, have the left end rod end on the same end (top or bottom) as the passenger side.

                  Now, set the car on the ground, and roll or drive the car about 20 feet.

                  This next step is actually setting the length of the drivers side link. The best way to do this is for the car to have been cornerweighted, but at a minimum, the ride heights must have been set. Adjusting the length of the sway bar links to remove sway bar preload is the very last step in setting up the car.

                  With the wheels pointed straight ahead, and the driver or drivers equivalent weight in the car, lie down on your right side and reach up behind the drivers front tire and grab onto the drivers side link. Twist the link one way or another, it doesn't matter yet. As you feel the link start to get harder to turn (adding preload to the sway bar), maybe after after 3 turns or so, stop turning. Now start turning the other direction until the preload feels the same. Keep track of how many turns with your fingers, it is actually pretty easy.

                  Lets say you have turned 6 turns between preload clockwise and the same preload counterclockwise. You may have to go back and forth a few times to make sure what you are feeling is consistent, but it doesn't take long. You would then split the difference of 6 turns. In other words, turn the link back to where you felt you were preloading the bar, and turn back 3 turns.
                  This will be very very very close to zero preload.
                  Here is my photo gallery answering common questions about Ground Control Suspension, and e30 suspension problems in general.
                  Ground Control Gallery

                  The Ground Control facebook page: Dragged, kicking and screaming into social media to see what happens next.
                  Ground Control facebook page

                  Comment


                    #10
                    I have a factory rack, but I run 2 degrees of total toe out in the front. Good turn in, but perhaps not good for high speed tracks, especially with heavy braking zones. The car doesn't tramline particularly, but it can be noticeable on un-even surfaces.
                    '84 318i M10B18 147- Safari Beige
                    NA: 93whp/90ftlbs, MS2E w/ LC, 2-Step
                    Turbo: 221whp/214ftlbs, MS3x flex @ 17psi

                    Comment


                      #11
                      Originally posted by Hellabad View Post
                      Here is write up I made on the easy way to take preload out of M3 style front sway bar links.

                      I think it works for any brand of adjustable end links. It works for the rear too, just change the words.

                      Ground Control sway bar end links.

                      Intended to fit only the make and model of the car stated on the invoice


                      The following is for a right handed person, swap sides if you are left handed:

                      Always use two wrenches to tighten the end link studs to the existing holes in the strut and sway bar. Do not use power tools to spin the bearing stud until it tightens. This will void any warranty, and is easily recognized. The stainless stepped washer remains up against the stud, and the small gold washer is placed on the other side of the bracket or sway bar.

                      After installing both Ground Control sway bar links, and using the two wrenches to tighten the bolts that hold it to the sway bar and strut:


                      Start by actually setting the passenger side link length permanently. You will not adjust the length of this side. Make sure the rod ends are parallel when tightening the jam nuts. This operation should probably be done with car in the air. This link should be as long as possible, with about 0.250 minimum clearance from the sway bar to the top of the control arm.

                      Again, use two wrenches to tighten the jam nut, do not twist the rod end until it stops and then tighten the jam nut. This will force the ball loose, and the rod end will not last as long.

                      Now for the drivers side, set the length the same as the passenger side, but do not tighten the jam nuts. For consistency sake, have the left end rod end on the same end (top or bottom) as the passenger side.

                      Now, set the car on the ground, and roll or drive the car about 20 feet.

                      This next step is actually setting the length of the drivers side link. The best way to do this is for the car to have been cornerweighted, but at a minimum, the ride heights must have been set. Adjusting the length of the sway bar links to remove sway bar preload is the very last step in setting up the car.

                      With the wheels pointed straight ahead, and the driver or drivers equivalent weight in the car, lie down on your right side and reach up behind the drivers front tire and grab onto the drivers side link. Twist the link one way or another, it doesn't matter yet. As you feel the link start to get harder to turn (adding preload to the sway bar), maybe after after 3 turns or so, stop turning. Now start turning the other direction until the preload feels the same. Keep track of how many turns with your fingers, it is actually pretty easy.

                      Lets say you have turned 6 turns between preload clockwise and the same preload counterclockwise. You may have to go back and forth a few times to make sure what you are feeling is consistent, but it doesn't take long. You would then split the difference of 6 turns. In other words, turn the link back to where you felt you were preloading the bar, and turn back 3 turns.
                      This will be very very very close to zero preload.
                      Thanks for the post! I've always just adjusted one side until it's free but this is a better way to do it.
                      - '88 m54 coupe

                      <3

                      Comment

                      Working...
                      X