
Today my brother and I were at the junkyard and I grabbed a window motor. (keep in mind that front and back motors are the same on each side in a saloon)
I'm going to show you how to pull the motor out, and how to test and make sure that you're getting 12v at the connector.
I know it is very wordy, I am writing it so that children can understand, if you're more advanced or have ADHD you can just look at the photos.
Time: Took me about an hour after getting one from the yard and making sure it worked. (12v right to the wires)
Tools: phillips bit, 1/4 ratchet with socket for bit, long phillips screw driver, flat blade screw driver, multimeter/test light, 12v battery, two jumper wires. Optional: rare earth magnet when you drop screws in the door.
First step: Disconnect your battery or something so you don't die. (given)
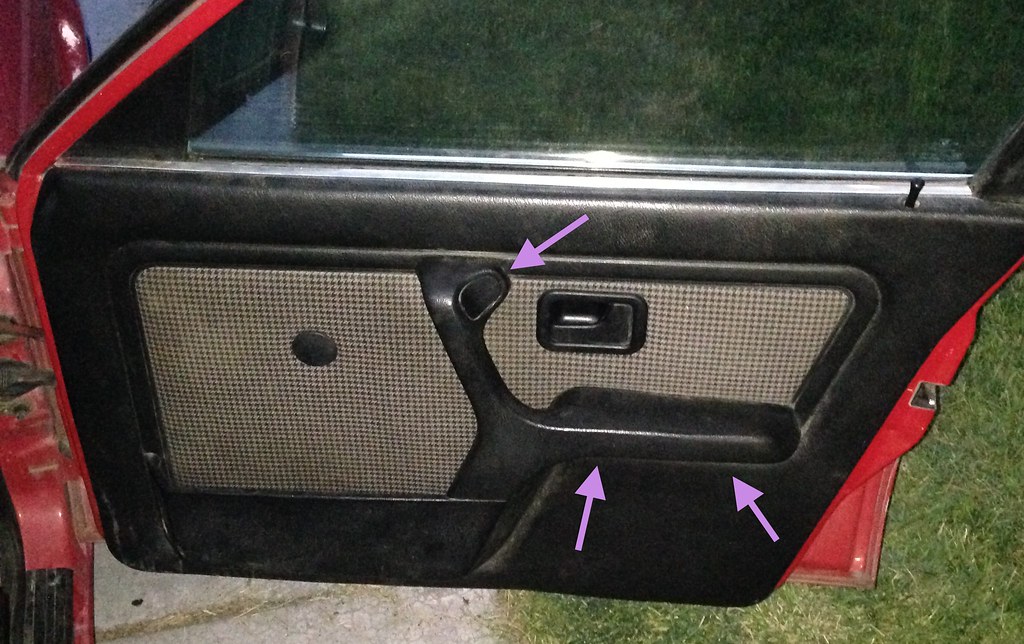
Step two: Removal of door card.
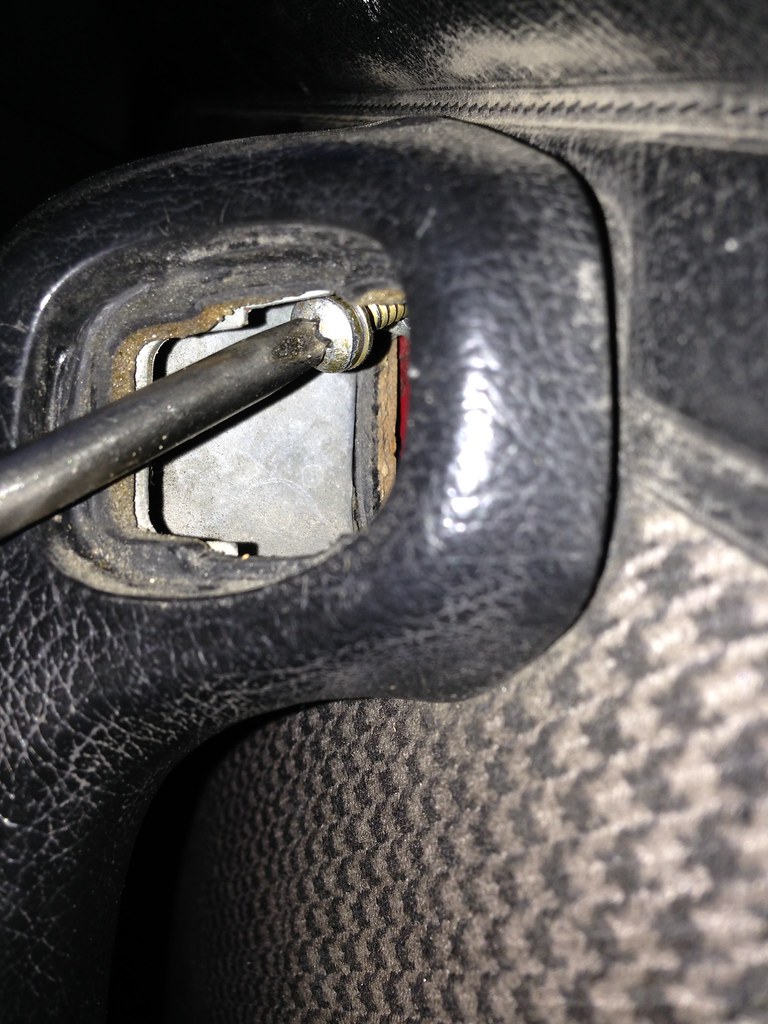
This is pretty straight forward, there are three screws holding the door card on, two are in the arm rest, one is located behind a cover. at the top of the interior handle (only in the armrest in the rear). Additionally there are plastic clips that run around the edge of the door card, they are brittle, I use a thin flat blade screw driver and gently pry against the door card. If some break, sucks to be you.
Step three: Remove the vapor barrier.
Next you will have a vapor barrier, this is a piece of plastic glued to the door to keep moisture out. This needs to be peeled away to access the goodies, its a good idea to keep this so you can reattach it. Although I don't have one, and live in a very dry climate, I've read its important.
Now we should see the window motor and the other internals.
Step four: Testing the motor and connector.
I wanted to make sure my motor was bad to be sure it was worth the effort of changing it. So what I did was gab my battery and two 14 gauge wires and tested. You need to unclip the connector (in the above photo it's the black wire, you can't miss it) and plug the two jump wires into the connector. The Blue wire is the positive, black negative. Now touch those to the battery. Does the motor move? If it does not, it's a bad motor. If it does work, test the other end of the connector with a multimeter. You should be getting 12V when the ignition is on, and the window button is pressed. If you don't get 12v at the connector then good luck tracking down why you're not.
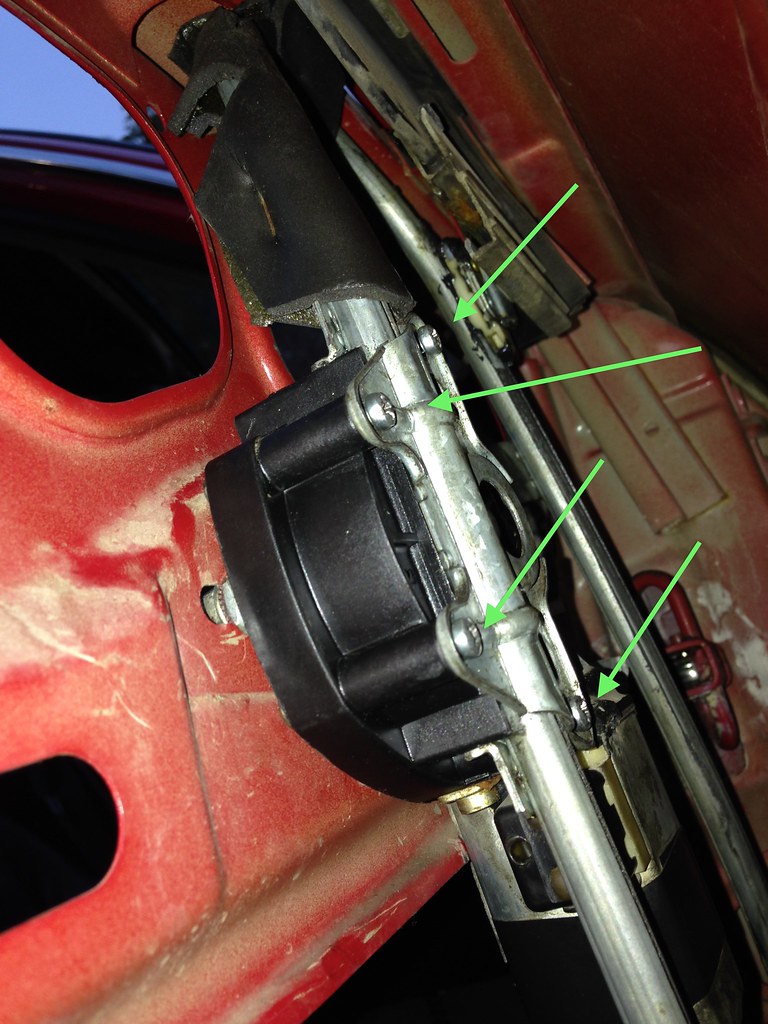
Step Five: Disconnecting the window track.
WARNING: the window may fall, get help. To remove the window track there are 4 phillips screws pressing a cover, preventing the track sprocket from losing contact with the motor sprocket. These are hard to get to. I used a phillips bit inside a small ratchet wrench. It worked faster then one of those L shaped screw drivers. Once all four screws are out you need to push gently on the track at the top and the bottom, the window may fall, so have someone there to help hold it if necessary.
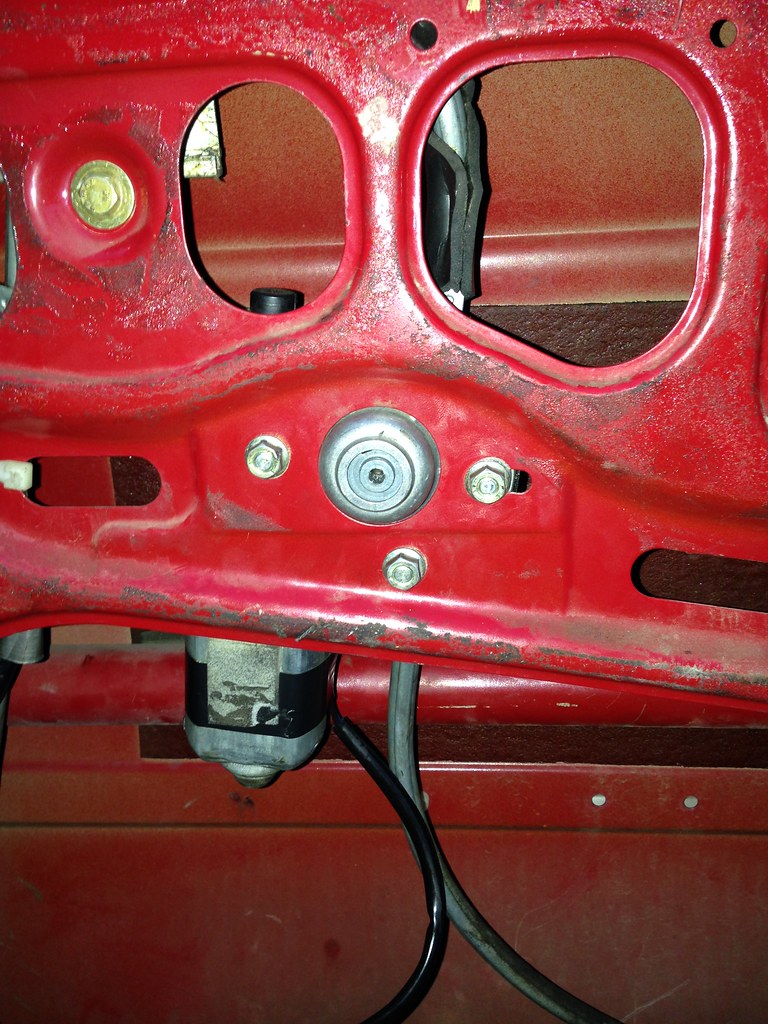
Step Six: Remove the three nuts holding the motor in, and remove motor. Should slide right down.
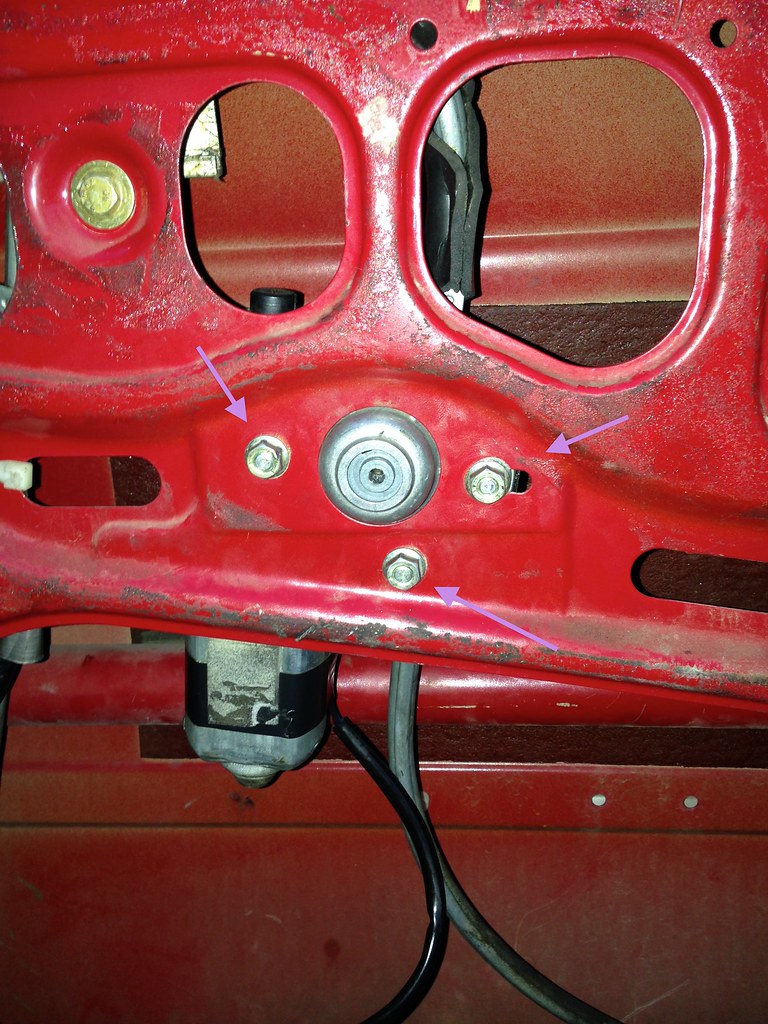
Step Seven: putting the new motor in.
The new motor should side right up in there. Put the three nuts back in. Now you need to make sure the track sprocket meets with the motor sprocket. To do this I just pressed against the track, and turned the motor with the hand crank slowly. You will know its in when the hand crank actually moves the window up and down. The hand crank is a number 4 hex, don't strip it, make sure you put the key way in there.
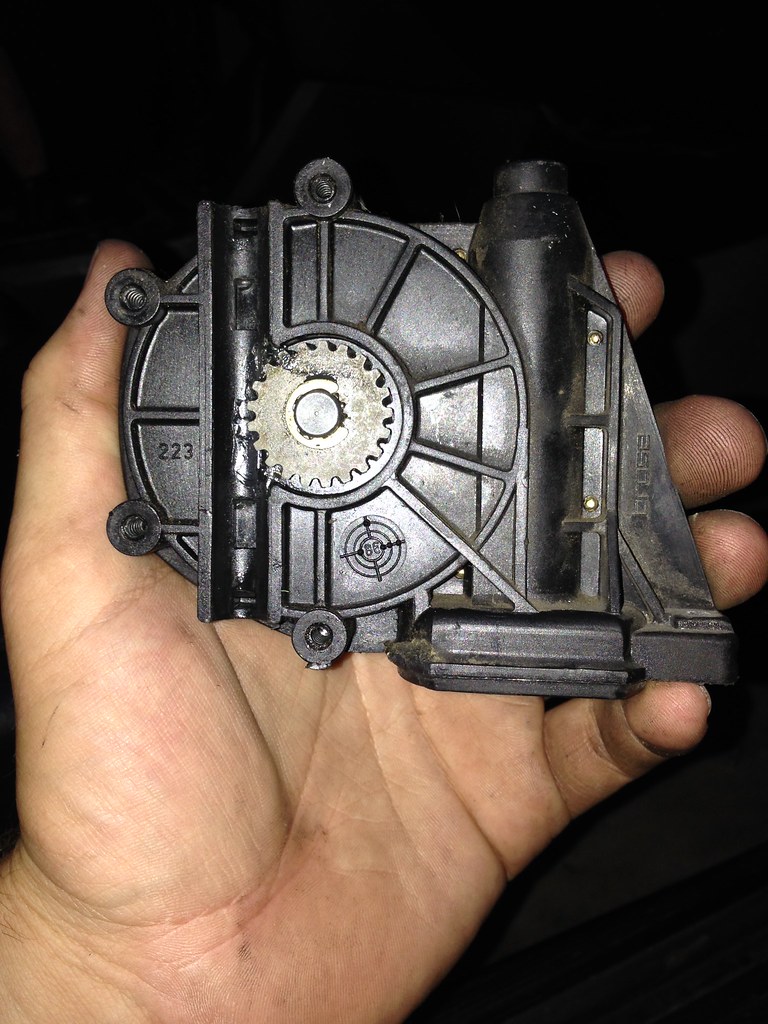
BACK OF THE MOTOR: This is what it would look like if the door was shut and you could see through the door.
Step Seven: Reassemble.
Now put the four screws back in, plug in the motor and test. You should be good to go, then button up vapor barrier and door card and your good to go!
Hope this helped, and I hope you're no longer embarrassed to go through the drive through.
Let me know if you think anything needs adjusted or changed.
I'm going to show you how to pull the motor out, and how to test and make sure that you're getting 12v at the connector.
I know it is very wordy, I am writing it so that children can understand, if you're more advanced or have ADHD you can just look at the photos.
Time: Took me about an hour after getting one from the yard and making sure it worked. (12v right to the wires)
Tools: phillips bit, 1/4 ratchet with socket for bit, long phillips screw driver, flat blade screw driver, multimeter/test light, 12v battery, two jumper wires. Optional: rare earth magnet when you drop screws in the door.
First step: Disconnect your battery or something so you don't die. (given)
Step two: Removal of door card.
This is pretty straight forward, there are three screws holding the door card on, two are in the arm rest, one is located behind a cover. at the top of the interior handle (only in the armrest in the rear). Additionally there are plastic clips that run around the edge of the door card, they are brittle, I use a thin flat blade screw driver and gently pry against the door card. If some break, sucks to be you.
Step three: Remove the vapor barrier.
Next you will have a vapor barrier, this is a piece of plastic glued to the door to keep moisture out. This needs to be peeled away to access the goodies, its a good idea to keep this so you can reattach it. Although I don't have one, and live in a very dry climate, I've read its important.
Now we should see the window motor and the other internals.
Step four: Testing the motor and connector.
I wanted to make sure my motor was bad to be sure it was worth the effort of changing it. So what I did was gab my battery and two 14 gauge wires and tested. You need to unclip the connector (in the above photo it's the black wire, you can't miss it) and plug the two jump wires into the connector. The Blue wire is the positive, black negative. Now touch those to the battery. Does the motor move? If it does not, it's a bad motor. If it does work, test the other end of the connector with a multimeter. You should be getting 12V when the ignition is on, and the window button is pressed. If you don't get 12v at the connector then good luck tracking down why you're not.
Step Five: Disconnecting the window track.
WARNING: the window may fall, get help. To remove the window track there are 4 phillips screws pressing a cover, preventing the track sprocket from losing contact with the motor sprocket. These are hard to get to. I used a phillips bit inside a small ratchet wrench. It worked faster then one of those L shaped screw drivers. Once all four screws are out you need to push gently on the track at the top and the bottom, the window may fall, so have someone there to help hold it if necessary.
Step Six: Remove the three nuts holding the motor in, and remove motor. Should slide right down.
Step Seven: putting the new motor in.
The new motor should side right up in there. Put the three nuts back in. Now you need to make sure the track sprocket meets with the motor sprocket. To do this I just pressed against the track, and turned the motor with the hand crank slowly. You will know its in when the hand crank actually moves the window up and down. The hand crank is a number 4 hex, don't strip it, make sure you put the key way in there.
BACK OF THE MOTOR: This is what it would look like if the door was shut and you could see through the door.
Step Seven: Reassemble.
Now put the four screws back in, plug in the motor and test. You should be good to go, then button up vapor barrier and door card and your good to go!
Hope this helped, and I hope you're no longer embarrassed to go through the drive through.
Let me know if you think anything needs adjusted or changed.


Comment