Announcement

Collapse
No announcement yet.

How-to: New way to fit rear plasic bumpers on 87 or older

Collapse
X
 
  • Filter
  • Time
  • Show
Clear All
new posts

    How-to: New way to fit rear plasic bumpers on 87 or older

    For ever, people have been trying to find an easy way to fit the plastic bumpers onto a metal bumpered car. There is no easy way to do it and when I started to do mine, I wanted it to be perfect (or close to it). I know that Jordan has a nice write up and I used that to help my idea along. So, after you make the nessasary notches in the bumper holes like so...
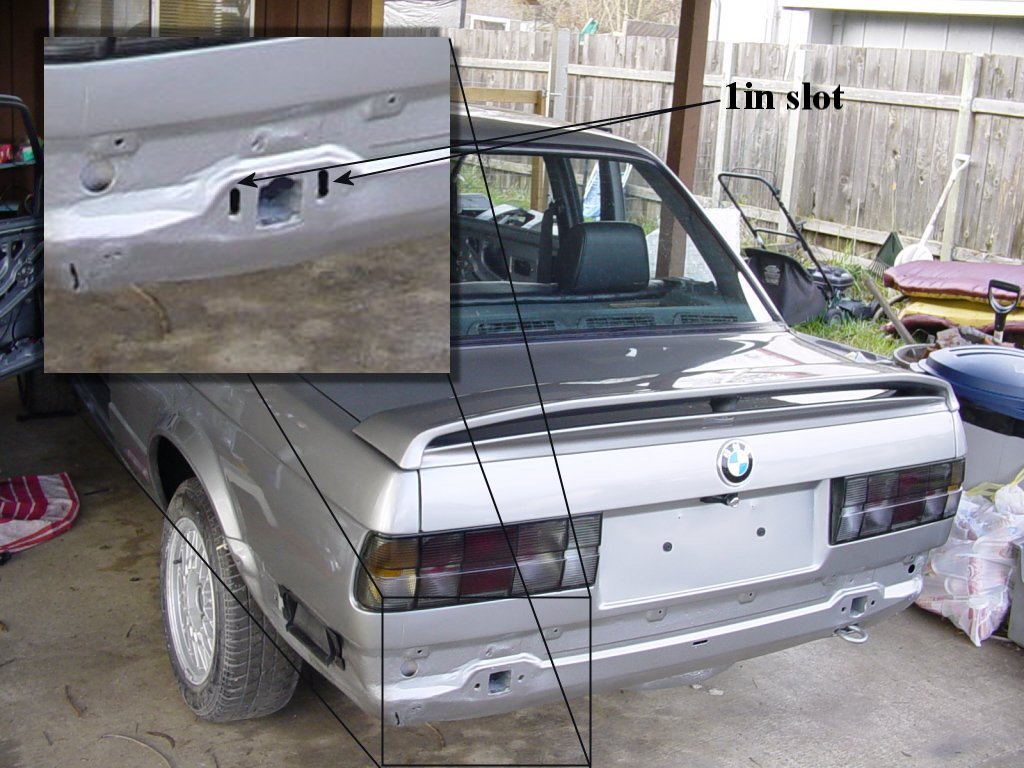


    You can begin the fun stuff:-D

    First step: You need to bolt up the bumper so that it is exactly how you want it to be on the car, you know, except it will be a little too long.


    See, too long:tsk:

    Second step: Now take the bumper off and cut off the front half of the bumper. I cut off about 3 inches before the side marker light. After both sides are cut (cut strait), bolt the bumper back up like you had it before.


    It should look like this. The plastic outer skin is held in by the black inner skin with tabs that can be a little hard to get off. A long flat head screwdriver works well for this.

    Third step: Take the piece that you just took off and place it up to the bumper and overlap the pieces to see how much material you need to take off. Should be about an inch.


    Fourth step: I used the blue masking tape for my cut line because it helps to keep the melting of the plastic to a minimum which is a good thing. I used a dremmel tool with a cut-off wheel for this job.


    Blue cut off line.

    Fifth step: Cut off material and see how it lines up. I had to do some minor trimming of the parts so it would fit tight, but it was not bad at all.


    Freshly cut and taped on for now8-)
    Last edited by Mike325; 07-09-2006, 05:21 PM.
    Originally posted by cabriodster87
    "Honey? What color is this wire? Is it the same as that one? Are you sure? I don't believe it. OK, it works. Thank you sweetie."
    Originally posted by Kershaw
    i've got a boner and a desire to speed.

    #2
    Step six: You need to take the bumper off and connect the two pieces back together again. I used some small self tapping screws in the ares where the trim goes to hold it in place. I also took a soldering iron and melted the two together at the line for added strenth.

    Step seven: Now that both pieces are together, you can focus on the crack in the middle. First, sand off the paint around the crack so the bondo has something to stick too. I used my dremmel with a sanding wheel for this and it took like five minuets to do both sides:crazy: I used bondo to fill the cracks and it workes fucking awsome, but any crack filler or something of that nature will work fine also. I used two layers of bondo on this. Put it on, let it dry and then sand till smooth. You should not be able to feel a bump where the bondo is.


    Here is the finished project. I used 80 grit sandpaper for the take off and 180 grit for finish work. Came out great and the fit is sweet.

    Here are some more pics of the finished part.


    All I need is some black paint on this bitch and it will be mint. Paint will be on in early August:pimp: Let me know if there are any questions on this. I will be glad to help. This is not hard at all.
    Originally posted by cabriodster87
    "Honey? What color is this wire? Is it the same as that one? Are you sure? I don't believe it. OK, it works. Thank you sweetie."
    Originally posted by Kershaw
    i've got a boner and a desire to speed.

    Comment


      #3
      I would have used the flexable bondo. The stuff with the fiberglass in it. I used the same stuff you did to shave the bumper trim on my car and its cracking a little. Very good Idea...but I would be scared that it would crack over the course of a few months.

      Comment


        #4
        Good initiative --- the only issue I see is that you still have the appearance of the early rear valence disappearing under the car. As your eyes travel vertically down the rear of the car, it appears to end abruptly after the plastic bumper --- that's what I don't like about this swap.

        Comment


          #5
          Thanks guys. I hope it does not crack eaither. I got an RD rear valance to solve the lower area problem;) There is no easy way to make these bumpers work, but with some time it can be done
          Last edited by Mike325; 07-12-2006, 07:06 PM.
          Originally posted by cabriodster87
          "Honey? What color is this wire? Is it the same as that one? Are you sure? I don't believe it. OK, it works. Thank you sweetie."
          Originally posted by Kershaw
          i've got a boner and a desire to speed.

          Comment


            #6
            Originally posted by Low Level E30
            Good initiative --- the only issue I see is that you still have the appearance of the early rear valence disappearing under the car. As your eyes travel vertically down the rear of the car, it appears to end abruptly after the plastic bumper --- that's what I don't like about this swap.
            If I were to ever do the swap, I'd get an M-Tech II rear apron to install under the bumper.

            Comment


              #7
              Originally posted by Eurospeed
              If I were to ever do the swap, I'd get an M-Tech II rear apron to install under the bumper.
              x2
              -Frank
              1987 325is m50nv (schwarz)
              1990 325is (sterling silber)(sold)
              2001 525i

              Comment


                #8
                you're chopping the trim then too correct? I hand fit the bumpers at the arches, but i cut the trim. I used a combination of fiberglass lightweight and expoy resin and its cracked slightly. There is hardly any stress on that little piece of trim but more so on the bumper itself.
                Old and improved:

                Comment


                  #9
                  Originally posted by Eurospeed
                  If I were to ever do the swap, I'd get an M-Tech II rear apron to install under the bumper.
                  Originally posted by E30_pilot
                  x2

                  Yous guys know that the M-tech-II rear bumper and valence are one piece , right ?

                  So its either use the whole OE MT2 rear set-up or go with a replica valence only like Filip up in Canada (+ a few others) offers .

                  Or if you are a real baller you can just cut/seperate the valence portion from an real MT2 rear bumper .

                  E30 M3 / E30 325is / E34 525iT / E34 535i

                  Comment


                    #10
                    ...someone told me that you cannot fit the M-tech 2 rear on the diving board cars... or that you would have to mangle the already pricey M-tech 2.... :(
                    Slicktop City!

                    Comment


                      #11
                      Originally posted by ldsbeaker
                      ...someone told me that you cannot fit the M-tech 2 rear on the diving board cars... or that you would have to mangle the already pricey M-tech 2.... :(
                      I think this is only true if you are using diving boards. If you swap to plastics, everything should fit fine. It might be a little long, like how the bumpers are, but that is an easy fix.

                      Comment


                        #12
                        I like these bumpers, but this looks like more work than I want to do. Oh well.

                        Andrew, I like your car!
                        Yes, a girl with an e30 . . . on a forum!

                        Comment


                          #13
                          I believe only the fiberglass replicas of the mtec2 are one piece. I know for a fact that the front are two pieces and im near certain that the rear is two piece. That was actually the one I was going to use on mine, but the RD works just fine.
                          Old and improved:

                          Comment


                            #14
                            REAL M-tech 2 (or 1) is ABS plastic, right?
                            Slicktop City!

                            Comment


                              #15
                              Originally posted by EtaSport
                              I believe only the fiberglass replicas of the mtec2 are one piece.
                              No. The OEM Mtech II rear is one piece also.

                              Aaron
                              2008 Audi S4 Avant

                              Comment

                              Working...
                              X