If you want to keep OBD2 here are the steps you need to take (there are other ways to do it, but this is what I did and its been quite simple).
Here is my build thread: http://www.r3vlimited.com/board/showthread.php?t=234207
I'm going to be editing and adding to this along the way.
Thread comparing OBD1 vs OBD2: http://www.r3vlimited.com/board/showthread.php?t=230879
1. Wiring Harness:
You'll want the wiring harness for the engine you have, try to get it with your engine when you buy it.
Send off wiring harness to be modified or do it yourself. I can't help you with the DIY as I sent mine off the Dave @ Markert motorwerks (see link)
Link: http://www.markertmotorworks.com/#!p...ess-conversion
2. ECU:
You'll want the ECU for your engine, also try to get this when buying your engine.
Send off ECU to get tuned. You have several options but the cheapest and best place to do this I found was DesertBMW here on the forums (see link)
This tune will do several things
It will delete the following: rear 02, SAP, EWS, fuel tank sensor, muffler flap valve
Picture of ECU returned from DesertBMW
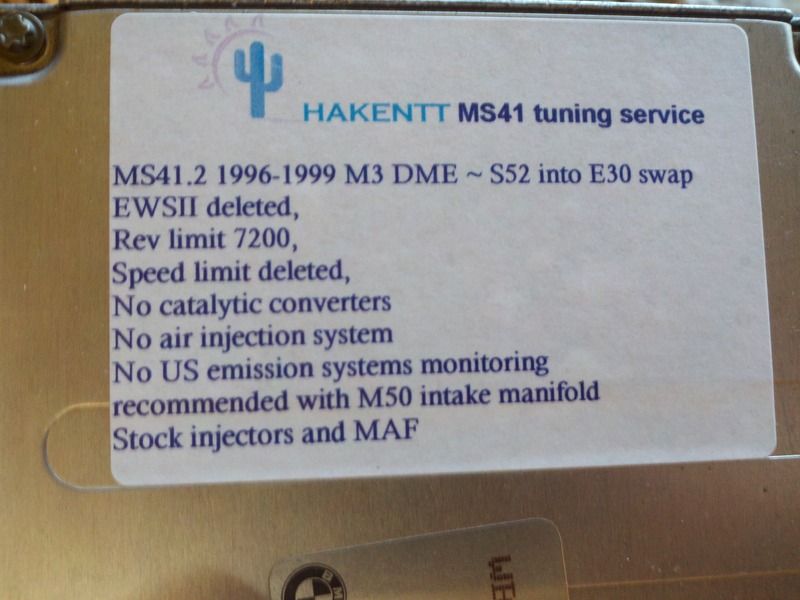
Now you can retain some of these things if you have the parts and want to work a little harder, it is easiest to just toss them IMO.
Link: http://www.r3vlimited.com/board/member.php?u=35673
Price: This tune cost me $280 from DesertBMW (prices subject to change depending on the person providing the service and perticular situation)
Other options for tuning companies
TRM tuning: http://www.racersmarket.net/index.ph...hk=1&Itemid=93
MarkertMotorworks: http://www.markertmotorworks.com/#!bmw-ecu-tuning/cd6w
3. SAP Delete:
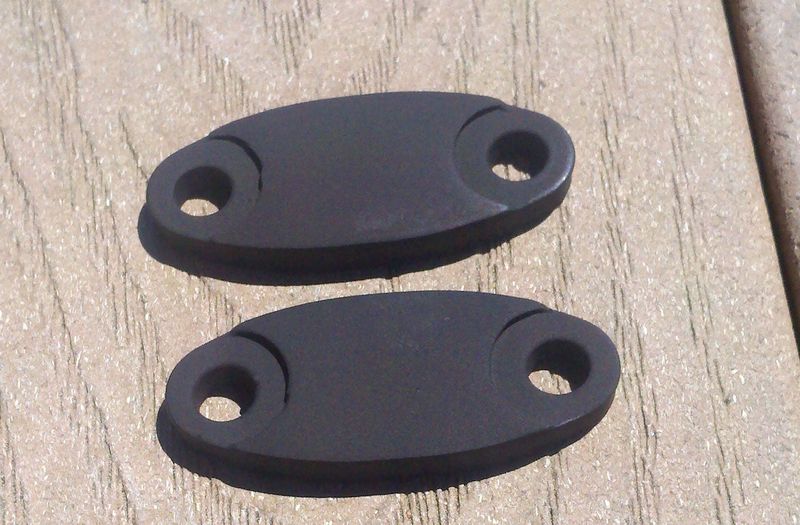
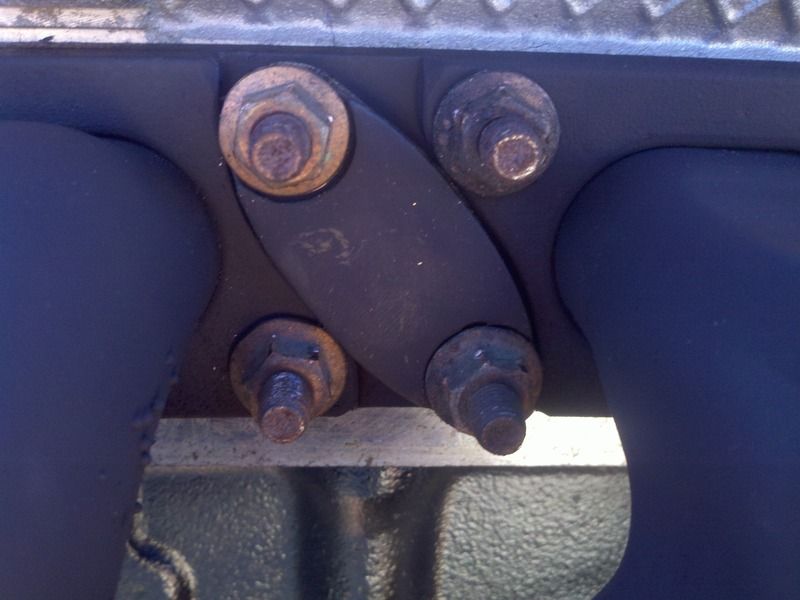
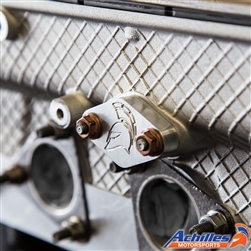
Since you have deleted your SAP you can toss it. The cheapest way to do this is cut the pipes off right at the flanges and fill the flanges up with some welding. (see picures)
The two flanges welded and painted:
Bolted up on the exhaust manifolds
You can also buy these plates from several manufacturers now, I believe.
Links:
4. Fueling:
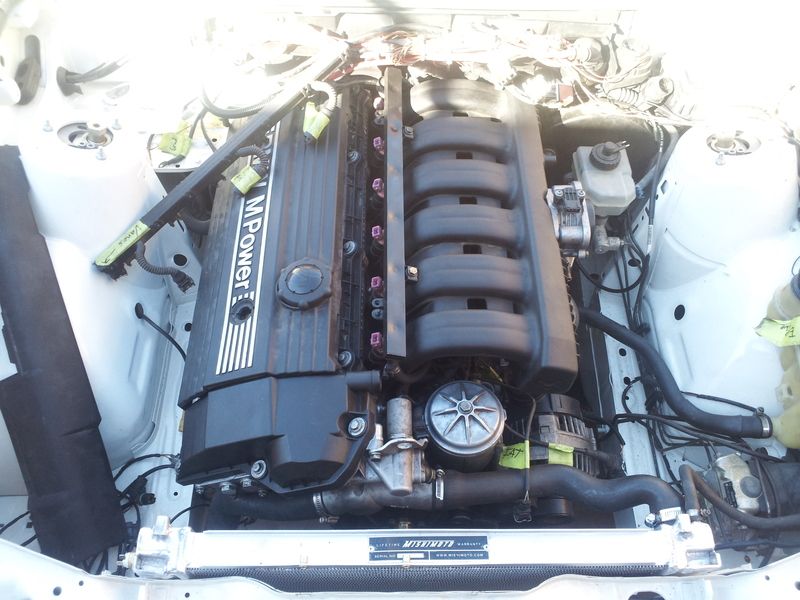
OBD2 cars (atleast the s52 cars, you'll have to double check for m52's) use a remote FPR and running loss valve that is mounted to the Frame rail. You can keep this or use a m50 OBD1 Fuel rail and FPR along with the M50 intake manifold (for a little power gain. Info about this everywhere, see step 5 also).
Only mod needed is a bend of the tabs on the m50 fuel rail that block the s52 harness from plugging into the injectors. Bending these tabs will no longer allow you to run a fuel rail beauty cover, if you want this cover you have to get a early OBD-II fuel rail from either an E36 328 or an E39 528. It has the FPR on the rail and the mounting brackets do not interfere with harness or the cover. You will need the tabs for the fuel rail cover that come in an M50 manifold conversion kit. (Credit for this info goes to Dave@Markert and Gooch)
Here is my engine bay with the m50 manifold and fuel rail:
5. M50 OBD1 Intake manifold & other intake components:
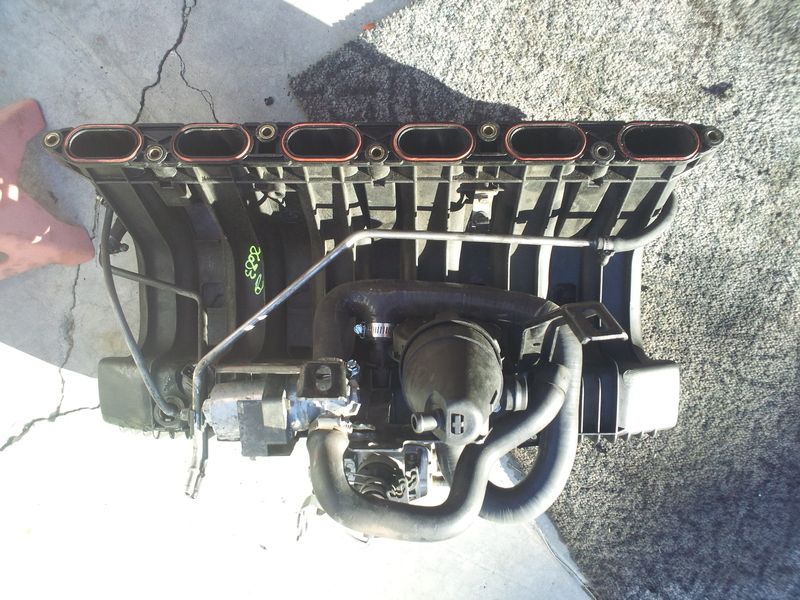
Not required but popular because of the power gains. I ran the m50 fuel rail and used the M50 manifold conversion kit from M50manifold.com. If you go this route you won't need the brackets for the s52 fuel rail and you won't need to modify stuff for the SAP valve
M50 Manifold kit picured below:
Links to several M50 manifold swap kits:
M50manifold: http://m50manifold.com//index.php?op...d=23&Itemid=40
Turner Motorsport: http://www.turnermotorsport.com/p-19...an-m52s52.aspx
KO Performance: http://www.koperformance.com/BMW/eng...kit_e36_m3.htm
If you delete SAP and the OBD2 FPR like I did you don't have to worry about routing vacuum lines to these things. You will need a vacuum cap for the nipple on the main vacuum source connector that inserts into the manifold.
Intake boot and IAT sensor:
You'll want the long OBD1 intake boot with 2 holes in the bottom. One for the ICV hose and the other to either plug or mount your OBD2 IAT sensor in.
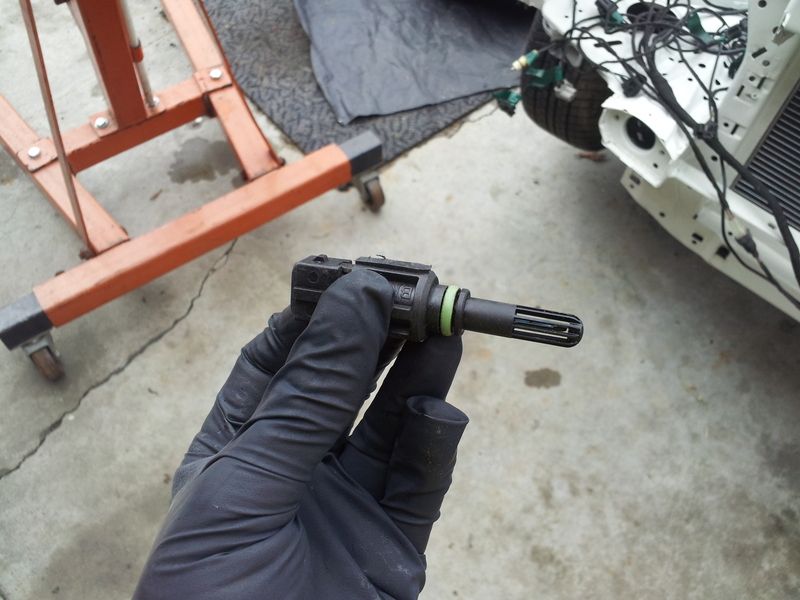
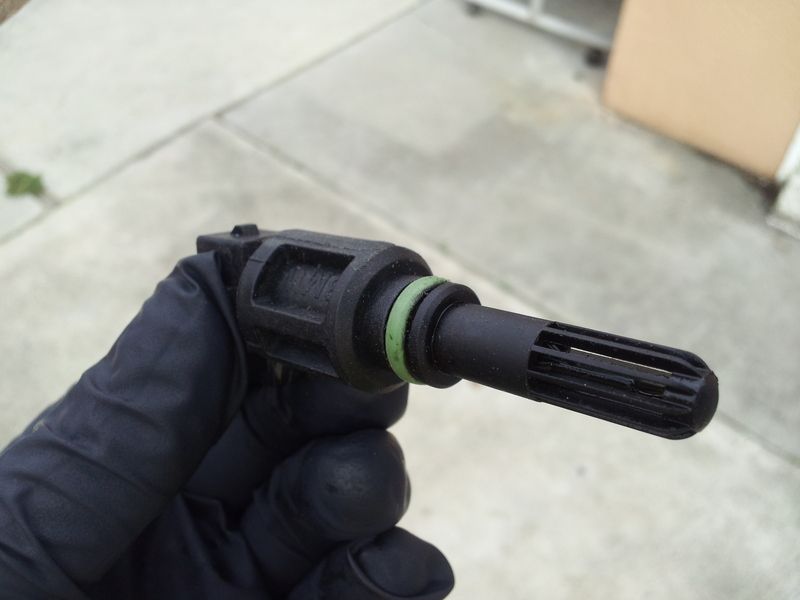
I chose to mount my IAT sensor in the boot, since this is more ideal than rethreading it to mount it in the original OBD1 IAT spot on the intake manifold.
To mount the IAT sensor in the hole you'll want to shave off some of the plastic to make it more round like pictured below.
Before:
After:
OBD1 intake boot part number: 13541738757
6. Dipstick modification:
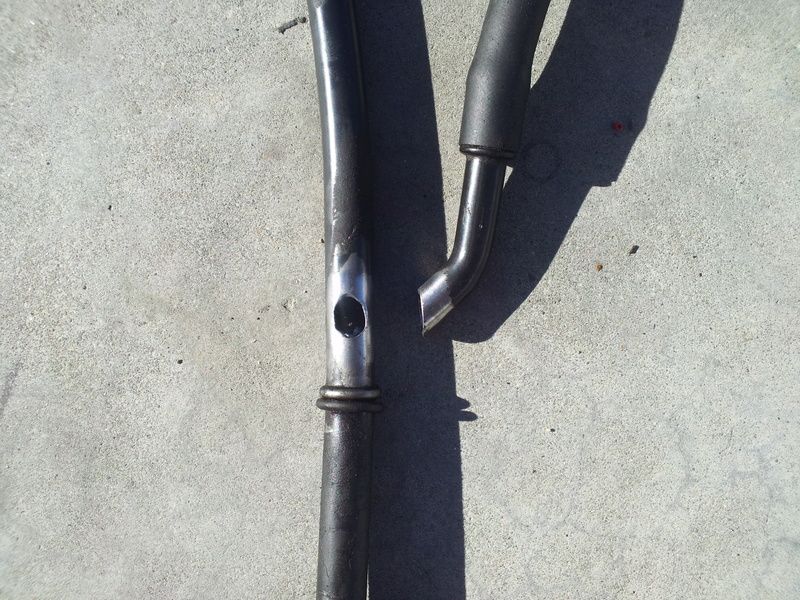
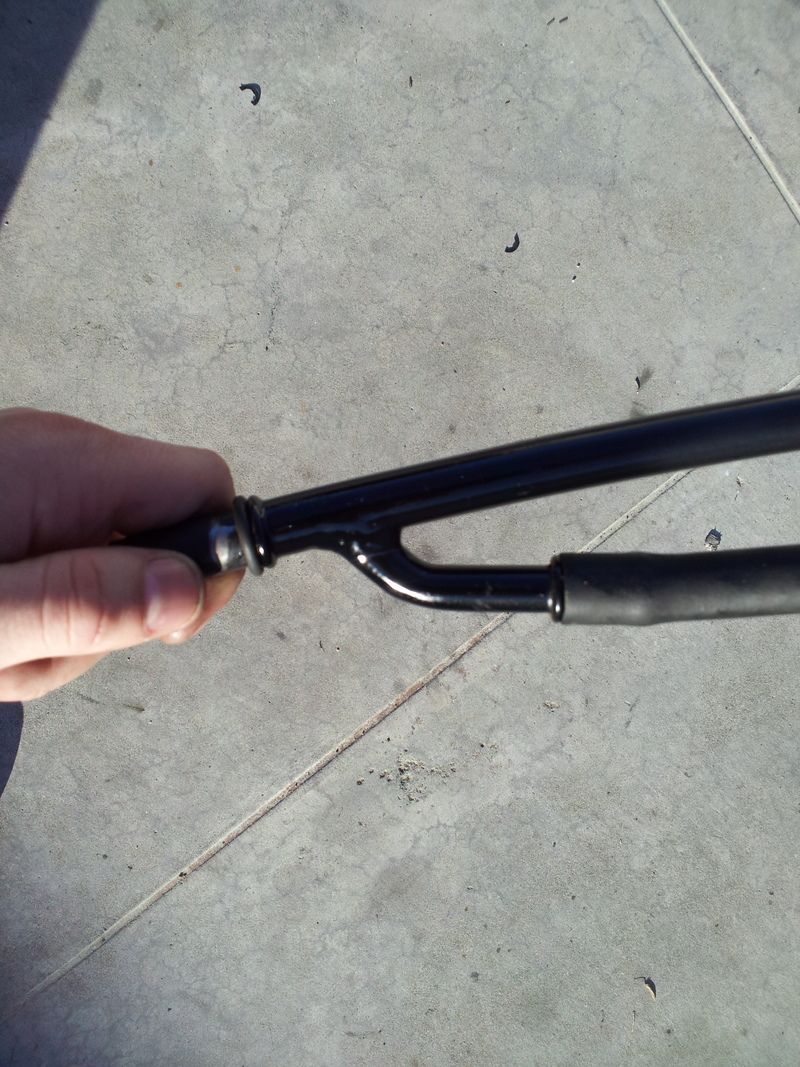
If you are keeping the CCV you will want to modify the e34 m50 dipstick to have the CCV drain into it. To do this, simply cut the pipe off your M52/S52 dipstick and drill a hole in the e34 m50 dipstick and weld the pipe on.
Before welding:
Welded on:

7. Coolant Lines:
If you are running the late model 325 cooling system you should be able to use all S52/M52 coolant lines (I was and I'm running an e36 mishimoto radiator with late model m20 expansion tank. UPDATE: Do not use e36 Mishimoto radiators. They are crap. I went through two over a 4 year period, both ended up leaking in the same way. They leak at the rows on both sides due to poor engineering. I went with the Z3M radiator which is a much better alternative.). I used the long e36 S52 hose that came off the metal pipe and cut it for my heater core and expansion tank line. There is quite a bit of info on this around the forum.
Lines used:
Top Radiator: e36 S52 hose (no trimming needed)
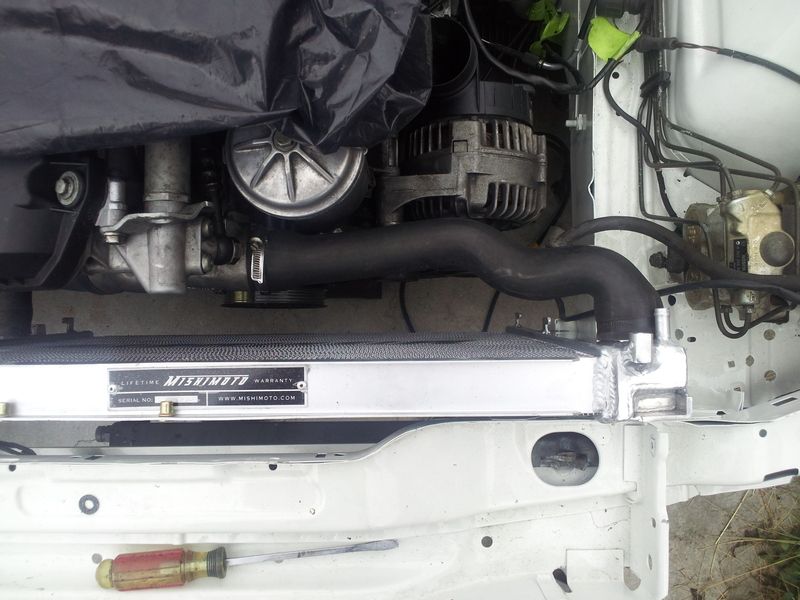
Bottom Radiator: cut long e36 s52 hose (This method actually ended up cracking due to the kink in it. It worked for several years and may work with a different radiator option.)
BETTER OPTION: Get part number "NBH 8484" from NAPA auto parts and cut to length. I have read this can be used for the top hose as well, although I have not tested this. Link to hose: https://www.napaonline.com/napa/en/s...se&referer=PLP
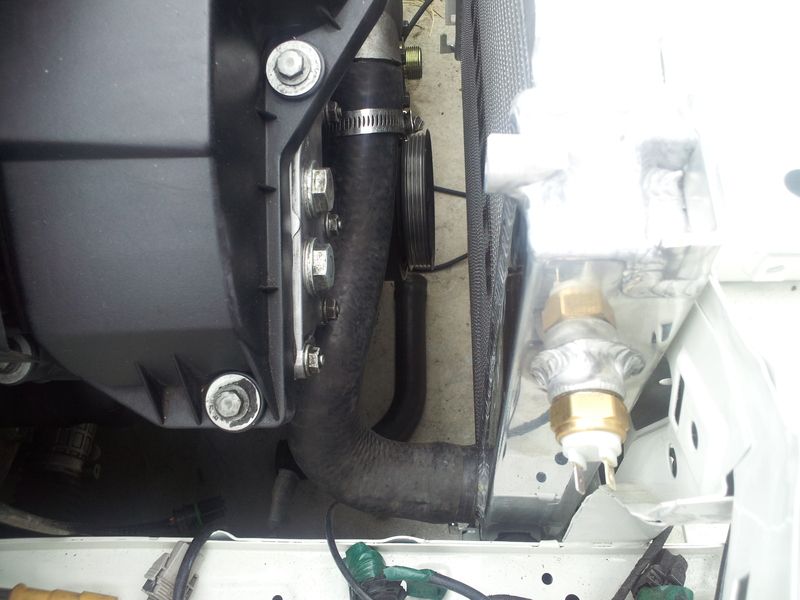
Expansion tank to metal pipe: cut piece of long S52 hose
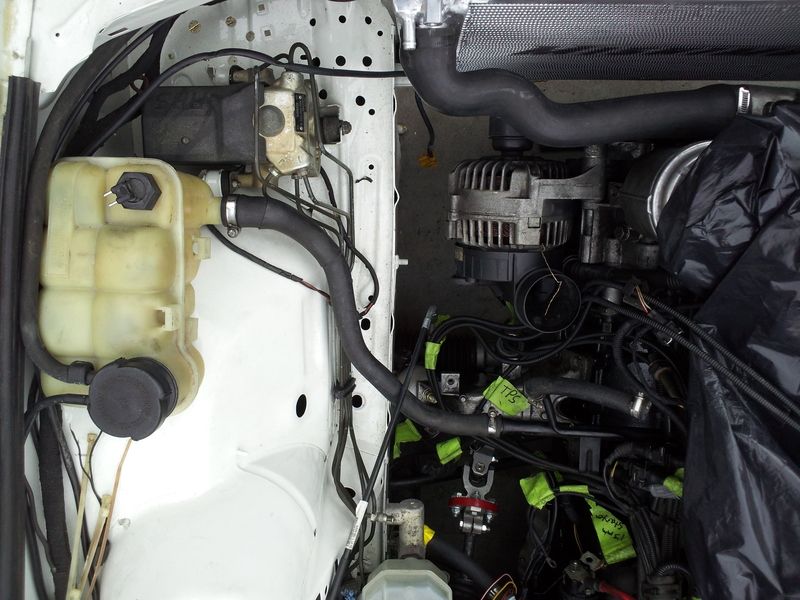
Back of head to BOTTOM heater core and Back of metal pipe to TOP heater core (don't mix this up! courtesy of Dave@Markert http://www.r3vlimited.com/board/show...ghlight=heater)
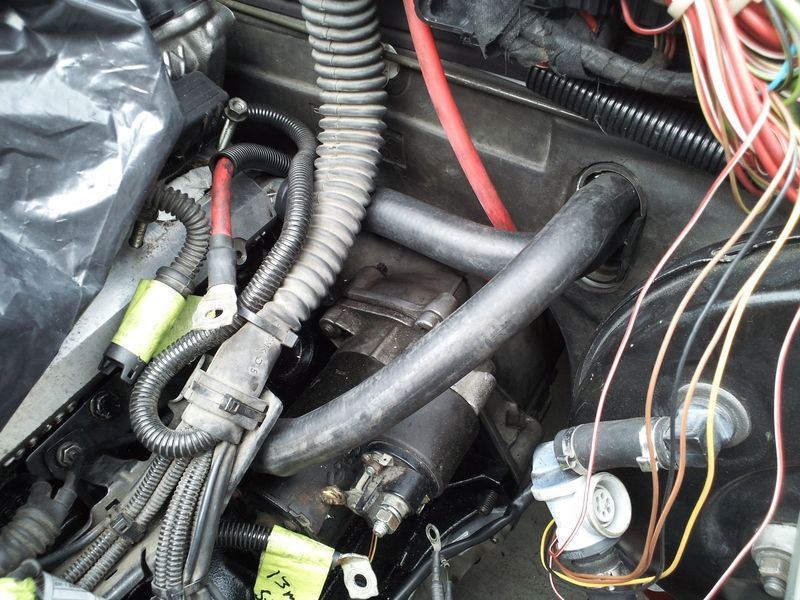
Throttle body lines: You can keep or delete these lines. I chose to delete them since it makes it more simple and isn't necessary unless you live in VERY VERY cold climates
If you go the delete route like me you'll want to close up the line on the pipe for the throttle body coolant line. I welded mine like this
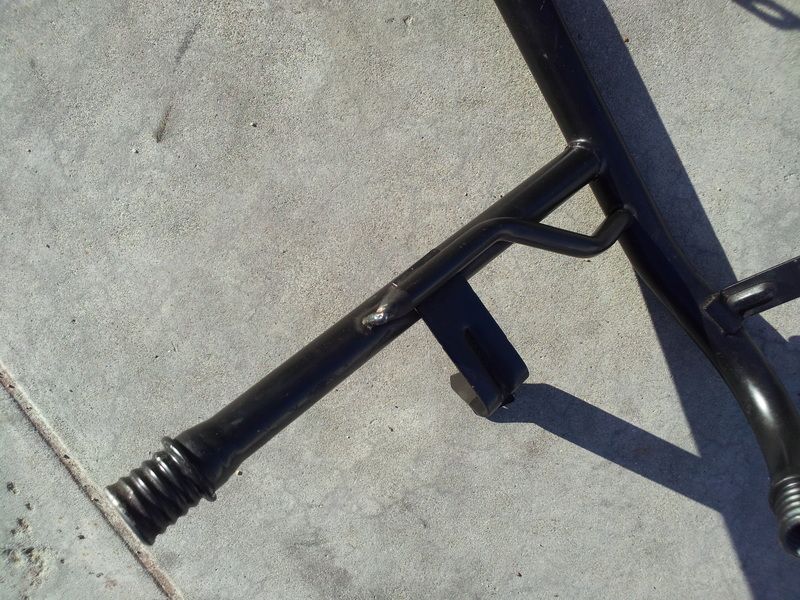
The line that comes from the head will be taken care of below in the Coolant temp sensor step.
8. Coolant Temp Sensor:
You will need to use an e30 brown top coolant temp sensor for the cluster reading. This will replace the pipe that screws into the head for the throttle body coolant line. You have three options here
Option 1 (what I did): Use a die and change the pitch of the threads to match the s52 head threads. The pitch was m12x1.5 (could be wrong, double check)
Tutorial: Have to search for it later, hard to find.
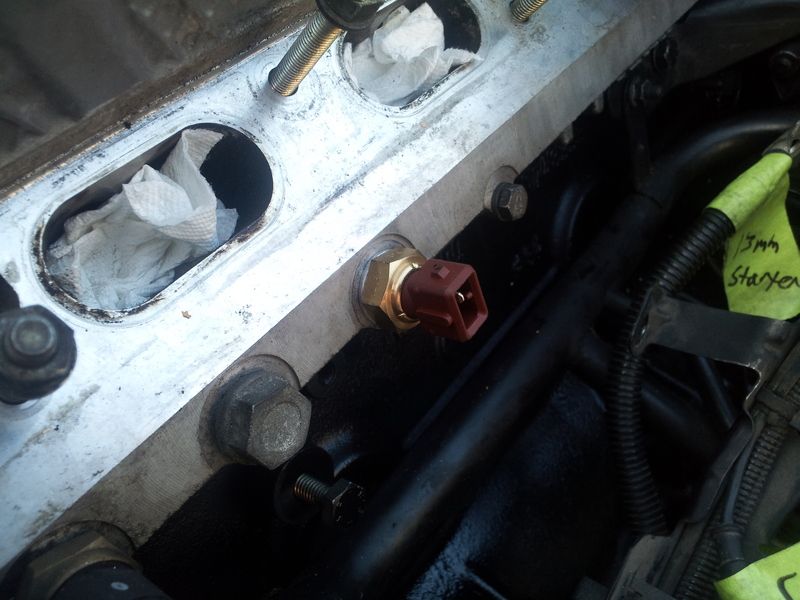
Option 2 (more risky IMO): Tap the head to match the sensor threads.
Option 3 (expensive, but easy if you don't have the tools: Buy a already rethreaded brown top coolant sensor from Markert motorwerks. http://www.markertmotorworks.com/MMWProducts.html
Basic Swap steps
9. Transmission:
Option 1: ZF transmission: Bolts right in. You can use the 318is/325 transmission brace they are the same. It will bolt right up with the proper mounts of your choice
Tons of info about this online.
Shift linkage: Use shift linkage from e36 M3 or 328i
Option 2: G260 from an m20 car: You will need a different transmission brace, either make your own or buy one.
White325is sells them here: http://www.r3vlimited.com/board/show...ght=white325is
Shift linkage: Selector rod will need to be modified to have a 10deg. twist because the g260 will be at an angle, this can be achieved by physically twisting it or cutting the selector rod and re-welding.
You can also buy one of these
UUC's DSSR version: http://store.uucmotorwerks.com/share...t=products.asp
10. Differential:
You can use any diff you'd like that bolts up to an e30, but it is recommended you use a medium case diff for more durabilty, preferably a 3.25lsd for a S52 car. With an m52 you could probably get away with any medium case lower than a 4.10.
Also tons of info about this online
11. Driveshaft:
Option 1:1986-1987 325e driveshaft with the large front flange
Option 2:1996-99 M3 or 328i driveshaft with the 4 bolt rear flange to bolt right up to the e30 diff.
Option 3:Revshift adapter guibo. This allows you to run your stock driveshaft.
Link: https://www.revshift.com/shop/24v-sw...-flex-disc.php
12. Brake booster:
Tons of info online
Option 1 (best option IMO because of retained brake pedal feel): Relocate stock brake booster: DIY (Thanks to hwy84): http://www.r3vlimited.com/board/showthread.php?t=250474
Option 2: E30 325ix booster: I believe it bolts right up. (More research will be done)
Option 3: E21 320i booster: The shaft for the clevis will need to be shortened and rethreaded (right?)
You can also buy an already modified one from Zionsville: http://www.zionsvilleautosport.com/s...code/POMBB.htm
Option 4: Porsche 944 booster: You need to shorten and thread the 944 booster input rod, but it is the same thread diameter and pitch as the E30 clevis.
13. Engine Mounting:
You will need e36 aluminum mount arms. Try to get these with your engine when you purchase it
You have a few options for engine mounts
Option 1: E28 535i or M5 engine mounts
Option 2: Aftermarket 24v mounts from vender of your choice.
Condor speed shop mounts (aggressive UHMW): http://www.condorspeedshop.com/collections/all
AKG Motorsport: http://www.akgmotorsport.com/catalog...0%2FM50%20Swap
14. Oil Pan:
Because the S52 and M52 come with a rear sump pan you will need front sump pan to be able to clear the E30 subframe
What you need
1. E34 M50 oil pan
2. E34 M50 oil pickup tube
3. E34 M50 dipstick tube and dipstick (see modification above for CCV)
4. E34 M50 oil level sensor
The swap to the E34 pan takes little modification, Here is the process
1. Remove original pan, pickup, and windage tray
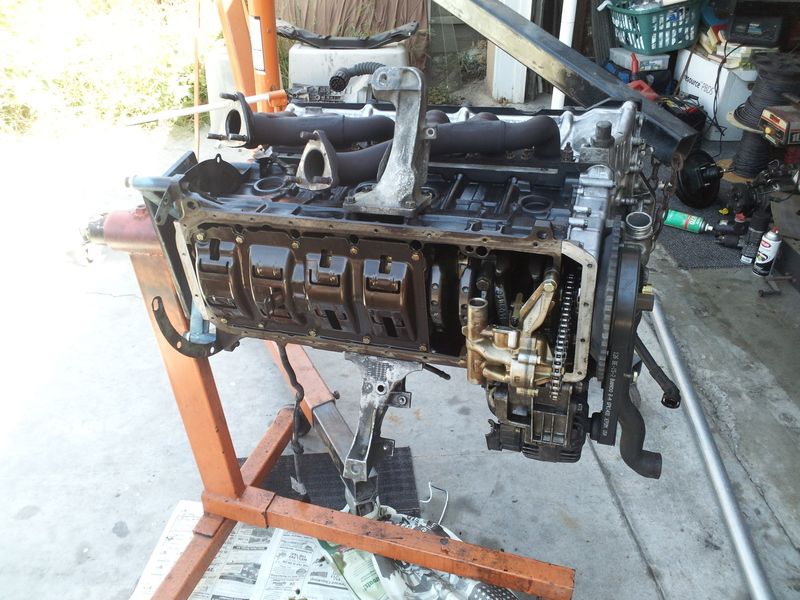
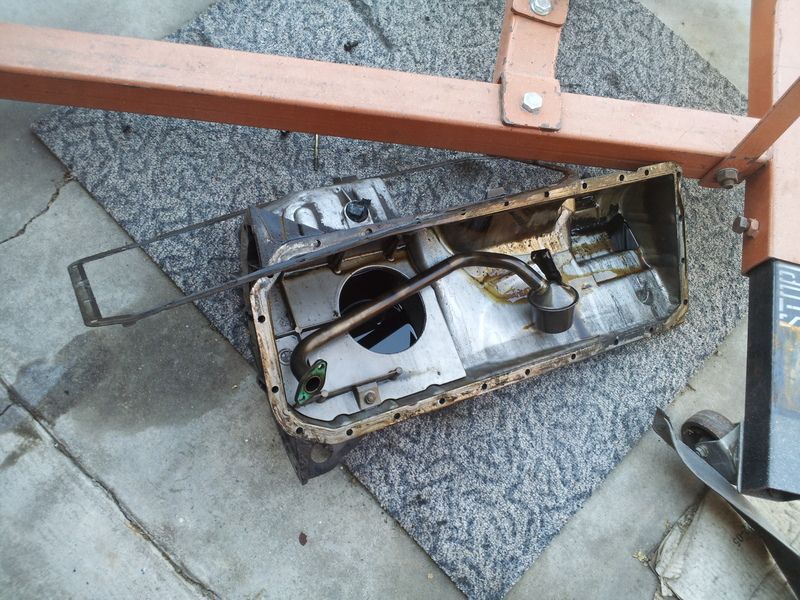
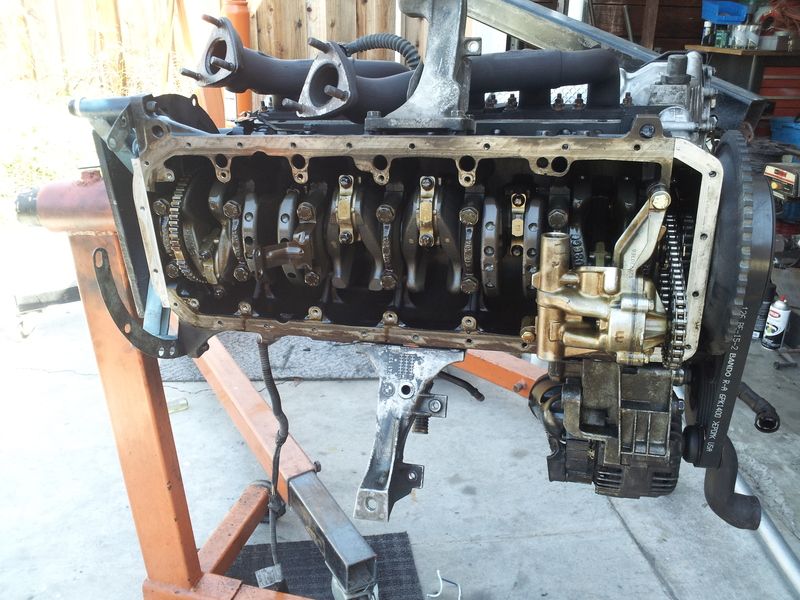
2. Cut bracket for s52 oil pickup tube. Important: Do this with the engine vertical on a stand to avoild metal pieces getting into the engine or simply bend the bracket off with large pliers.
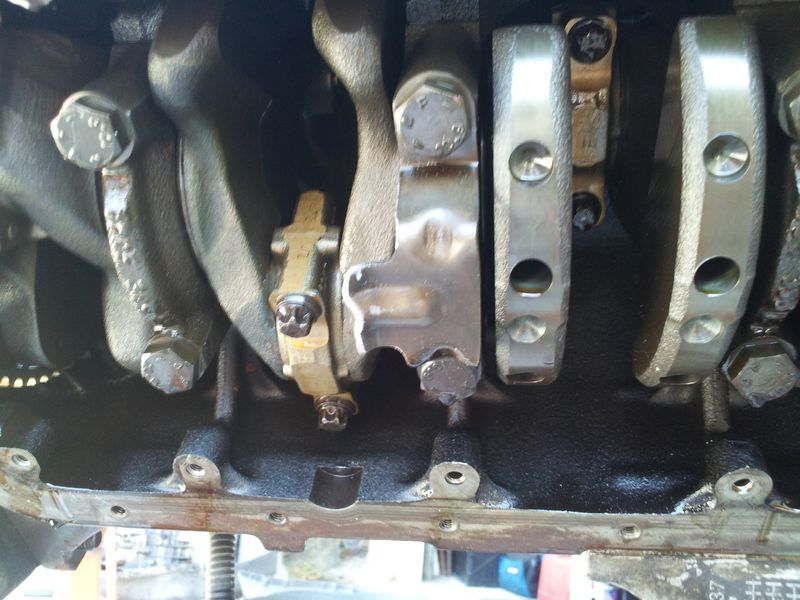
3. Install E34 M50 pickup tube with new gasket
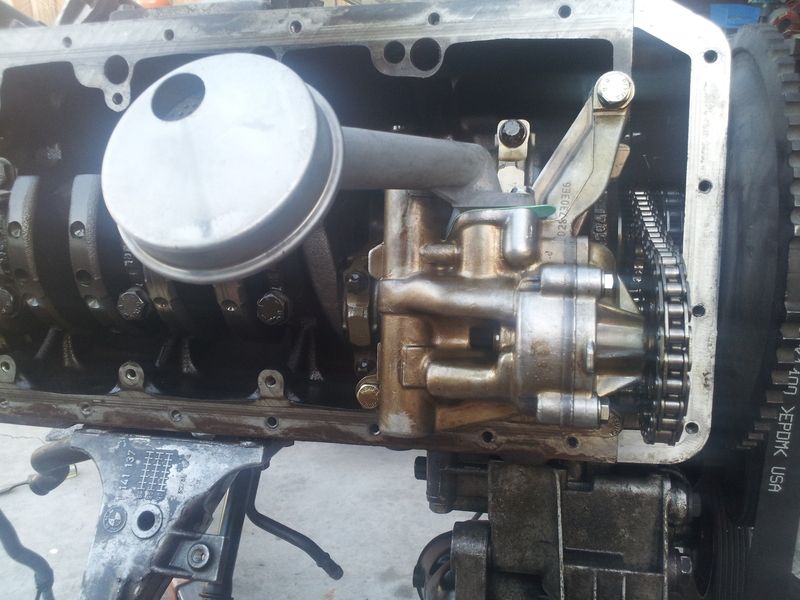
Optional (but highly recommended) while you're in there step:
Securing the oil pump nut. M50 based engines have an issue where the oil pump nut likes to back off, this is quite rare, but why not spend a little money and get some piece of mind.
My choice: Safety wire and red loctite. Some like to tack weld the nut to the shaft
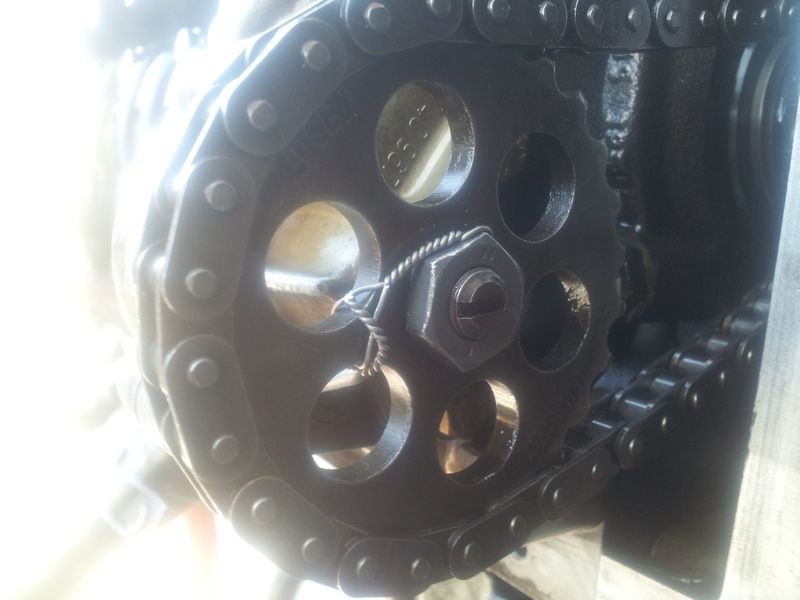
Link to oil pump nut with hole for safety wire:
4. Install new oil pan gasket and oil pan. Apply silicone to the cracks where the block and front timing case meet and also in the rear where the block and the rear main seal cover meet
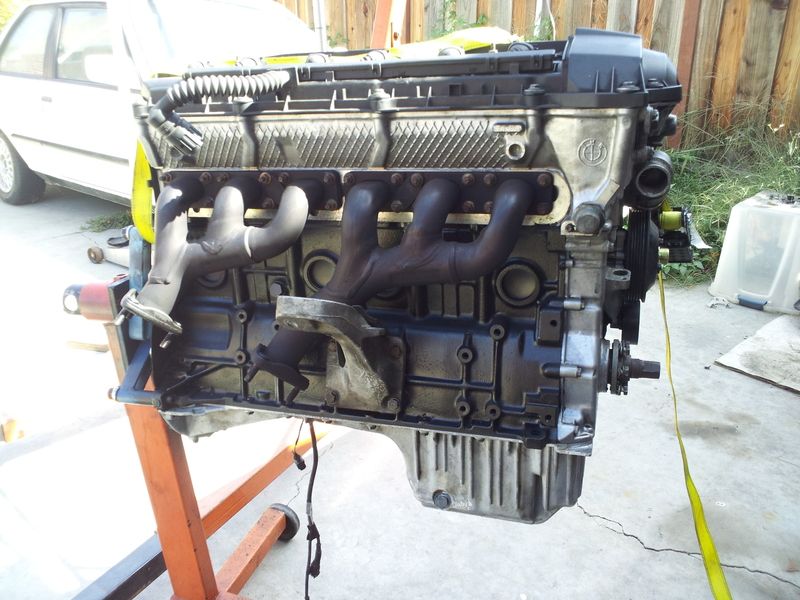
15. Throttle Cable:
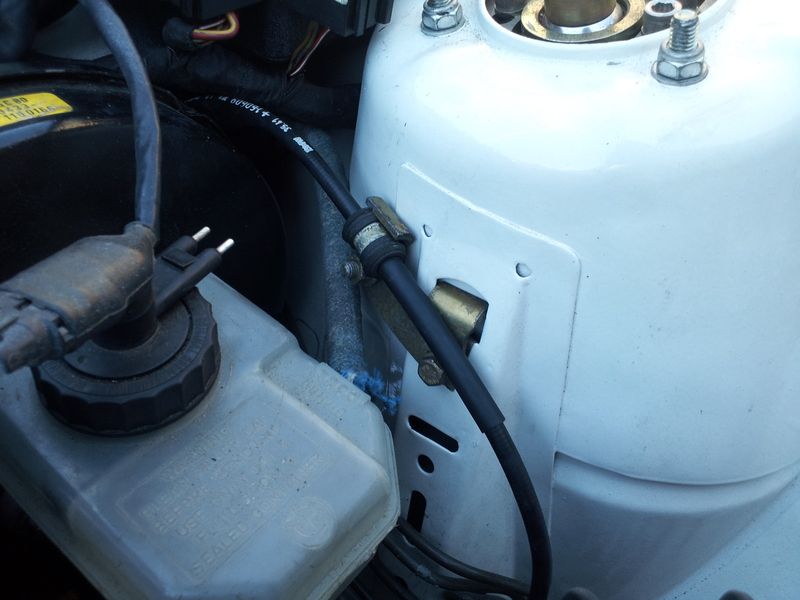
E34 M50 throttle cable will be needed
Part Number: 35 41 1 160 609
Tip: if relocating brake booster for clearance, install the throttle cable before the brake booster. It was a little tough to put the cable in after the booster; I got it eventually though.
I was able to use my 318is throttle cable mount to better stabilize the cable
16. Cooling fan:
Since the M52/S52 are longer than the m20 and m42 there is less room for a mechanical fan in front of the engine. A popular route is to wire up an electrical puller fan in front of the engine or a pusher in front of the radiator.
I'm not going to reinvent the wheel, so here is a link to Dave's Electric fan write up:
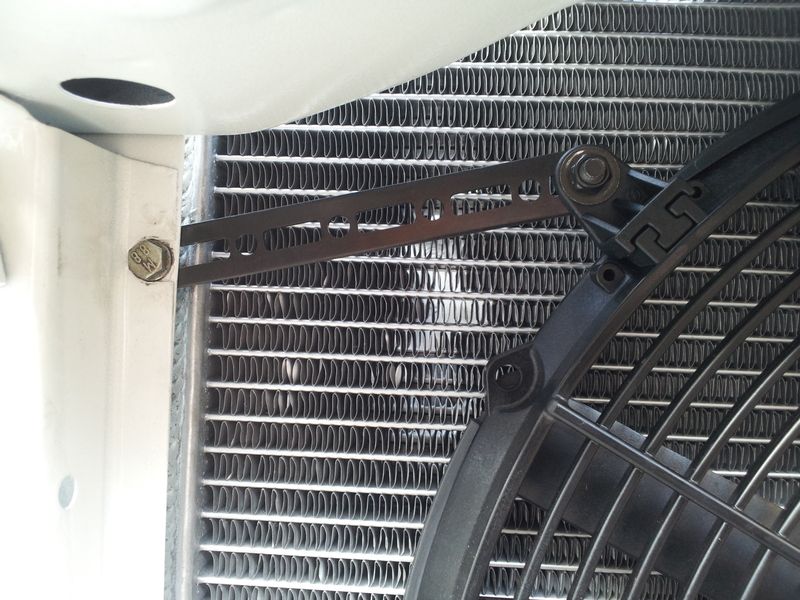
I personally chose a SPAL 16" pusher slim fan, these are very affordable and quality products.
Mounting was easy. YOU DON'T NEED TO BUY EXPENSIVE AFTERMARKET SPAL FAN BRACKETS. Just buy the brackets that SPAL sells and their gasket (Part numbers below)
SPAL part numbers:
Fan: 30100401
16" Gasket: 30130074
Mounting Brackets: 30130011
Here is how it looks:
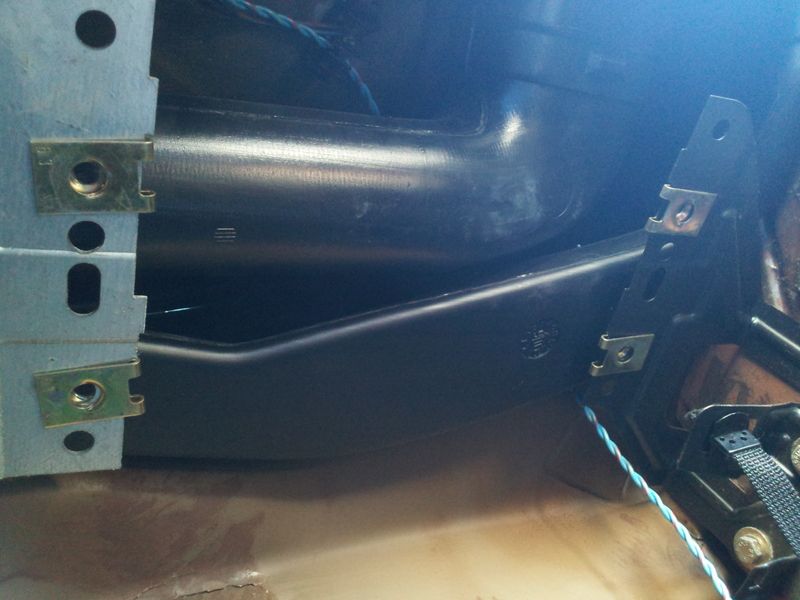
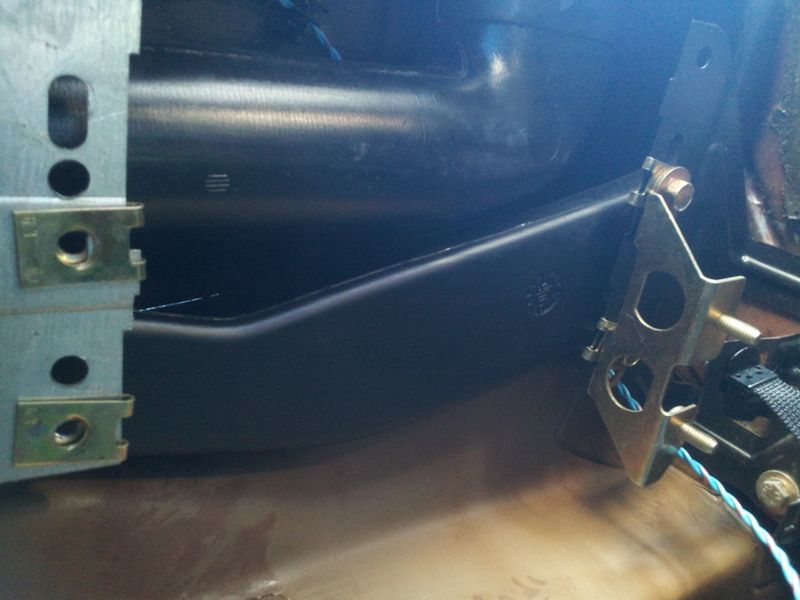
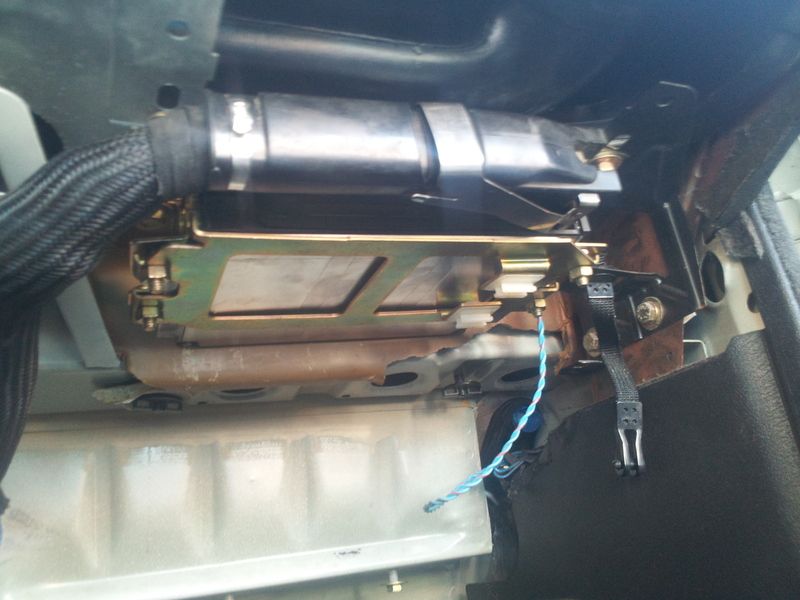
17. ECU Mounting:
To mount your ECU you will want to get the ECU mount brackets from a E30 318is (maybe any 318 model? confirm?)
I had to move my brackets (Have a 318is, so the brackets came in the car) all the way back to allow the ECU to be plugged in without being ridiculously tight.
Where the brackets originally mount:
Moved back to the last holes possible that are closest to firewall:
Final product:
Reverse Lights:
Reverse lights are quite simple. Find any two prong e36 plug that matches the e36 switch on the trans and splice it in to the factory e30 wiring under the shift boot.
Tips for dropping an M52/S52 in:
1. It's easiest to drop the engine and trans in together, opposed to dropping the engine in and then bolting the trans up.
2. Drop the engine in without the intake manifold on, you can put this on later.
3. Get yourself a load leveler, to angle the trans down and the engine up and then to level it in the car
I bought this cheap load leveler and it worked great: http://www.harborfreight.com/3-4-qua...ler-67441.html
Make the chain that attaches to the front engine lift point short and the one that mounts to the rear engine lift point as long as you can. This will allow you to get the engine angled as much as possible.
Here is a picture of how I had the leveler set up for reference:
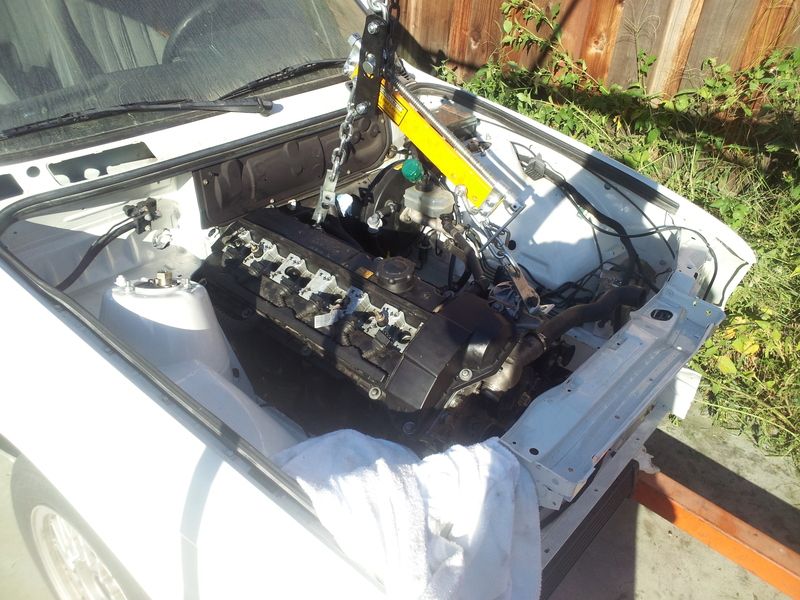
4. You'll want AT LEAST 1 other person helping you, 2+ helpers would be more ideal
5. I bolted the mounts up to the subframe first and then tried to get the engine onto the top studs of the engine mount, this worked great.
6. Put something on the front support of your car to help protect it if the engine hits it, do the same for other areas you don't want to get scratched
7. Use a jack on the transmission to help level the engine.
ENJOY!!!
Let me know if anything big is missing and I can try to add it.
Here is my build thread: http://www.r3vlimited.com/board/showthread.php?t=234207
I'm going to be editing and adding to this along the way.
Thread comparing OBD1 vs OBD2: http://www.r3vlimited.com/board/showthread.php?t=230879
1. Wiring Harness:
You'll want the wiring harness for the engine you have, try to get it with your engine when you buy it.
Send off wiring harness to be modified or do it yourself. I can't help you with the DIY as I sent mine off the Dave @ Markert motorwerks (see link)
Link: http://www.markertmotorworks.com/#!p...ess-conversion
2. ECU:
You'll want the ECU for your engine, also try to get this when buying your engine.
Send off ECU to get tuned. You have several options but the cheapest and best place to do this I found was DesertBMW here on the forums (see link)
This tune will do several things
It will delete the following: rear 02, SAP, EWS, fuel tank sensor, muffler flap valve
Picture of ECU returned from DesertBMW

Now you can retain some of these things if you have the parts and want to work a little harder, it is easiest to just toss them IMO.
Link: http://www.r3vlimited.com/board/member.php?u=35673
Price: This tune cost me $280 from DesertBMW (prices subject to change depending on the person providing the service and perticular situation)
Other options for tuning companies
TRM tuning: http://www.racersmarket.net/index.ph...hk=1&Itemid=93
MarkertMotorworks: http://www.markertmotorworks.com/#!bmw-ecu-tuning/cd6w
3. SAP Delete:
Since you have deleted your SAP you can toss it. The cheapest way to do this is cut the pipes off right at the flanges and fill the flanges up with some welding. (see picures)
The two flanges welded and painted:

Bolted up on the exhaust manifolds

You can also buy these plates from several manufacturers now, I believe.
Links:
4. Fueling:
OBD2 cars (atleast the s52 cars, you'll have to double check for m52's) use a remote FPR and running loss valve that is mounted to the Frame rail. You can keep this or use a m50 OBD1 Fuel rail and FPR along with the M50 intake manifold (for a little power gain. Info about this everywhere, see step 5 also).
Only mod needed is a bend of the tabs on the m50 fuel rail that block the s52 harness from plugging into the injectors. Bending these tabs will no longer allow you to run a fuel rail beauty cover, if you want this cover you have to get a early OBD-II fuel rail from either an E36 328 or an E39 528. It has the FPR on the rail and the mounting brackets do not interfere with harness or the cover. You will need the tabs for the fuel rail cover that come in an M50 manifold conversion kit. (Credit for this info goes to Dave@Markert and Gooch)
Here is my engine bay with the m50 manifold and fuel rail:

5. M50 OBD1 Intake manifold & other intake components:
Not required but popular because of the power gains. I ran the m50 fuel rail and used the M50 manifold conversion kit from M50manifold.com. If you go this route you won't need the brackets for the s52 fuel rail and you won't need to modify stuff for the SAP valve
M50 Manifold kit picured below:

Links to several M50 manifold swap kits:
M50manifold: http://m50manifold.com//index.php?op...d=23&Itemid=40
Turner Motorsport: http://www.turnermotorsport.com/p-19...an-m52s52.aspx
KO Performance: http://www.koperformance.com/BMW/eng...kit_e36_m3.htm
If you delete SAP and the OBD2 FPR like I did you don't have to worry about routing vacuum lines to these things. You will need a vacuum cap for the nipple on the main vacuum source connector that inserts into the manifold.
Intake boot and IAT sensor:
You'll want the long OBD1 intake boot with 2 holes in the bottom. One for the ICV hose and the other to either plug or mount your OBD2 IAT sensor in.
I chose to mount my IAT sensor in the boot, since this is more ideal than rethreading it to mount it in the original OBD1 IAT spot on the intake manifold.
To mount the IAT sensor in the hole you'll want to shave off some of the plastic to make it more round like pictured below.
Before:

After:

OBD1 intake boot part number: 13541738757
6. Dipstick modification:
If you are keeping the CCV you will want to modify the e34 m50 dipstick to have the CCV drain into it. To do this, simply cut the pipe off your M52/S52 dipstick and drill a hole in the e34 m50 dipstick and weld the pipe on.
Before welding:

Welded on:


7. Coolant Lines:
If you are running the late model 325 cooling system you should be able to use all S52/M52 coolant lines (I was and I'm running an e36 mishimoto radiator with late model m20 expansion tank. UPDATE: Do not use e36 Mishimoto radiators. They are crap. I went through two over a 4 year period, both ended up leaking in the same way. They leak at the rows on both sides due to poor engineering. I went with the Z3M radiator which is a much better alternative.). I used the long e36 S52 hose that came off the metal pipe and cut it for my heater core and expansion tank line. There is quite a bit of info on this around the forum.
Lines used:
Top Radiator: e36 S52 hose (no trimming needed)

Bottom Radiator: cut long e36 s52 hose (This method actually ended up cracking due to the kink in it. It worked for several years and may work with a different radiator option.)
BETTER OPTION: Get part number "NBH 8484" from NAPA auto parts and cut to length. I have read this can be used for the top hose as well, although I have not tested this. Link to hose: https://www.napaonline.com/napa/en/s...se&referer=PLP

Expansion tank to metal pipe: cut piece of long S52 hose

Back of head to BOTTOM heater core and Back of metal pipe to TOP heater core (don't mix this up! courtesy of Dave@Markert http://www.r3vlimited.com/board/show...ghlight=heater)

Throttle body lines: You can keep or delete these lines. I chose to delete them since it makes it more simple and isn't necessary unless you live in VERY VERY cold climates
If you go the delete route like me you'll want to close up the line on the pipe for the throttle body coolant line. I welded mine like this

The line that comes from the head will be taken care of below in the Coolant temp sensor step.
8. Coolant Temp Sensor:
You will need to use an e30 brown top coolant temp sensor for the cluster reading. This will replace the pipe that screws into the head for the throttle body coolant line. You have three options here
Option 1 (what I did): Use a die and change the pitch of the threads to match the s52 head threads. The pitch was m12x1.5 (could be wrong, double check)
Tutorial: Have to search for it later, hard to find.

Option 2 (more risky IMO): Tap the head to match the sensor threads.
Option 3 (expensive, but easy if you don't have the tools: Buy a already rethreaded brown top coolant sensor from Markert motorwerks. http://www.markertmotorworks.com/MMWProducts.html
Basic Swap steps
9. Transmission:
Option 1: ZF transmission: Bolts right in. You can use the 318is/325 transmission brace they are the same. It will bolt right up with the proper mounts of your choice
Tons of info about this online.
Shift linkage: Use shift linkage from e36 M3 or 328i
Option 2: G260 from an m20 car: You will need a different transmission brace, either make your own or buy one.
White325is sells them here: http://www.r3vlimited.com/board/show...ght=white325is
Shift linkage: Selector rod will need to be modified to have a 10deg. twist because the g260 will be at an angle, this can be achieved by physically twisting it or cutting the selector rod and re-welding.
You can also buy one of these
UUC's DSSR version: http://store.uucmotorwerks.com/share...t=products.asp
10. Differential:
You can use any diff you'd like that bolts up to an e30, but it is recommended you use a medium case diff for more durabilty, preferably a 3.25lsd for a S52 car. With an m52 you could probably get away with any medium case lower than a 4.10.
Also tons of info about this online
11. Driveshaft:
Option 1:1986-1987 325e driveshaft with the large front flange
Option 2:1996-99 M3 or 328i driveshaft with the 4 bolt rear flange to bolt right up to the e30 diff.
Option 3:Revshift adapter guibo. This allows you to run your stock driveshaft.
Link: https://www.revshift.com/shop/24v-sw...-flex-disc.php
12. Brake booster:
Tons of info online
Option 1 (best option IMO because of retained brake pedal feel): Relocate stock brake booster: DIY (Thanks to hwy84): http://www.r3vlimited.com/board/showthread.php?t=250474
Option 2: E30 325ix booster: I believe it bolts right up. (More research will be done)
Option 3: E21 320i booster: The shaft for the clevis will need to be shortened and rethreaded (right?)
You can also buy an already modified one from Zionsville: http://www.zionsvilleautosport.com/s...code/POMBB.htm
Option 4: Porsche 944 booster: You need to shorten and thread the 944 booster input rod, but it is the same thread diameter and pitch as the E30 clevis.
13. Engine Mounting:
You will need e36 aluminum mount arms. Try to get these with your engine when you purchase it
You have a few options for engine mounts
Option 1: E28 535i or M5 engine mounts
Option 2: Aftermarket 24v mounts from vender of your choice.
Condor speed shop mounts (aggressive UHMW): http://www.condorspeedshop.com/collections/all
AKG Motorsport: http://www.akgmotorsport.com/catalog...0%2FM50%20Swap
14. Oil Pan:
Because the S52 and M52 come with a rear sump pan you will need front sump pan to be able to clear the E30 subframe
What you need
1. E34 M50 oil pan
2. E34 M50 oil pickup tube
3. E34 M50 dipstick tube and dipstick (see modification above for CCV)
4. E34 M50 oil level sensor
The swap to the E34 pan takes little modification, Here is the process
1. Remove original pan, pickup, and windage tray


2. Cut bracket for s52 oil pickup tube. Important: Do this with the engine vertical on a stand to avoild metal pieces getting into the engine or simply bend the bracket off with large pliers.

3. Install E34 M50 pickup tube with new gasket

Optional (but highly recommended) while you're in there step:
Securing the oil pump nut. M50 based engines have an issue where the oil pump nut likes to back off, this is quite rare, but why not spend a little money and get some piece of mind.
My choice: Safety wire and red loctite. Some like to tack weld the nut to the shaft

Link to oil pump nut with hole for safety wire:
4. Install new oil pan gasket and oil pan. Apply silicone to the cracks where the block and front timing case meet and also in the rear where the block and the rear main seal cover meet

15. Throttle Cable:
E34 M50 throttle cable will be needed
Part Number: 35 41 1 160 609
Tip: if relocating brake booster for clearance, install the throttle cable before the brake booster. It was a little tough to put the cable in after the booster; I got it eventually though.
I was able to use my 318is throttle cable mount to better stabilize the cable

16. Cooling fan:
Since the M52/S52 are longer than the m20 and m42 there is less room for a mechanical fan in front of the engine. A popular route is to wire up an electrical puller fan in front of the engine or a pusher in front of the radiator.
I'm not going to reinvent the wheel, so here is a link to Dave's Electric fan write up:
I personally chose a SPAL 16" pusher slim fan, these are very affordable and quality products.
Mounting was easy. YOU DON'T NEED TO BUY EXPENSIVE AFTERMARKET SPAL FAN BRACKETS. Just buy the brackets that SPAL sells and their gasket (Part numbers below)
SPAL part numbers:
Fan: 30100401
16" Gasket: 30130074
Mounting Brackets: 30130011
Here is how it looks:

17. ECU Mounting:
To mount your ECU you will want to get the ECU mount brackets from a E30 318is (maybe any 318 model? confirm?)
I had to move my brackets (Have a 318is, so the brackets came in the car) all the way back to allow the ECU to be plugged in without being ridiculously tight.
Where the brackets originally mount:

Moved back to the last holes possible that are closest to firewall:

Final product:

Reverse Lights:
Reverse lights are quite simple. Find any two prong e36 plug that matches the e36 switch on the trans and splice it in to the factory e30 wiring under the shift boot.
Tips for dropping an M52/S52 in:
1. It's easiest to drop the engine and trans in together, opposed to dropping the engine in and then bolting the trans up.
2. Drop the engine in without the intake manifold on, you can put this on later.
3. Get yourself a load leveler, to angle the trans down and the engine up and then to level it in the car
I bought this cheap load leveler and it worked great: http://www.harborfreight.com/3-4-qua...ler-67441.html
Make the chain that attaches to the front engine lift point short and the one that mounts to the rear engine lift point as long as you can. This will allow you to get the engine angled as much as possible.
Here is a picture of how I had the leveler set up for reference:

4. You'll want AT LEAST 1 other person helping you, 2+ helpers would be more ideal
5. I bolted the mounts up to the subframe first and then tried to get the engine onto the top studs of the engine mount, this worked great.
6. Put something on the front support of your car to help protect it if the engine hits it, do the same for other areas you don't want to get scratched
7. Use a jack on the transmission to help level the engine.
ENJOY!!!
Let me know if anything big is missing and I can try to add it.






Comment