

Sorry in advance for the long winded post, as some of this is redundant. Thanks to those brave trail blazers who suggested this was possible, for part numbers, etc. Much appreciated. The purpose of my post is to sort of bring it all together in one place. There’s no such thing as too much e30 content for the iX.
I’ve had my iX for about a year. It was in various states of neglect when I bought it, most of which have been taken care of. Except, that was, for front driveshaft and transfer case fluid inspection. Frankly, it’s shameful I waited a year to do this, but wife, kids, blah blah. The driveshaft and transfer case fluid were concerns of mine based on the lack of maintenance elsewhere. There were no outward indications of bad torque transfer to the front end, other than a cracked and worn flex disc. No funny noises, no fluid leaks from the transfer case or diff, axle shafts are good, etc. The AWD system seemed to be working great based simply on various road conditions I’ve driven. But I assumed the worst with regard to the driveshaft splines and opted for the fatter guibo modification, sight unseen.
PARTS
(1) 26111225624 Flex disc for driveshaft
(1) 26201227191 Centering flange (X5)
(1) 26201225981 Ring cover
(3) 26111204215 Hex bolt M10X42
(3) 26111225054 Hex bolt M10X50
(3) 07129964672 Self locking hex nut M10
Front driveshaft removal, flex disc replacement, and transfer case fluid change -- as many of you probably know -- is one of the easiest maintenance items on the car. Swapping in the fatter rear flex disc, however, presents a small challenge. The entire process took me about three hours - some of that spent thinking about just how to proceed.
Original flex disc before removal

Driveshaft removed. Original lubricant dried to a fine red powder, or rust? I’m not sure.

Driveshaft output at transfer case, complete with red powder. This stuff was like fungus spores. Very fine, almost like a mist when the driveshaft was pulled out.

Original flex disc. Note the cracking and wear. Not good.

Some blaster and a wire brush cleaned the splines right up. Fortunately the splines were in good shape. I cleaned the insert at the transfer case as well.

Profile of new rear flex disc (left) compared to original. We’re looking at ~10mm added thickness.

Side by side – original up top, new below.

Centering pins – original up top, new below.

New centering pin on driveshaft with ring cover slipped on. That’s the new flex disc and the 50mm bolts. Gorgeous, huh?

This is where things get tricky. Before I lubed up the splines and got messy, I decided to fit the driveshaft with new components to test fit. As others before me have pointed out, there is a flange on the back of the bell housing for a torx bolt that definitely gets in the way of the bolt heads that secure the guibo to the centering pin/driveshaft (the 50mm bolts.) In my estimation it was 1/8” of clearance trouble, as I point to.

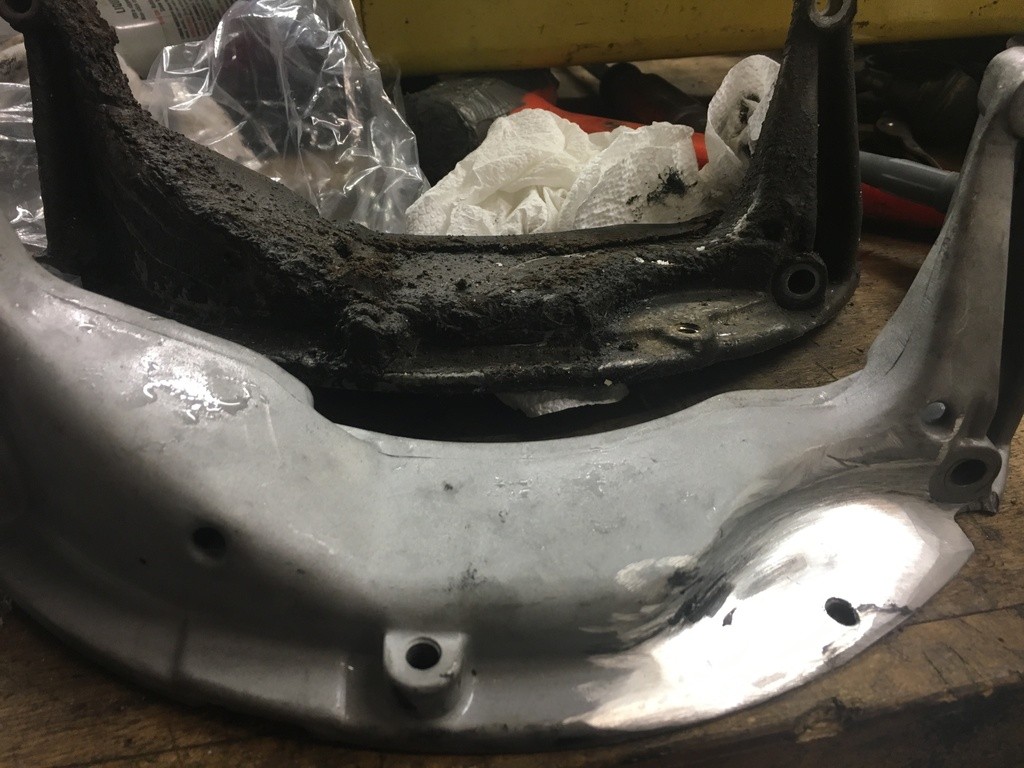
There are really only two options here – 1) grind the flange back, or 2) grind the bolt heads. I opted for #2 for a couple of reasons. One was out of necessity. I only had a 4” grinder and I couldn’t quite fit it where I needed to with the differential in the way (pictured below.) This is removable, but I didn’t want to fuck with it. Two, I just really didn’t want to be grinding on my oil pan. Period. Personal preference.

Bolt heads ground down approx 1/8”. Untouched bolt at right for comparison. You will want to test after grinding to ensure proper clearance. I was in and out from under my car a few times until I got it right. Also, I’ve read that differences in bolt head thickness may cause an imbalance in the front drive train, but I haven’t noticed any wobble or noise (more on that later.) I don’t believe everything I read, but sometimes it plants a seed of doubt.

Don’t forget to lubricate yourself during this process.

Time to put things back together. First I lubed up the splines, both on the driveshaft and in the output area at transfer case, with some Molykote BR-2 Plus. Here is a link to purchase that stuff.


New flex disc installed. Note the red arrow pointing to the flange at the rear of bell housing (lower right frame.) I have maybe 1mm of clearance between the bolt heads and this flange after grinding. The tolerance in this area is very slim. Also, you can see the original flex disc in the top of the frame that I’m holding up for comparison. And now that I’m thinking about it looking at this picture, did I install the flex disc backwards, or is there no particular front/back? Easy-ish enough to fix, but still…shit. Can anyone advise me here? I see an arrow there on the left side of the disc toward the bottom…is that meaningful?

I’ve got about ~75 miles (freeway and side road) on the new flex disc with no issues to report. If anything, I think I notice a little more snap to my acceleration, but that could be a placebo affect of knowing I have new parts. There is no vibration, wobble, or other feeling of imbalance, and no sound – which suggests I got the bolt clearance right. It feels pretty tight. In the end, this was an unnecessary modification for my car since the driveshaft splines were still in good shape. All I really needed was a replacement for the original guibo and some lube. The cost of the new centering pin and rear guibo was about as much as the OEM front guibo would have cost, so expense was a wash.
While I was under the car I also changed my transfer case fluid. It was pretty dark and the magnet on the drain plug was…crowded. Somebody before me thought the drain plug was an axle collar nut and torqued the thing to a thousand foot pounds. So I broke a few knuckles getting it off and rounded one of the bolt corners. I’m going to get a new drain plug (I hate loose ends) and when I replace it I’ll flip that flex disc if it is indeed backwards. Otherwise, it was a good afternoon of wrenching with music and a few cold beers. Thanks for reading and I hope this helps someone down the road.
I’ve had my iX for about a year. It was in various states of neglect when I bought it, most of which have been taken care of. Except, that was, for front driveshaft and transfer case fluid inspection. Frankly, it’s shameful I waited a year to do this, but wife, kids, blah blah. The driveshaft and transfer case fluid were concerns of mine based on the lack of maintenance elsewhere. There were no outward indications of bad torque transfer to the front end, other than a cracked and worn flex disc. No funny noises, no fluid leaks from the transfer case or diff, axle shafts are good, etc. The AWD system seemed to be working great based simply on various road conditions I’ve driven. But I assumed the worst with regard to the driveshaft splines and opted for the fatter guibo modification, sight unseen.
PARTS
(1) 26111225624 Flex disc for driveshaft
(1) 26201227191 Centering flange (X5)
(1) 26201225981 Ring cover
(3) 26111204215 Hex bolt M10X42
(3) 26111225054 Hex bolt M10X50
(3) 07129964672 Self locking hex nut M10
Front driveshaft removal, flex disc replacement, and transfer case fluid change -- as many of you probably know -- is one of the easiest maintenance items on the car. Swapping in the fatter rear flex disc, however, presents a small challenge. The entire process took me about three hours - some of that spent thinking about just how to proceed.
Original flex disc before removal
Driveshaft removed. Original lubricant dried to a fine red powder, or rust? I’m not sure.
Driveshaft output at transfer case, complete with red powder. This stuff was like fungus spores. Very fine, almost like a mist when the driveshaft was pulled out.
Original flex disc. Note the cracking and wear. Not good.
Some blaster and a wire brush cleaned the splines right up. Fortunately the splines were in good shape. I cleaned the insert at the transfer case as well.
Profile of new rear flex disc (left) compared to original. We’re looking at ~10mm added thickness.
Side by side – original up top, new below.
Centering pins – original up top, new below.
New centering pin on driveshaft with ring cover slipped on. That’s the new flex disc and the 50mm bolts. Gorgeous, huh?
This is where things get tricky. Before I lubed up the splines and got messy, I decided to fit the driveshaft with new components to test fit. As others before me have pointed out, there is a flange on the back of the bell housing for a torx bolt that definitely gets in the way of the bolt heads that secure the guibo to the centering pin/driveshaft (the 50mm bolts.) In my estimation it was 1/8” of clearance trouble, as I point to.
There are really only two options here – 1) grind the flange back, or 2) grind the bolt heads. I opted for #2 for a couple of reasons. One was out of necessity. I only had a 4” grinder and I couldn’t quite fit it where I needed to with the differential in the way (pictured below.) This is removable, but I didn’t want to fuck with it. Two, I just really didn’t want to be grinding on my oil pan. Period. Personal preference.
Bolt heads ground down approx 1/8”. Untouched bolt at right for comparison. You will want to test after grinding to ensure proper clearance. I was in and out from under my car a few times until I got it right. Also, I’ve read that differences in bolt head thickness may cause an imbalance in the front drive train, but I haven’t noticed any wobble or noise (more on that later.) I don’t believe everything I read, but sometimes it plants a seed of doubt.
Don’t forget to lubricate yourself during this process.
Time to put things back together. First I lubed up the splines, both on the driveshaft and in the output area at transfer case, with some Molykote BR-2 Plus. Here is a link to purchase that stuff.
New flex disc installed. Note the red arrow pointing to the flange at the rear of bell housing (lower right frame.) I have maybe 1mm of clearance between the bolt heads and this flange after grinding. The tolerance in this area is very slim. Also, you can see the original flex disc in the top of the frame that I’m holding up for comparison. And now that I’m thinking about it looking at this picture, did I install the flex disc backwards, or is there no particular front/back? Easy-ish enough to fix, but still…shit. Can anyone advise me here? I see an arrow there on the left side of the disc toward the bottom…is that meaningful?
I’ve got about ~75 miles (freeway and side road) on the new flex disc with no issues to report. If anything, I think I notice a little more snap to my acceleration, but that could be a placebo affect of knowing I have new parts. There is no vibration, wobble, or other feeling of imbalance, and no sound – which suggests I got the bolt clearance right. It feels pretty tight. In the end, this was an unnecessary modification for my car since the driveshaft splines were still in good shape. All I really needed was a replacement for the original guibo and some lube. The cost of the new centering pin and rear guibo was about as much as the OEM front guibo would have cost, so expense was a wash.
While I was under the car I also changed my transfer case fluid. It was pretty dark and the magnet on the drain plug was…crowded. Somebody before me thought the drain plug was an axle collar nut and torqued the thing to a thousand foot pounds. So I broke a few knuckles getting it off and rounded one of the bolt corners. I’m going to get a new drain plug (I hate loose ends) and when I replace it I’ll flip that flex disc if it is indeed backwards. Otherwise, it was a good afternoon of wrenching with music and a few cold beers. Thanks for reading and I hope this helps someone down the road.


Comment