Plastic bumper tuck

Collapse
X
 
  • Time
  • Show
Clear All
new posts
  • xLibelle
    R3VLimited
    • Aug 2004
    • 2673

    #1

    Plastic bumper tuck

    If a person chooses to change something of the norm, does that mean he/she disapproves or is bored with it? ...enough with the rhetorical q's

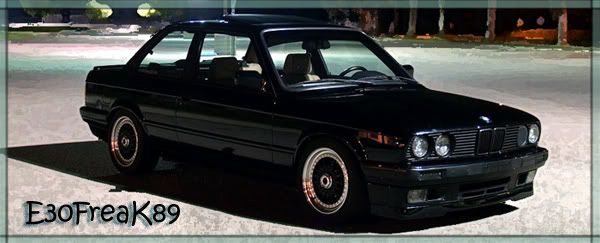
    This was brought up here but i've had this in my sights for a couple years now since i had body damage twice in a row. Now that its going into the shop to get its "bubble-car" paint and refurb, i thought it time for an advanced look. Something not many would notice but just enough to be "cooler" than the next car.


    The animated gif was bothering me so i put a stop to it. You can see the change. not much but if youve mocked it up in person and taken a walk around the car, its kinda cool looking. Like a blunt nose or shovel face. It should take the design back a few years to 2002'esk. Also, the 89+ valence is nice. i think this tuck would also help accentuate it more by making it a little more visible.

    Yes, its a little bit in depth of a procedure, something only the most idiotic would take time out to do. How do you do it? Shorten bumper mount shock lenth for one. The other part is cut the amount you shortened the shocks out of each side of the bumper. ok, easy enough...

    if only it were this much we remove, it would be easy. But we want more gone so we have to basically do what jordan does to the side molding, but with all 8 lengths!!! fuck

    What about the shocks? none of this j&**# rigging bullshit. just kidding. it works and its easier than the method i choose. but then i didnt want to destroy my shocks since i am bringing both sets of bumpers to the paint shop so i can switch everything back to OEM if i dont like it ... or everyone else starts doing this mod. :roll: AND, its a slight weight reduction. With the shocks though, once you get them to the right spot, weld them to that length.

    I started off with some calculations to find out where BMW was coming from and what sort of round numbers they used. scribble
    Having eye-balled some stuff, i thought 1 inch would be perfect but in the process of constructing the components, i realized that we will have to settle with 2cm of a tuck for the front.
    ....ok, is it worth it anymore? i have no idea. starting to feel dumb. just about the same as i feel every time i want to change something BMW did and realize why they did things the way they did...
    you can see on the RD valance how they addressed this mount bolt issue.

    oh wow, didnt realize i typed this much.
  • PiercedE30
    R3V Elite
    • Apr 2005
    • 4220

    #2
    What about doing some metal removal around the shock mounting point (the part that sticks out) and then see if it would be possible to put a hole in the top of the edge of the valence (edge next to the mounting bolt). That would make it where you couldn't see the hole in the valence since the bumper would hide it.
    My 2.9L Build!

    Originally posted by Ernest Hemingway
    There are only three sports: bullfighting, motor racing, and mountaineering; all the rest are merely games.

    Comment

    • xLibelle
      R3VLimited
      • Aug 2004
      • 2673

      #3
      i thought about it.
      if i pushed it back 3 cm instead for the 1 inch originally intended, that would put the bolt insertion striaght through the middle of the rolled edge of the valance. at that point, the amount of material needed to provide for proper room for the bolt would not go unnoticed.
      also, the metal bracket thats bolted to the fiber bumper core has an awkward amount of protuding material to which a lot would need to be cut out of the metal framework, like you were suggesting.
      If i brought the vertical cylinder for mounting the bumper all the way against the mount plate on the car would bring us to the problem as mentioned above, but more importantly tuck the bumper more than what i think most would agree to as too much. It would look weird if the side bumper thickness were more than the main, front part.

      i have toyed with other ideas like drilling holes for accessing the mount points from the front of the bumper...... hmm...... the only problem with this would be that everytime you wanted to remove the bumper, youd have to break the black molding each time....

      Comment

      • xLibelle
        R3VLimited
        • Aug 2004
        • 2673

        #4
        So here are my mounting brackets... ignore the shotty welding. this thing is as old as me.


        Comment

        • VAPORBLADE
          E30 Mastermind
          • Sep 2006
          • 1771

          #5
          that is cool!
          '89 "is" = M technic II build mode.

          sigpic

          Comment

          • xLibelle
            R3VLimited
            • Aug 2004
            • 2673

            #6
            Next part is to trim the top inside on the bumper for the OEM looking cut.
            this bumper mount length tucks exactly 20.25mm so i take that off the core.
            start cutting... blurry picture
            let me stress, this fiber core is HARD as diamonds. i fucked up my router bit and flattened three jigsaw bits and broke out the sawzall with a metal cutter and it went through finally with minimal trouble.
            also, WEAR A MASK, WEAR A MASK, WEAR A MASK!!! ...well, one at a time. i saw the dust and immediately stopped, bought one of those 3M ones with replacable filters, good stuff.
            Here is how close it comes to the mounting hardware.

            Again, another half cm to full cm could still be removed but the valance is the main problem holding me back from going that much more. I have to push in the valance now even, to insert/remove the bolts.
            Here is a shot of the core mounted.

            Comment

            • xLibelle
              R3VLimited
              • Aug 2004
              • 2673

              #7
              Ok, tucking the fronts, making them look right will be the hard part because there isnt much room to remove material from. Here is the idea:
              Yellow is the reinforcement removal cut, blue is the material to be removed and orange is kinda where the structural "bandaids" will be welded.

              ACK!

              This is an important part that actually had me a little worried. If i screwed this up, it would be difficult to repair.
              Mark the removed amount, with templated corners.


              With my dremel in router-mode, it went nicely through the plastic. Just take your time and keep it pressed tight against the edge.
              Finished cut comparrison:


              Mounted view:

              and below

              Comment

              • SchnellerVert
                No R3VLimiter
                • Sep 2005
                • 3948

                #8
                Hope you don't city park. Looks good thou and has the profile of an early metal bumper car now.

                Comment

                • xLibelle
                  R3VLimited
                  • Aug 2004
                  • 2673

                  #9
                  Originally posted by SchnellerVert
                  Hope you don't city park.
                  i'm constantly contemplating not keeping this look just because of the loss of the shocks. but really, after this and the paintjob, i will be taking a lot more care about driving and parking than i usually do.

                  Comment

                  • Garageaholic
                    Freestyle Fabricator
                    • Dec 2005
                    • 5204

                    #10
                    Cool writeup! what ended up happening? any completed pictures?
                    Recent Rebranding!!
                    Visit Garageaholic for all of your E30 Swap Needs!
                    E30 SM62/S62
                    E30 M60 V8
                    E30 M30 Big 6!


                    Check out this E36 N54 Swap Build
                    Instagram.com/garageaholic
                    Youtube.com/garageaholic

                    Comment

                    • E30FreaK89
                      E30 Addict
                      • Apr 2006
                      • 437

                      #11
                      yah is there any current pictures of the out come of this project?

                      Comment

                      • Jean
                        Moderator
                        • Aug 2006
                        • 18228

                        #12
                        This is nuts ! But props!
                        Mtech1 v8 build thread - https://www.r3vlimited.com/board/sho...d.php?t=413205


                        OEM v8 manual chip or dme - https://www.r3vlimited.com/board/sho....php?p=4938827

                        Comment

                        • e30this
                          No R3VLimiter
                          • Dec 2007
                          • 3580

                          #13
                          This is going to be bad ass
                          I have been thinking of this for some time
                          cant wait to see the end result

                          Comment

                          Working...