
Go to your favorite search engine & look for WinISD. It is freeware. Download WinISD Pro (alpha) & install it. Please note that trying to exit the program normally in Win7 may toss an error & not let you quit. Just Crtl-Alt-Del & kill the process in the task manager if this happens.
Sections
1) Entering driver parameters, if needed
2) Important design performance parameters - more than bass extension
3) The pros & cons of sealed and ported boxes
4) Sealed design example
5) Ported design example
6) Summary
1) Entering parameters for drivers not already in the database
There are 2 ways to get the driver entry window. Click New Project & then hit the New button, or select Database Editing from the Utilities menu. Enter the driver manufacturer, brand & model. This is important & will make life easier when you need to load it into a design. Once you are done, switch to the Parameters tab. Here is what you will be looking at.
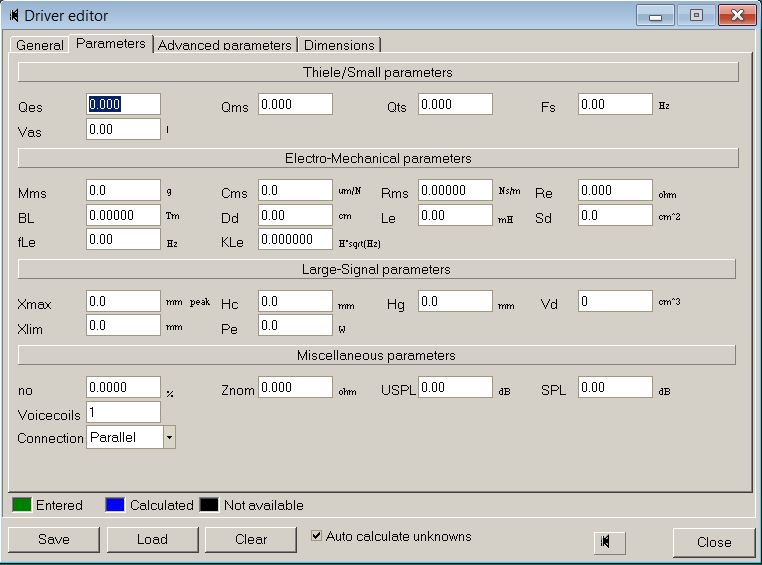
Do NOT manually enter everything. You only need to enter a few things & it auto-calculates the rest. Clicking the little text units next to boxes will cycle through them. I usually enter Qes, Qms, Fs & Vas. Check that Qts is close to the one in the data sheet. You only need to enter 2 of the 3 Qs and the 3rd will be calculated. Next, enter Mms & BL. Check that Cms & Re are close to the published values for the driver. Don’t worry too much about the other stuff for now, this is only a basic tutorial. Enter Xmax if published. Note that this is zero-to-peak excursion, so if a sheet specifies peak-peak excursion, enter half of that. Xmax really is sort of important, and if a driver doesn’t have this published, consider another one. Sometimes this parameter is called max linear excursion or something similar.
Some sheets have different names/symbols for parameters. Use your cleverness to try to figure out what is what, it isn’t that tough. When done, save it. If you get an error, you entered too many things. It won’t save if all the numbers don’t cross-calculate, so clear whatever you entered that should be auto-calculated.
2) Important Design Considerations
The main thing people use WinISD for seems to be to figure out what they need to do to get maximal bass extension. This is all well & good since that is the point of a sub in a system, but there is a lot more to it if you don’t want it to sound like a piece of garbage. There is a reason some setups are loud, but boomy & unclear. This usually happens in systems with ported boxes or “space-saver” sealed & ported ones. Damaging the drivers is also common, but can easily be avoided.
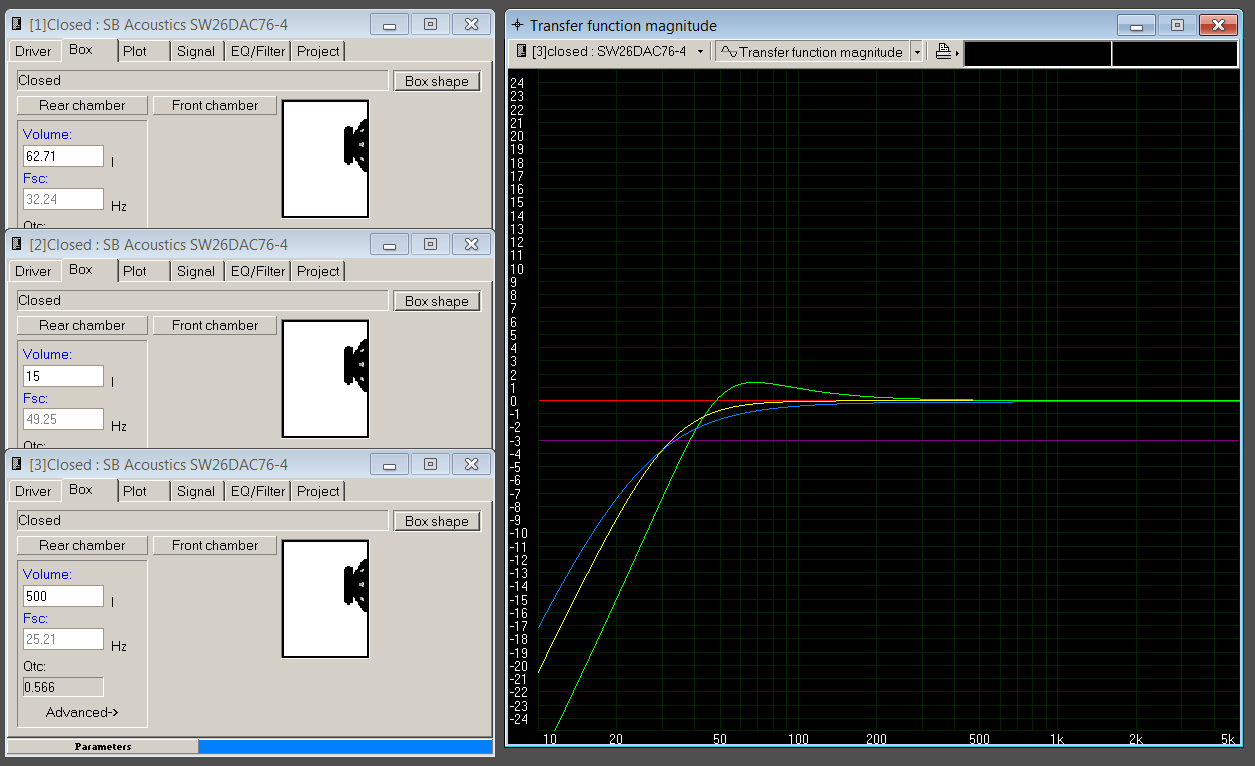
The drop down at the top of the plot window has all the parameters you will be watching during the process. We’ll start with the favorite parameter…transfer function. This shows a normalized plot of the driver’s relative response due to box properties. When working on a design, don’t let the response line bulge above 0dB by more than 1.5 or 2dB. More than that will lead to boominess. You adjust this in the Box tab of the individual project’s window. You can change the line color by clicking the colored box in the lower right of that design window.
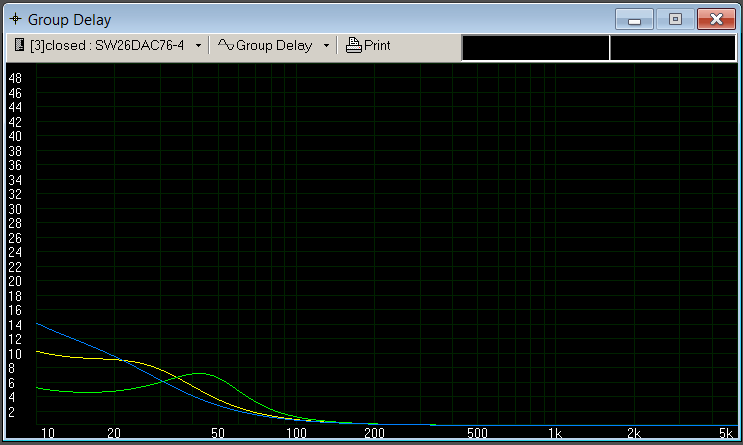
OK, so you have a response curve you like. Done! Nope, not by a long shot. First, plot the group delay. Lower is better (GD is basically how delayed the output of sound at a given frequency will be relative to other frequencies…try to keep it below 10ms in the range of frequencies above the -3dB point). This isn’t usually a huge concern in sealed boxes.
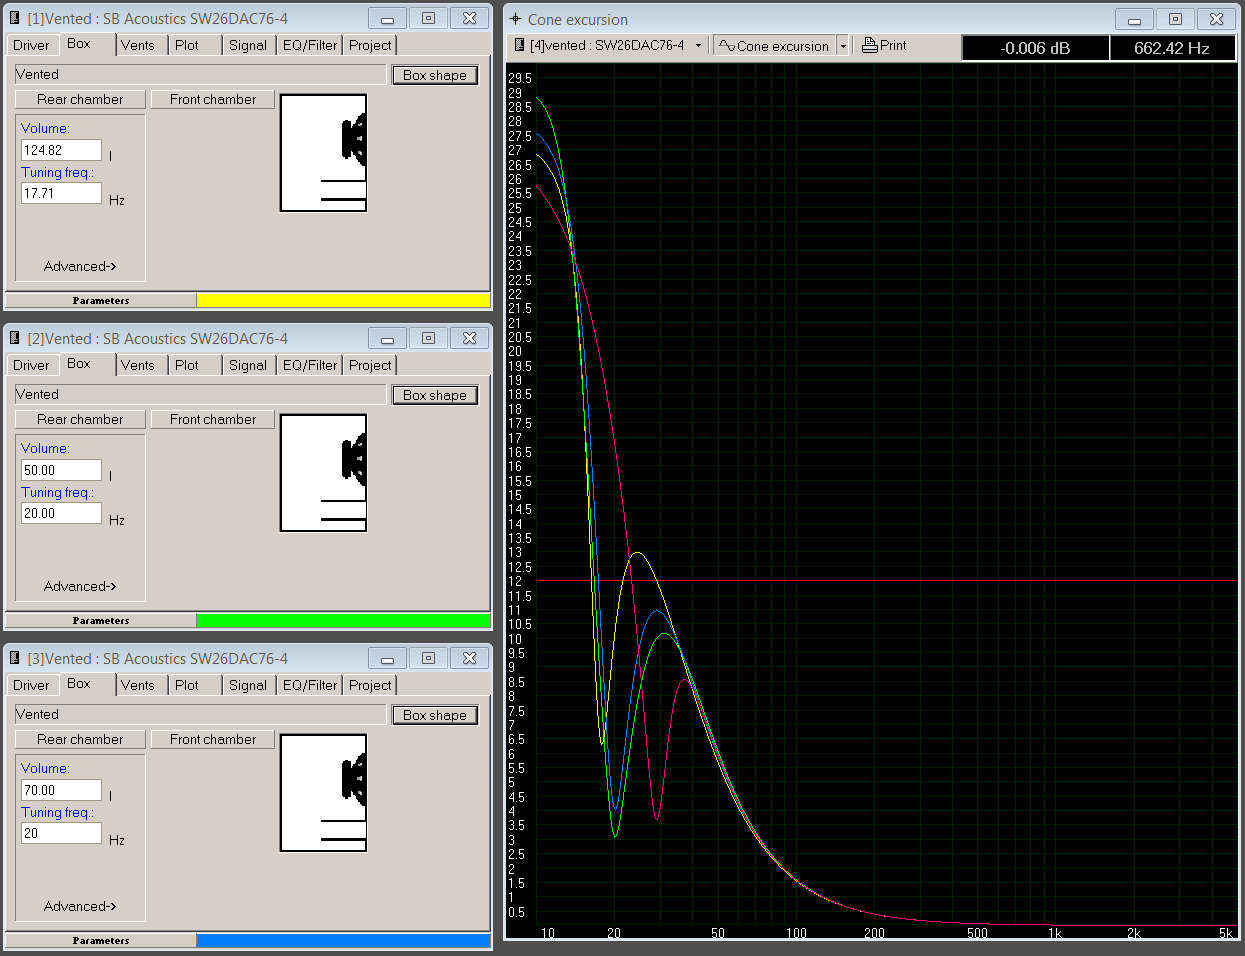
Next plot cone excursion. You’ll want to switch to the Signal tab in the design window & enter your expected peak power. Remember x-max? Well, you want to keep the excursion below this. Remember though that this assumes that all the peak power is going into one frequency to make the plot, and with real music this is basically never the case. I’d feel safe entering half the expected peak power (even that is probably very conservative). If you plan to run sine tones, then you probably already know this stuff & know how to avoid blowing up your driver. If you plan to run sine tones & don’t already know this, don’t run sine tones at any kind of medium or high power level (you’ll be sorry).
If desired, enter crossover info in the EQ/Filter tab in the design window. You can use this to help control excursion and…
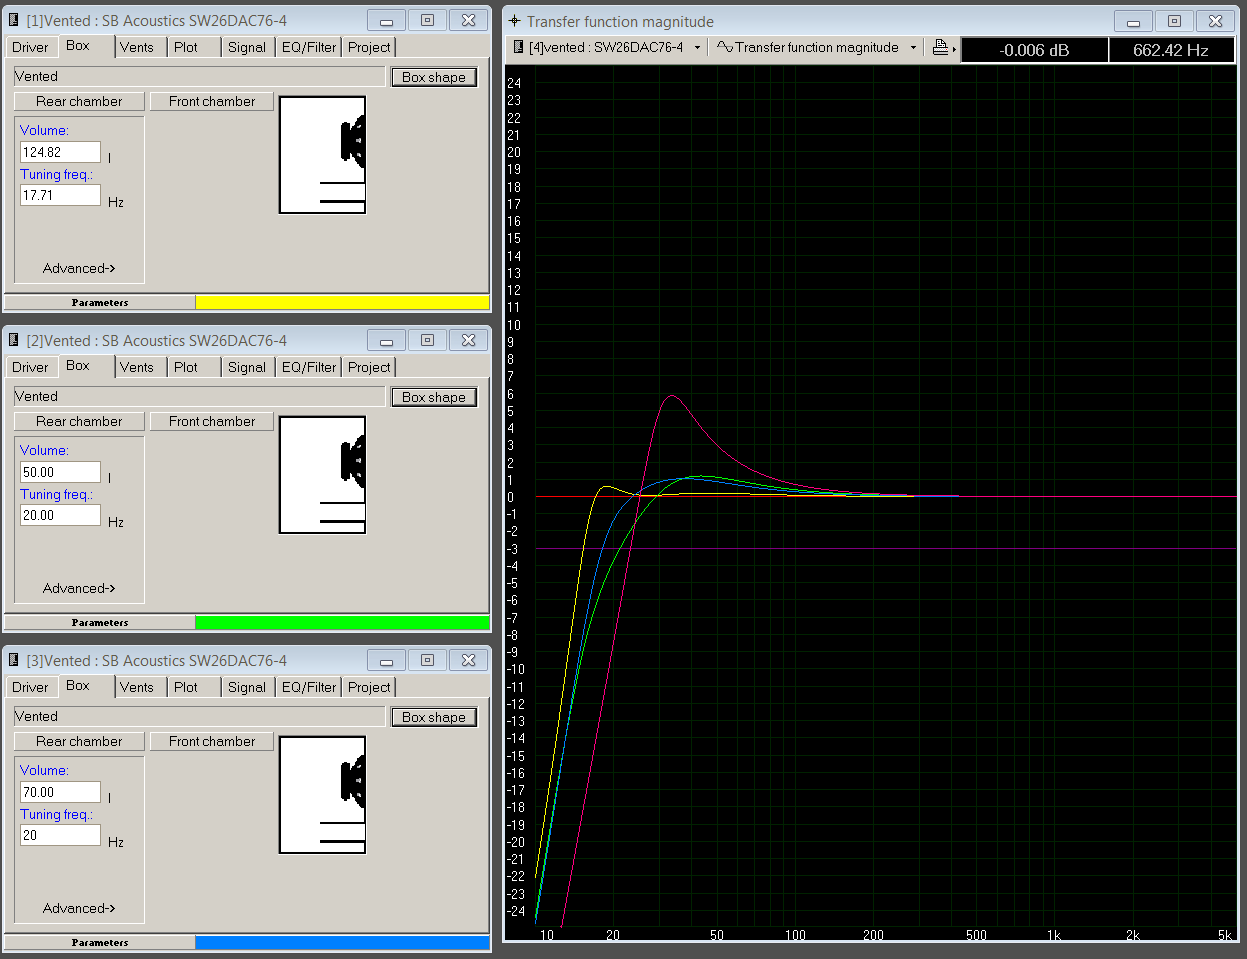
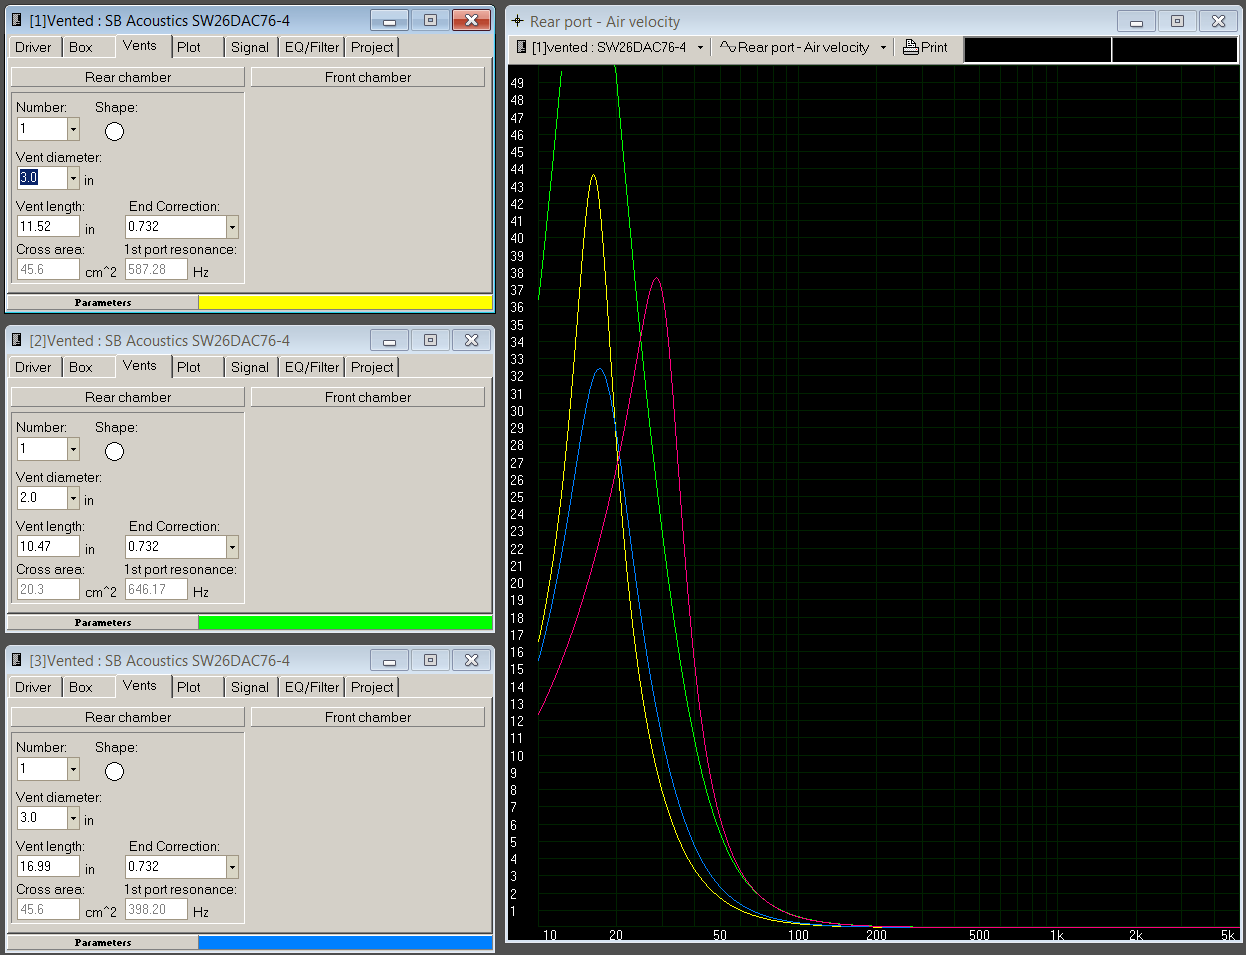
Rear-port air velocity is the final critical stop, only if you are doing a ported design. You will need to adjust box volume, box tuning frequency & the vent diameter/quantity to get this right. Keep the same power settings that you used in the excursion check. You want to keep the air velocity below 15m/s to avoid weird port whistles & whooshes. If you must, cap yourself at 20m/s, but really try to remain below 15m/s. I will have more on this in the subsequent sections.
3) Sealed versus Ported
There are a lot of myths & misconceptions out there, mainly about ported boxes (sometimes called bass-reflex enclosures). Many claim that ported boxes always sound boomy, unclear & all-around inferior. This is silly, and is only true in poor designs.
Sealed Boxes
Pros
- Excellent cone excursion control - drivers can safely handle more power & operate linearly / without damage
- Superior group delay - sealed boxes don’t suffer from terrible peaks in GD like ported ones
- Volume-efficient - A sealed box will give good bass extension with a lot less internal volume than a ported one with the same driver
- Easier to construct
Cons
- Bass extension is not as good as with a ported box for the same driver
Ported Boxes
Pros
- Superior bass extension with a given driver
Cons
- Inverse of sealed-box pros
Right now it is probably looking like ported boxes DO suck! Well, they aren’t for everyone. If you are space-constrained & 35-40Hz bass extension is good enough, then sealed is probably just fine. However, if you want to be able to hit REALLY low frequencies, ported is the way to go. If you take some extra time & can sacrifice a little more room, you will get that extra extension with minimal practical trade-offs.
Sections
1) Entering driver parameters, if needed
2) Important design performance parameters - more than bass extension
3) The pros & cons of sealed and ported boxes
4) Sealed design example
5) Ported design example
6) Summary
1) Entering parameters for drivers not already in the database
There are 2 ways to get the driver entry window. Click New Project & then hit the New button, or select Database Editing from the Utilities menu. Enter the driver manufacturer, brand & model. This is important & will make life easier when you need to load it into a design. Once you are done, switch to the Parameters tab. Here is what you will be looking at.
Do NOT manually enter everything. You only need to enter a few things & it auto-calculates the rest. Clicking the little text units next to boxes will cycle through them. I usually enter Qes, Qms, Fs & Vas. Check that Qts is close to the one in the data sheet. You only need to enter 2 of the 3 Qs and the 3rd will be calculated. Next, enter Mms & BL. Check that Cms & Re are close to the published values for the driver. Don’t worry too much about the other stuff for now, this is only a basic tutorial. Enter Xmax if published. Note that this is zero-to-peak excursion, so if a sheet specifies peak-peak excursion, enter half of that. Xmax really is sort of important, and if a driver doesn’t have this published, consider another one. Sometimes this parameter is called max linear excursion or something similar.
Some sheets have different names/symbols for parameters. Use your cleverness to try to figure out what is what, it isn’t that tough. When done, save it. If you get an error, you entered too many things. It won’t save if all the numbers don’t cross-calculate, so clear whatever you entered that should be auto-calculated.
2) Important Design Considerations
The main thing people use WinISD for seems to be to figure out what they need to do to get maximal bass extension. This is all well & good since that is the point of a sub in a system, but there is a lot more to it if you don’t want it to sound like a piece of garbage. There is a reason some setups are loud, but boomy & unclear. This usually happens in systems with ported boxes or “space-saver” sealed & ported ones. Damaging the drivers is also common, but can easily be avoided.
The drop down at the top of the plot window has all the parameters you will be watching during the process. We’ll start with the favorite parameter…transfer function. This shows a normalized plot of the driver’s relative response due to box properties. When working on a design, don’t let the response line bulge above 0dB by more than 1.5 or 2dB. More than that will lead to boominess. You adjust this in the Box tab of the individual project’s window. You can change the line color by clicking the colored box in the lower right of that design window.
OK, so you have a response curve you like. Done! Nope, not by a long shot. First, plot the group delay. Lower is better (GD is basically how delayed the output of sound at a given frequency will be relative to other frequencies…try to keep it below 10ms in the range of frequencies above the -3dB point). This isn’t usually a huge concern in sealed boxes.
Next plot cone excursion. You’ll want to switch to the Signal tab in the design window & enter your expected peak power. Remember x-max? Well, you want to keep the excursion below this. Remember though that this assumes that all the peak power is going into one frequency to make the plot, and with real music this is basically never the case. I’d feel safe entering half the expected peak power (even that is probably very conservative). If you plan to run sine tones, then you probably already know this stuff & know how to avoid blowing up your driver. If you plan to run sine tones & don’t already know this, don’t run sine tones at any kind of medium or high power level (you’ll be sorry).
If desired, enter crossover info in the EQ/Filter tab in the design window. You can use this to help control excursion and…
Rear-port air velocity is the final critical stop, only if you are doing a ported design. You will need to adjust box volume, box tuning frequency & the vent diameter/quantity to get this right. Keep the same power settings that you used in the excursion check. You want to keep the air velocity below 15m/s to avoid weird port whistles & whooshes. If you must, cap yourself at 20m/s, but really try to remain below 15m/s. I will have more on this in the subsequent sections.
3) Sealed versus Ported
There are a lot of myths & misconceptions out there, mainly about ported boxes (sometimes called bass-reflex enclosures). Many claim that ported boxes always sound boomy, unclear & all-around inferior. This is silly, and is only true in poor designs.
Sealed Boxes
Pros
- Excellent cone excursion control - drivers can safely handle more power & operate linearly / without damage
- Superior group delay - sealed boxes don’t suffer from terrible peaks in GD like ported ones
- Volume-efficient - A sealed box will give good bass extension with a lot less internal volume than a ported one with the same driver
- Easier to construct
Cons
- Bass extension is not as good as with a ported box for the same driver
Ported Boxes
Pros
- Superior bass extension with a given driver
Cons
- Inverse of sealed-box pros
Right now it is probably looking like ported boxes DO suck! Well, they aren’t for everyone. If you are space-constrained & 35-40Hz bass extension is good enough, then sealed is probably just fine. However, if you want to be able to hit REALLY low frequencies, ported is the way to go. If you take some extra time & can sacrifice a little more room, you will get that extra extension with minimal practical trade-offs.


Comment