-
My only car that actually has better BT is in my GT350 with Sync 3. That is very highly integrated. And Jay's radio does integrate with Siri just like the Ford.
My 335i had a lot of connection issues as does my Ghibli and the Ram. For as ubiquitous as BT is I actually find it still to be inconsistently executed by the major OEMs.
Jay's hacked together solution works more quickly and consistently than most cars I own. Frankly, it is his place to tell us what we should or shouldn't expect. The engineering is far beyond my comprehension so I'm just not in a position to assume what is or isn't possible.Leave a comment:
-
I think we need to temper our expectations.
Headunits today have a might tighter integration to phones. They are capable of accessing your phones contacts, and voice activated assistants.
In this case Jay created a board that hijacks an input. He didn't create a board that provides this level of integration. The board only has the ability to take the audio single input and provide an output back to the phone. It also can send universal commands like skip or fast forward. Could it possibly do more? Maybe but I think it would require a lot more work, and potentially processing power. On top of that as standards on the phones change the board may require updates, which for now can seem to be only done via a jtaq pinout on the board.
I for one am particular impressed with the mics ability to pick up my voice even with the window down. While on calls people can hear me very clearly and it even seems to be able to filter out a lot of road noise. Although I chaulk that up to the mics foam wind filter.Leave a comment:
-
My counterpoint here is that my other 3 cars with factory BT don't need any adjustment from calls to music. I'm guessing there is some type of default value which could be adjusted to compensate. As mentioned, curious if others have experienced this.
Overall I'm still blown away by the quality and integration of this system but I'm guessing Jay wants this detailed feedback from this early beta group.Leave a comment:
-
On my iPhone, music and call volume are separate attributes. Try turning up the volume on your phone during a call, or lowering music volume to the same level as call volume.
Noise cancellation to prevent echo'ing is usually handled by the bluetooth device. Jay might need to check if there is a setting for this in the bluetooth module's firmware.
You might try a more directional mic too, and aim it at your mouth better, it's pretty hard to cancel audio with Bluetooth, there's so many delays in the system.Leave a comment:
-
random observation - Bluetooth connection is super fast upon startup. Phone connects within a couple seconds after radio power. Way faster than my other cars with factory BT.
Jay, a little feedback and would be curious as to experience of others:
Volume when on a phone call is much quieter than with other audio. For instance, if listening to Pandora and I receive a call it is barely audible until I raise the volume. Then, I must quickly lower as the call ends so it isn't crazy loud.
Caller on the other side will get an echo when speaking. As in when my wife calls me it sounds just fine in the car but she is getting an echo on her side.
Let me know if you need clarification on either issue.Last edited by tuckerware; 06-20-2017, 01:33 PM.Leave a comment:
-
Jay, I confirmed the track switching issue was just me. There is a little bit of a delay, and I was being too impatient. :D
Otherwise, I drove the car during my commute and thoroughly enjoy music via bluetooth in much higher quality! I haven't test the mic while driving, but I did a quick test last night and had no complaints from the other end. :DLeave a comment:
-
Board arrived yesterday but I did not have time to install until tonight. It is very easy and works great upon initial impression. I need to order a microphone as well but this is awesome and sounds worlds better than the tape adapter.
Jay, you are a genius.Leave a comment:
-
Ahhh! You mean to hold the little brackets that came off the tape deck that need to be transplanted? Derp. I'll fix that when I install the mic.Leave a comment:
-
Yeah it seems near impossible to get it out without removing the LCD. I just remove the top and right side faceplate screws though rather than pulling the whole thing off. It can be kinda a pain to get all the plastic bits aligned if you fully remove it, plus you only need to pull the right side out maybe a quarter inch.
Sounds like your allen key method is basically what I do. The sleeve on that connector doesn't actually need to be fully disconnected though, once you pull it up a little, it should be kind of loose, at which point it's fully released and you can use your allen key to pull up on it.
Those 3 are to hold the mounting brackets to the new board. The screws that held them to the cassette assembly are M2.5 I believe. The screw terminals on the new board are 4-40. The 4-40 screws are snug in the bracket holes but go through with the turn of a screwdriver.Leave a comment:
-
Yep shield went on.
I really didn't test it much. I connect everything, made sure it turned on, made sure it paired, and made sure sound came out of the speakers.
I'm super impressed that Jay was able to reverse engineer the head unit, and make a board that would fit and hijack the controls. All of which is done at a fair price!
Personally I think there is a huge market to retrofit older headunits with newer technology. I cringe every time I see a older car with a newer head unit. I die inside...EVERY TIME.Leave a comment:
-
how cool - mine should be here today hopefully.
you put the RF shield in as well yes?Leave a comment:
-
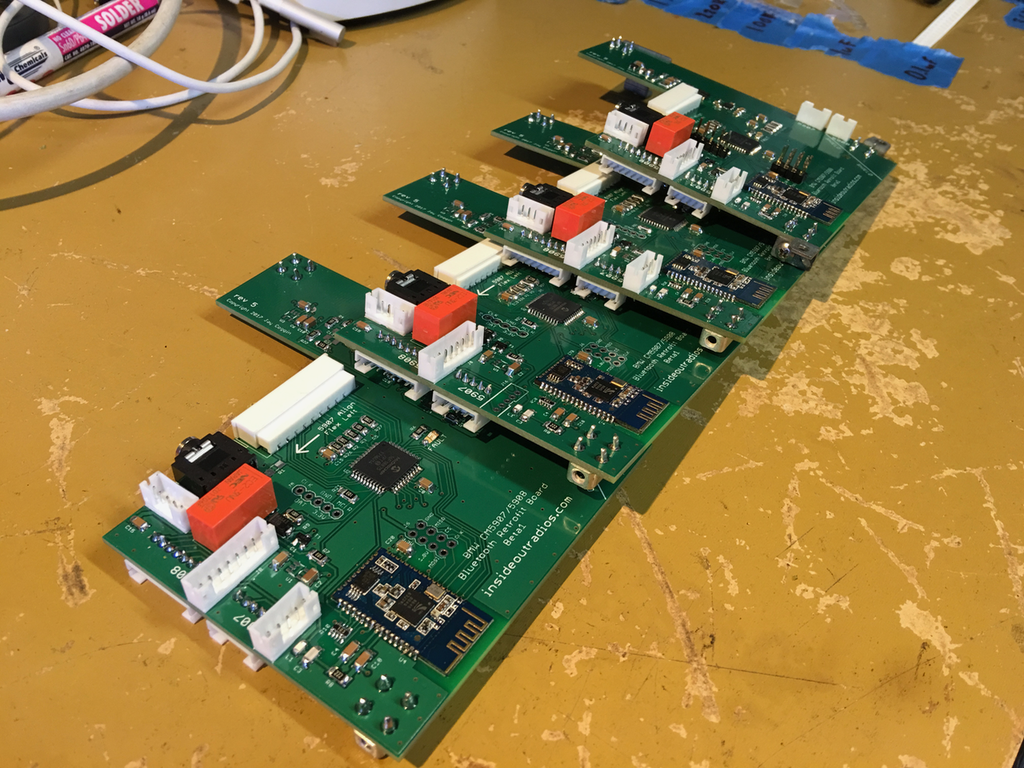
Jay sent out the beta boards on Monday, and being that I'm a few miles from his location I had a sneaking suspicion that I'd get it the day after. I rushed home yesterday after work, and sitting in the mail box was the beta inside out board for the CM5908/CM5907.
The board is actually smaller than I imagined. Placement of the connectors are well positioned for the cables inside the CM5908, and all of the connectors are label for their according head unit model.
Jay is still working on instructions, but I'm an impatient person. I quickly ate dinner, and pulled the head unit from the car. There are a few screws to take the top cover off (5?), and 4 screws to remove the tape deck. I'm not sure if this is correct, but the lcd read out was hindering the removal of the tape deck, so the front face plate was removed, 3 screws and two plastic tabs need to be pressed. The screen can then be pulled out.
The one snag I came across was the ribbon cable. I didn't realize that the connector had a sleeve that had to be disconnect to release the ribbon. I struggled for 20 mins trying to figure out how I could pull on the ribbon without tearing it. I ended up using an allen key that ran the width of the cable and pulled slowly. It was only then the connect sleeve opened, and I realized that there was more to removing the cable that just pulling it. I even gave the inside out board a hard look, and never realized there was a sleeve.
After that, a little bit of jimmying the tape deck around and it came out nicely. A quick screw and nut to hold the shield and the new board went in without a hitch. You'll have to reuse 3 of the mounting stands that hold the tape deck to the head unit. There is an included cable that is used to highjack the volume knob. And I think that is about it.
Jay includes 3 screws, but I'm not sure what they are for. I ended up just reusing all the screws that came of the head unit.
So far, the head unit is working great! The bluetooth sound quality is much better than anything the stock head unit ever produced. I ran into an issue with skipping songs, but it was getting late, and I didn't have a chance to really play with it. Could be nothing.
The head unit hasn't be completely reassembled. I'm waiting for a mic to arrive before I close it back up and really run it through its paces.
All in all, the installation of the board should take an hour. It is super easy and straight forward. The board is a quality piece, and I'm honestly shocked that Jay soldered everything himself. I know how to use a soldering iron, but not with the level of expertise required to put all the components on the board. I think most of us will appreciate the fact that the board comes fully assembled.
Here is a quick photo:

I can snap more tonight if everyone would like.Leave a comment:
-
I haven't tried to reproduce and see what's going on but from what it says in the manual, I kinda doubt I can do anything about it. It doesn't sound like there's a way to dismiss the tone once it starts going. And there'd need to be some way the cassette deck itself could dismiss the tone. I can't imagine what the use case would have been for that.
I think this might be a minor inconvenience that we have to put up with for 0.01% of the time. It's a retro "feature" ;) Think of it like an accomplishment. Take a moment (err, 10 seconds) to reflect on the last 15 hours of whatever's been coming out of your speakers.
Another quirky reminder that we can't totally shake the cassette past is that you can still turn on the Dolby Noise Reduction EQ if you want it to sound like garbage.
Yep, the shield that I showed mounted in the last post basically kills it all, at least to the point where it's lost in the existing noise floor of the stereo. The final thing is luckily pretty simple in design and will just screw down to the board with an included screw+nut. I gotta start looking for a manufacturer on alibaba to make a bunch of them.Leave a comment:


Leave a comment: