
UPDATE:
Finally, the first batch of these kits will become available Wednesday, March 14th at 6 PM PST! I have 48 total kits to distribute (I am holding on to 2 of the first 50).
What:
A plug-n-play modification to the BMW CM5908 radio that provides Bluetooth streaming, hands-free calling, and voice assistance integrated into factory controls. It's a custom circuit board that replaces the cassette module inside the radio.
IMPORTANT: This board will ONLY support the CM5908 at this time. CM5907 support is coming in future revision.
How to buy:
On Wednesday, 3/14/18 at 6 PM PST I'll create a for sale thread in the Parts for Sale section. Be on the lookout for the thread, and post a simple "dibs" post to get in line. That evening, I'll send everyone in line, (or just the first 48, depending how it goes) a private link to checkout and purchase.
Check out the full product page and take a look at the installation procedure in the downloadable manual at cantalouperadio.com
More details:
- 48 total kits available
- Limit 1 per customer
- Kit price: $185+sh
- Optional installation price: $65
- Major credit cards and PayPal will be accepted at checkout
/UPDATE
For those that have seen my other thread documenting my hacking a slider radio to add Bluetooth and take over complete control of it, I've mentioned a simpler approach to adding Bluetooth to the radio that doesn't involve as much surgery, and that I was thinking about making it with the intent of selling. Well I'm working on it now so I'm breaking this out into its own thread to avoid confusing the two projects.
So the goals here are:
- Make a printed circuit board that replaces the cassette deck from the Alpine CM5908 (also will fit 5907) to add Bluetooth music streaming wired into the stereo, taking place of the cassette input
- Integrate the functionality as much as possible into the factory interface
- Make it easy to install and reversible. No hacking up the stereo and no soldering required (other than kit assembly if sold that way)
- If sold as a kit, make it reasonably easy to hand-assemble
Whereas the RaspberryCassette project takes over full control of the face by hacking into the LCD and front panel connectors, I'll pretty much only use the connections available to the cassette deck for this version.
I'm at the point now where I have the reverse engineering done, I have a breadboard prototype I'm working on, I know the steps to get it done, and I'm ready to get some feedback, especially from those interested about whether you'd prefer a kit or money + assembled unit. More on that later.
So I'll run through my thinking on the design. Here's the lay of the land when you open the lid on one of these:
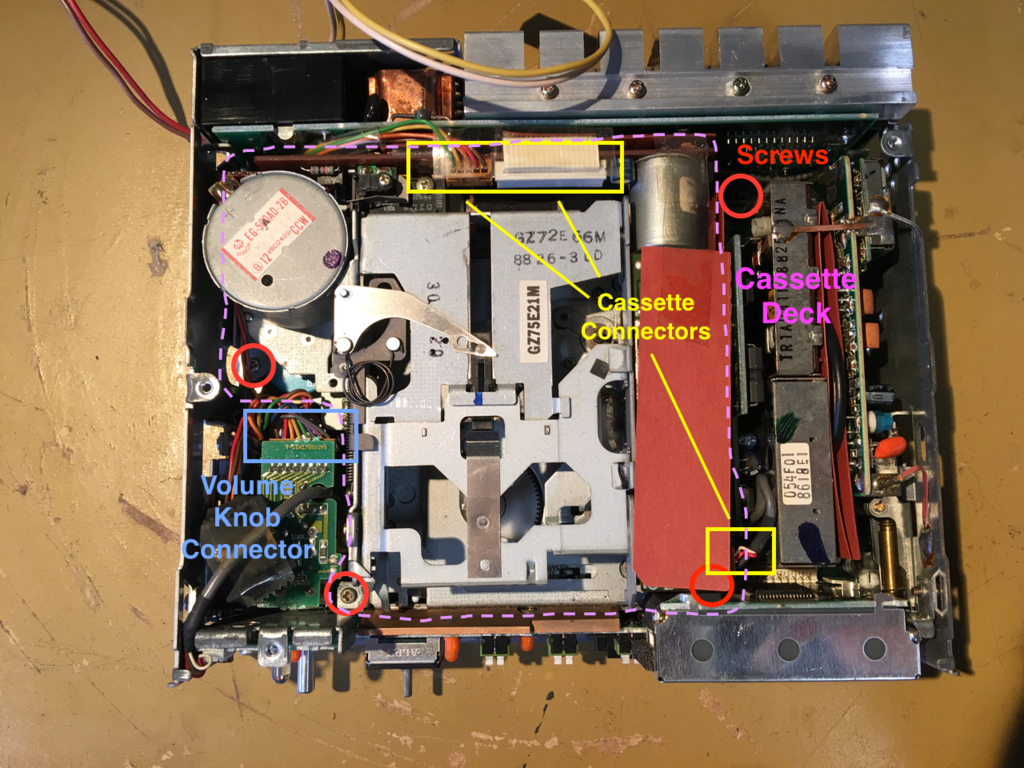
Outlined in magenta is the giant cassette assembly, held in by 4 screws circled in red (some occluded). The yellow boxes circle a total of 3 connectors attached to the assembly. Top left is power, top right white flex cable is transport control, and the connector at the bottom is the audio output. When the screws and connectors are removed, the assembly can be wiggled out (also best to remove the LCD first by pulling it up)
Once it's removed, we can use the power from the power connector to run a Bluetooth audio module and output it's audio into the connector for the tape audio. I figured out where a switch needs to be used to change from radio to tape input, and that's the gist of how this works.
Next problem was placing the input-switching button. My first thought was a push button mounted on the PCB behind the cassette door that you'd stick your finger through and push to switch. Then I realized that the volume knob actually has a clicking push switch that's used for some tuner scanning mode. Because this signal comes through a harness I can unplug (see top view above) and because no one really cares about the scanning feature, right?, I decided I'd steal that signal and use this click to switch inputs.
Once in tape mode, the wide white flex cable carries a bunch of signals telling the deck user inputs like eject, FF, RWD, etc. I figured out the button inputs I could gather from the cable and all the LCD display elements I could control. Because of some of the complexity, I need a little microcontroller to handle these tape commands, acknowledge in some cases, signal to the Bluetooth module the commands, toggle the input source and save it to flash, etc.
So with all that, here's what's possible and what I'm currently thinking for interface:

The inputs I can gather are:
- Push of volume button
- All 4-way pad inputs
- Button 1/EJ
- Button 2/PROG
I can only tell how long a button is held from the push button though. All the other inputs have pre-defined pulse lengths since they're signaled by another MCU.
The LCD outputs I can control:
- Switch display between "1" and "2"
- Turn on/off the "MTL" display
The other feature I want to implement is auto-switch input to BT if a call comes in when you're listening to the radio, then switch back at the appropriate time.
So, any other must-have controls or indications you'd rather see? The Bluetooth module I'm going to use has a way to configure it so that a whole variety of controls can be exposed via its GPIO ports so that I can control them.
The other big question is how I'd distribute this. There are two directions: kits, or pre-assembled units, and that affects how I design the PCB. So I'd love to know, from those interested:
1. Would you rather save say $30 and assemble the PCB yourself, or pay it and get an assembled board ready for install? Kit assembly would probably contain about 30-40 through-hole components you'd need to populate on the board
2. If it was only sold as a kit, would that prevent you from getting one?
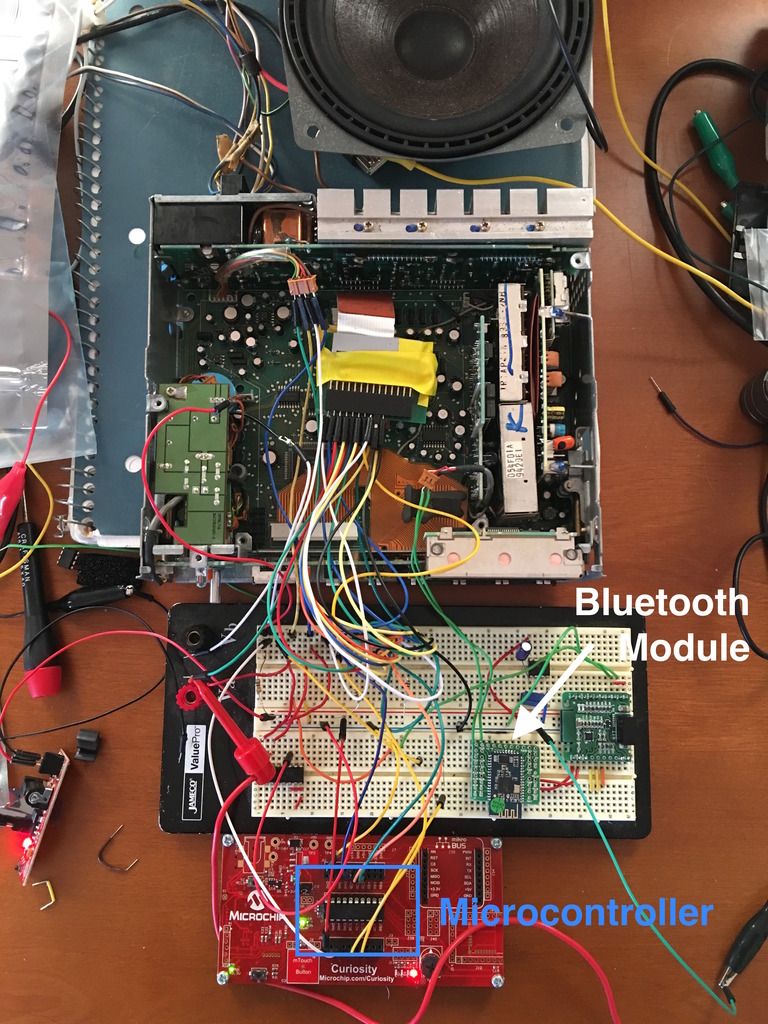
Below is where I am as of now. I'm using a PIC microcontroller which is on the red board at bottom connected up to the stereo through the breadboard. I got the firmware for the PIC working this weekend and handling the tape transport input signals and the volume push button input. I'm waiting on a few bits and pieces but hopefully will have a fully working prototype soon. I'm really happy with how this one is coming along, it's a much more elegant and functional integration than I originally thought was possible and I'm excited to get it into some people's hands!
Finally, the first batch of these kits will become available Wednesday, March 14th at 6 PM PST! I have 48 total kits to distribute (I am holding on to 2 of the first 50).
What:
A plug-n-play modification to the BMW CM5908 radio that provides Bluetooth streaming, hands-free calling, and voice assistance integrated into factory controls. It's a custom circuit board that replaces the cassette module inside the radio.
IMPORTANT: This board will ONLY support the CM5908 at this time. CM5907 support is coming in future revision.
How to buy:
On Wednesday, 3/14/18 at 6 PM PST I'll create a for sale thread in the Parts for Sale section. Be on the lookout for the thread, and post a simple "dibs" post to get in line. That evening, I'll send everyone in line, (or just the first 48, depending how it goes) a private link to checkout and purchase.
Check out the full product page and take a look at the installation procedure in the downloadable manual at cantalouperadio.com
More details:
- 48 total kits available
- Limit 1 per customer
- Kit price: $185+sh
- Optional installation price: $65
- Major credit cards and PayPal will be accepted at checkout
/UPDATE
For those that have seen my other thread documenting my hacking a slider radio to add Bluetooth and take over complete control of it, I've mentioned a simpler approach to adding Bluetooth to the radio that doesn't involve as much surgery, and that I was thinking about making it with the intent of selling. Well I'm working on it now so I'm breaking this out into its own thread to avoid confusing the two projects.
So the goals here are:
- Make a printed circuit board that replaces the cassette deck from the Alpine CM5908 (also will fit 5907) to add Bluetooth music streaming wired into the stereo, taking place of the cassette input
- Integrate the functionality as much as possible into the factory interface
- Make it easy to install and reversible. No hacking up the stereo and no soldering required (other than kit assembly if sold that way)
- If sold as a kit, make it reasonably easy to hand-assemble
Whereas the RaspberryCassette project takes over full control of the face by hacking into the LCD and front panel connectors, I'll pretty much only use the connections available to the cassette deck for this version.
I'm at the point now where I have the reverse engineering done, I have a breadboard prototype I'm working on, I know the steps to get it done, and I'm ready to get some feedback, especially from those interested about whether you'd prefer a kit or money + assembled unit. More on that later.
So I'll run through my thinking on the design. Here's the lay of the land when you open the lid on one of these:
Outlined in magenta is the giant cassette assembly, held in by 4 screws circled in red (some occluded). The yellow boxes circle a total of 3 connectors attached to the assembly. Top left is power, top right white flex cable is transport control, and the connector at the bottom is the audio output. When the screws and connectors are removed, the assembly can be wiggled out (also best to remove the LCD first by pulling it up)
Once it's removed, we can use the power from the power connector to run a Bluetooth audio module and output it's audio into the connector for the tape audio. I figured out where a switch needs to be used to change from radio to tape input, and that's the gist of how this works.
Next problem was placing the input-switching button. My first thought was a push button mounted on the PCB behind the cassette door that you'd stick your finger through and push to switch. Then I realized that the volume knob actually has a clicking push switch that's used for some tuner scanning mode. Because this signal comes through a harness I can unplug (see top view above) and because no one really cares about the scanning feature, right?, I decided I'd steal that signal and use this click to switch inputs.
Once in tape mode, the wide white flex cable carries a bunch of signals telling the deck user inputs like eject, FF, RWD, etc. I figured out the button inputs I could gather from the cable and all the LCD display elements I could control. Because of some of the complexity, I need a little microcontroller to handle these tape commands, acknowledge in some cases, signal to the Bluetooth module the commands, toggle the input source and save it to flash, etc.
So with all that, here's what's possible and what I'm currently thinking for interface:
The inputs I can gather are:
- Push of volume button
- All 4-way pad inputs
- Button 1/EJ
- Button 2/PROG
I can only tell how long a button is held from the push button though. All the other inputs have pre-defined pulse lengths since they're signaled by another MCU.
The LCD outputs I can control:
- Switch display between "1" and "2"
- Turn on/off the "MTL" display
The other feature I want to implement is auto-switch input to BT if a call comes in when you're listening to the radio, then switch back at the appropriate time.
So, any other must-have controls or indications you'd rather see? The Bluetooth module I'm going to use has a way to configure it so that a whole variety of controls can be exposed via its GPIO ports so that I can control them.
The other big question is how I'd distribute this. There are two directions: kits, or pre-assembled units, and that affects how I design the PCB. So I'd love to know, from those interested:
1. Would you rather save say $30 and assemble the PCB yourself, or pay it and get an assembled board ready for install? Kit assembly would probably contain about 30-40 through-hole components you'd need to populate on the board
2. If it was only sold as a kit, would that prevent you from getting one?
Below is where I am as of now. I'm using a PIC microcontroller which is on the red board at bottom connected up to the stereo through the breadboard. I got the firmware for the PIC working this weekend and handling the tape transport input signals and the volume push button input. I'm waiting on a few bits and pieces but hopefully will have a fully working prototype soon. I'm really happy with how this one is coming along, it's a much more elegant and functional integration than I originally thought was possible and I'm excited to get it into some people's hands!


Comment