

Here is a detailed instructional for installing a hidden dash cam in your e30. Thankfully I haven't needed one yet, but I had a friend recently get charged with reckless driving for "drifting" because his belt was screeching in his car. Thankfully there was security camera footage of the entire incident proving he did not drift, but this made me decide to finally install this.
There were several factors that went in to deciding on what dash cam to purchase, but ultimately I wanted something completely hidden. I hate a dash cam in the windshield, and I didn’t want people to always be asking questions about it and why I use one etc. So if you like me, want a hidden dash cam, keep reading.
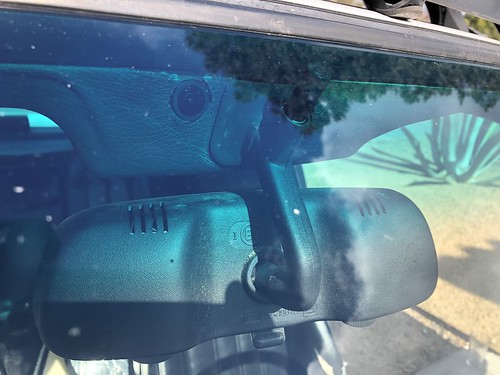
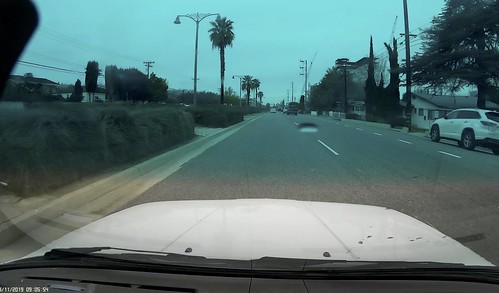
Here is what it will look like when your install is completed:

You will need to purchase the following:
Mobius action cam - I chose lens D for wider angle
(https://www.spytec.com/mobius-wide-angle-lens-d.html)
8 Inch Lens Extension Cable
Mobius Super Capacitor
Class 10 Micro SD card, recommend 64gb
12v to 5v converter
Tools you will need:
Wire cutters
Soldering iron
Razor blade
Drill or dremel
Hot glue gun and glue
I chose the mobius 1 because it is a simple, compact, reliable camera that is easy to dissemble to move the lens out of the body and replace the battery with a capacitor. I did not want a lipo battery baking in my car during the hot southern california summers, so I replaced it with a capacitor which should never need replaced. The capacitor supplies just enough power to allow the camera to save the video before shutting off. The camera also needed to allow the lens to be moved outside the body. This probably can be done with other fancier and cheaper dash cams that have the typical dash cam features, but I new for sure it would work on the mobius.
There is a newer mobius maxi camera out now that records in 2.7-4k. I have no experience with this but from light research it appears that a 2in (5cm) extension cable will work (longer may not work given resolution) and that you can set it up similarly. The capacitor is different though so if you purchase the maxi be careful to purchase the correct capacitor.
You will need a 12v to 5v step down. You can find these on amazon with varing degrees of quality, and some already have the output as a mini usb cable. I found one that had good reviews, and soldered all my own connections. I purchased this one (https://www.amazon.com/DROK-Electric...tronics&sr=1-4).
Set up your camera with the extension. I put tape on mine to prevent the connector from bending as much. Also put a piece of the foam in the lens hole.


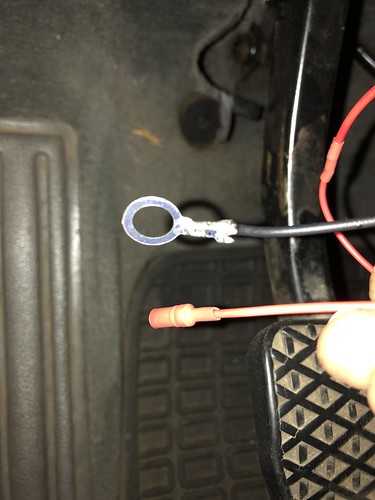
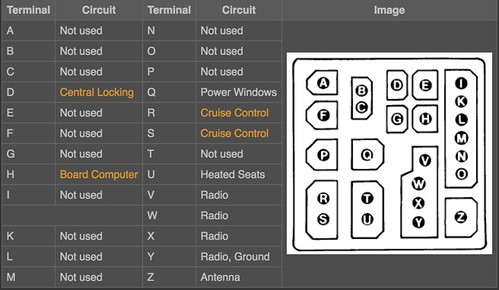
Use a voltmeter to find 12v switched power under your dash. I found an unused plug on c302 (F) and hooked up to that. There is a ground right next to this connector. I zip tied the converter under the dash and then ran the wires up the A pillar (remove the trim) and behind the visor trim panel all the way to check panel lights area. I left the visor trim panel in place during the install but did remove the visors to allow it to flex down for running the wires.


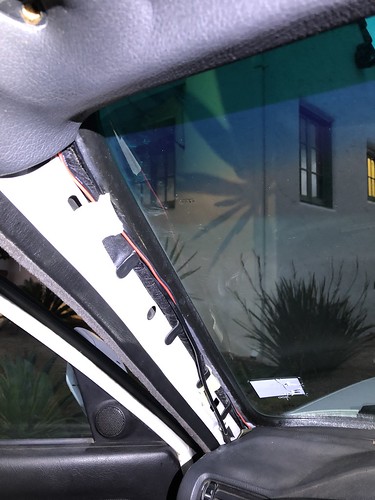
Mount the lens about 1 inch away from the edge of the rubber mirror grommet. I put mine too close and you can just see the edge of the mirror support in the image. Mark the area and then cut the hole out. The diameter should be exactly the size of the largest part of the lens. I used a large drill bit and then used a razor blade to finish it up. A dremel tool would also work and be easier. My trim panel covering was separating so I did the composite material first then the lining after with the blade to match the hole.
Once the hole is complete run a bead of hot glue all the way around the lens of the camera, and stick it in place so it is level with ground, and hold it place. Now just use some double sided sticky foam for the camera body and stick up somewhere you can still reach the sd card. The velcro that came with the camera may work but I didn’t try it. I doubt I’ll ever need to take it out.

Here are some links that may be helpful to setting up the camera. You’ll need to download the appropriate software.

There were several factors that went in to deciding on what dash cam to purchase, but ultimately I wanted something completely hidden. I hate a dash cam in the windshield, and I didn’t want people to always be asking questions about it and why I use one etc. So if you like me, want a hidden dash cam, keep reading.
Here is what it will look like when your install is completed:
You will need to purchase the following:
Mobius action cam - I chose lens D for wider angle
(https://www.spytec.com/mobius-wide-angle-lens-d.html)
8 Inch Lens Extension Cable
Mobius Super Capacitor
Class 10 Micro SD card, recommend 64gb
12v to 5v converter
Tools you will need:
Wire cutters
Soldering iron
Razor blade
Drill or dremel
Hot glue gun and glue
I chose the mobius 1 because it is a simple, compact, reliable camera that is easy to dissemble to move the lens out of the body and replace the battery with a capacitor. I did not want a lipo battery baking in my car during the hot southern california summers, so I replaced it with a capacitor which should never need replaced. The capacitor supplies just enough power to allow the camera to save the video before shutting off. The camera also needed to allow the lens to be moved outside the body. This probably can be done with other fancier and cheaper dash cams that have the typical dash cam features, but I new for sure it would work on the mobius.
There is a newer mobius maxi camera out now that records in 2.7-4k. I have no experience with this but from light research it appears that a 2in (5cm) extension cable will work (longer may not work given resolution) and that you can set it up similarly. The capacitor is different though so if you purchase the maxi be careful to purchase the correct capacitor.
You will need a 12v to 5v step down. You can find these on amazon with varing degrees of quality, and some already have the output as a mini usb cable. I found one that had good reviews, and soldered all my own connections. I purchased this one (https://www.amazon.com/DROK-Electric...tronics&sr=1-4).
Set up your camera with the extension. I put tape on mine to prevent the connector from bending as much. Also put a piece of the foam in the lens hole.
Use a voltmeter to find 12v switched power under your dash. I found an unused plug on c302 (F) and hooked up to that. There is a ground right next to this connector. I zip tied the converter under the dash and then ran the wires up the A pillar (remove the trim) and behind the visor trim panel all the way to check panel lights area. I left the visor trim panel in place during the install but did remove the visors to allow it to flex down for running the wires.
Mount the lens about 1 inch away from the edge of the rubber mirror grommet. I put mine too close and you can just see the edge of the mirror support in the image. Mark the area and then cut the hole out. The diameter should be exactly the size of the largest part of the lens. I used a large drill bit and then used a razor blade to finish it up. A dremel tool would also work and be easier. My trim panel covering was separating so I did the composite material first then the lining after with the blade to match the hole.
Once the hole is complete run a bead of hot glue all the way around the lens of the camera, and stick it in place so it is level with ground, and hold it place. Now just use some double sided sticky foam for the camera body and stick up somewhere you can still reach the sd card. The velcro that came with the camera may work but I didn’t try it. I doubt I’ll ever need to take it out.
Here are some links that may be helpful to setting up the camera. You’ll need to download the appropriate software.


Comment