Announcement
Collapse
No announcement yet.
First Head gasket change
Collapse
X
-
First Head gasket change
Last edited by unitt01; 11-22-2014, 07:28 PM.FS: Plug n Play Second Trunk Light !
My Parts for Sale Thread~
x 1984 325e 2.7i ~ CastroMotorsport Built x Daily Driven
Tags: None
-
make sure yo use distilled water to flush out the system. BMW coolant is the best, dont use the green crap. check hoses for wear. have the head machined and valves ground. then just follow the Bentley's manual.
i chase each head bolt thread. they are always way too dirty.
clean the block with a razor blade, using scotch brights has been show to leave debris in the cylinders and oil passages and can cause damage.
set the block and head to TDC, i always forget to set the head and then have to rotate the head the last moment.
if this is your first time, plan for about a 6 hour job.
-
Originally posted by efficient View PostMaybe change the front main seal if its leaking.
Hope your changing the water pump aswellFS: Plug n Play Second Trunk Light !
My Parts for Sale Thread~
x 1984 325e 2.7i ~ CastroMotorsport Built x Daily Driven
Comment
-
Originally posted by Cabriolet View Postmake sure yo use distilled water to flush out the system. BMW coolant is the best, dont use the green crap. check hoses for wear. have the head machined and valves ground. then just follow the Bentley's manual.
i chase each head bolt thread. they are always way too dirty.
clean the block with a razor blade, using scotch brights has been show to leave debris in the cylinders and oil passages and can cause damage.
set the block and head to TDC, i always forget to set the head and then have to rotate the head the last moment.
if this is your first time, plan for about a 6 hour job.FS: Plug n Play Second Trunk Light !
My Parts for Sale Thread~
x 1984 325e 2.7i ~ CastroMotorsport Built x Daily Driven
Comment
-
did you blow the head gasket? or are you just changing it for maintenance?
If you blew the head gasket, then you are going to have to do an overhaul on your cylinder head due to warpage.
Even if you didn't blow the head gasket, this is a list of procedure i would do:
-disassemble head, and keep everything in order so you can put everything back in the way it came out.
-Take it in to a machine shop and have them hot tank the head and check to see if it needs to be resurfaced (which it most likely will)
-have the machine shop magnaflux the head to check for cracks, and pressure test it
-measure valve guide clearances
-measure valve stem wear
-regrind or lap the valves
-re-assemble with lots of assembly lube
-vacuum test all ports to prove that all the valves are sealingsigpic
Comment
-
Originally posted by MR 325 View PostAs said you definitely want to have the head resurfaced at a minimum. Even if the car didn't overheat or blow the gasket the head can be slightly warped from regular use. If it's in your budget I'd rebuild the head as well.FS: Plug n Play Second Trunk Light !
My Parts for Sale Thread~
x 1984 325e 2.7i ~ CastroMotorsport Built x Daily Driven
Comment
-
Small update, got to work around it yesterday for a few hours. I'm just having a hard time taking the intake manifold out. (i think i have to remove the fuel injector railing?) once thats out i'm gonna tackle taking the timing cover/belt off and get onto the valves and head. it hasn't been that hard and i'm really enjoying working on it so far :DFS: Plug n Play Second Trunk Light !
My Parts for Sale Thread~
x 1984 325e 2.7i ~ CastroMotorsport Built x Daily Driven
Comment
-
Originally posted by unitt01 View PostReally wanted to have a DIY resurfacing/rebuild but I think I rather take it to a machine shop and get it done professionally. (if i can afford what it'll cost also)
Where in SoCal are you? PM me if you'd like a quote on a rebuild.
Comment
-
Originally posted by unitt01 View PostSmall update, got to work around it yesterday for a few hours. I'm just having a hard time taking the intake manifold out. (i think i have to remove the fuel injector railing?) once thats out i'm gonna tackle taking the timing cover/belt off and get onto the valves and head. it hasn't been that hard and i'm really enjoying working on it so far :D
You don't need to separate the fuel rail from the intake. The "bitch tube" is probably causing some problems (hence the name). It's under the intake and goes from the bottom of the intake to the oil pan. It's held in with a spring and takes some finagling to get out.
Good luck and welcome to r3v.
This will help too- Timing Belt How-ToOriginally posted by Andy.BWhenever I am about to make a particularly questionable decision regarding a worryingly cheap diy solution, I just ask myself, "What would Ether-D do?"
Comment
-
Originally posted by MR 325 View PostYou can't DIY a head resurface job. ;)
Where in SoCal are you? PM me if you'd like a quote on a rebuild.
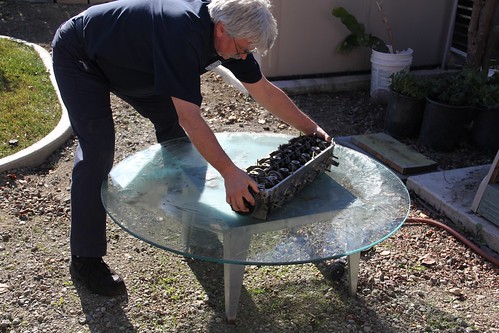
lapping a head smooth by Eric Berger, on Flickr
lapping the 885 head's face by Eric Berger, on Flickr
Comment
-
Originally posted by Ether-D View PostIf you haven't done this already, remove the hood and radiator. It'll save you a bunch of headache.
You don't need to separate the fuel rail from the intake. The "bitch tube" is probably causing some problems (hence the name). It's under the intake and goes from the bottom of the intake to the oil pan. It's held in with a spring and takes some finagling to get out.
Good luck and welcome to r3v.
This will help too- Timing Belt How-ToFS: Plug n Play Second Trunk Light !
My Parts for Sale Thread~
x 1984 325e 2.7i ~ CastroMotorsport Built x Daily Driven
Comment
-
Originally posted by Cabriolet View Postwell... you can but it is hell. lapping compound+water on a flat glass surface does work. but takes a lot of time. never again hahaha.FS: Plug n Play Second Trunk Light !
My Parts for Sale Thread~
x 1984 325e 2.7i ~ CastroMotorsport Built x Daily Driven
Comment
-
When it comes time to reinstall the head, take a rag and blast each of the head bolt holes in the block with compressed air (using the rag to catch any crap that comes out). Make sure the bolt holes are nice and clean.
After the head is in place, take some straight 30W oil and apply a small dab to the last inch of each head bolt (no point oiling the whole bolt, only the last inch actually interfaces with the block threads). Don't go crazy lubing the threads. Another small dab of oil between the bolt shoulder and the washer to make sure friction is minimised - give you a nice true torque reading.
You should be able to run them in with your fingers and they'll feel nice and "free". You might want to take a thread chaser to the bolt holes first, if you can find one. M10x1.5 iirc.
The small holes that you'll notice where the head bolt washers sit are not for oiling - they're where the manufacturing drill ran through to create oiler holes for the camshaft oil feed in the lower portion of the rocker shaft bores (which are very important). Basically, I made the mistake of thinking I shouldn't have them covered, which (I believe) caused my head to make 6-7 loud "clacking" sounds the first time it was heat cycled - some of the washers shifted under clamping force as the bolts expanded from the heat. It wasn't a particularly nice sound, but fortunately no damage was caused. Just keep the head bolts straight and the washers "neutral" in terms of alignment - ignore the small holes!
If you do send your head off for rebuild/facing, make sure the rocker shaft locking plate comes back with it (and the shafts are installed and properly aligned!). Attached is an example of a not-so-great alignment (ask me how I know so much about head rebuilds...)
Using an angle gauge for the 90 degree + 90 degree final 2 stages of bolt tightening was impossible for me, since the firewall made use of the gauge damn near impossible, so I just took a ruler and made the best vertical line on each bolt I could (after the initial 22lb/ft torque). Then rotate first pass, rotate second pass, nice n straight, job done.
As others have suggested, stay away from scotchbrite pads if you need to clean the block/head mating surfaces - the embedded aluminium oxide is not what you want floating around your engine. A fresh razor blade held vertical to scrape off any gasket material is recommended. I also had a vacuum cleaner on hand to extract any crap that fell where it shouldn't.
Of course, check the timing marks are lined up before installing the head, and make sure the 2 head/block alignment dowels are in place - maybe even consider installing a fresh set (Pelican has them for a grand total of $1.75 each...11121726241. Maybe BMW include them in the gasket kit...)
Good luck! :)
Comment
Comment