shocks, springs, bushings and ?? suspesion overhaul.
Collapse
X
-
Mtech1 v8 build thread - https://www.r3vlimited.com/board/sho...d.php?t=413205
OEM v8 manual chip or dme - https://www.r3vlimited.com/board/sho....php?p=4938827 -
I'm sorry but I didn't take any pictures and I regret it madly. It would have been a much needed write up for sure. I can say however that it is pretty straight forward if you have a few needed tools and pay attention to where and how things go. The below is all I gots.....

Disassembly
- Remove clamps securing rack boots, and pull back boots to expose tie rod joint.
- Bend up tabs on tie rod lock plates, position rack as needed to secure rack with suitable spanner, then remove tie rods.
- Disconnect and remove fluid lines.
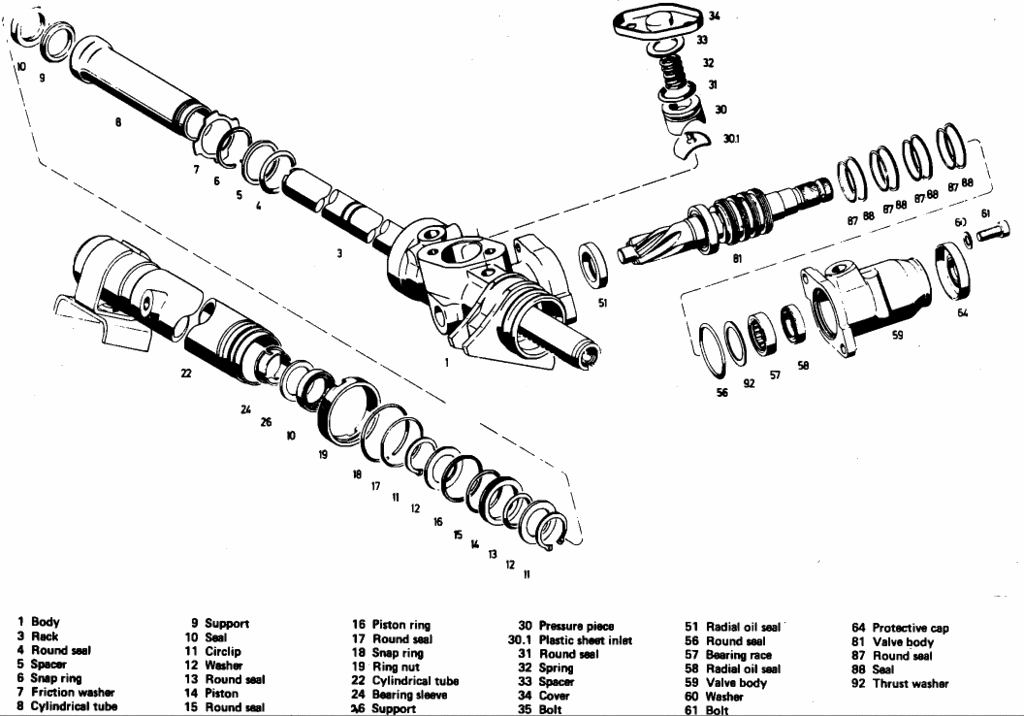
- Remove cap spring and spacer from rack adjuster pressure piece, Fig. 1.
- Thread self-tapping screw into pressure piece, then remove pressure piece along with seal and plastic insulator.
- Pull off cap protecting pinion steering spindle, then ensure rack is centered.
- Mark position of steering spindle, valve body housing and gear housing in relation to each other.
- Remove valve housing bolts, the housing and pinion assembly, and the housing O-ring.
- Remove pinion and thrust washer from valve housing, then the seal and bearing, noting installation position.
- Mark position of cylindrical tube (22), Fig. 1, in relation to gear housing, then loosen ring nut and remove tube.
- Withdraw rack assembly from gear housing, then remove piston assembly (11-14) and cylindrical tube (8), Fig. 1, from rack, noting installation position for assembly.
- Remove seal, spacer, snap ring and friction washer (4-7) from tube (8), Fig. 1, then drive seal and support ring out of opposite end of tube.
- Insert screwdriver through slot in bearing retainer in tube (22), Fig. 1, and drive remove seal and support ring.
- Remove seal (1) and snap ring (18) from end of tube (22), Fig. 1.
- Remove seal and piston ring from piston.
- Inspect components and replace any that are damaged, deformed or excessively worn.

Replace seals and O-rings, and coat seal and friction surfaces with hydraulic fluid during assembly.- Replace pinion shaft seal in gear housing, as needed, ensure seal is fully seated, then pack seal lip with grease.
- Install support ring into tube (8), Fig. 1, with chamfer facing inside of tube, then press seal into tube with open end facing out.
- Cover cuts in rack with cellophane tape to prevent seal damage, then slide tube (8) over rack and remove tape.
- Install friction washer, snap ring, spacer and O-ring on end of tube (8), Fig. 1.
- Install piston, washers, O-ring and circlips (11-14) on rack, Fig. 1, in position noted during disassembly.
- Install O-ring and piston ring on rack piston, then coat assembly with hydraulic fluid.
- Install support ring and seal (10) into tube (22), Fig. 1, ensuring seal is fully seated and that open end faces up.
- Measure and record thickness of snap ring (18), then install snap ring and new O-ring over end of tube (22).
- Insert rack into tube assembly (22), slightly compressing piston ring to prevent damage, and ensure tube is flush with friction washer (7), Fig. 1.
- Lubricate rack teeth with grease, then insert rack assembly into gear housing and tighten ring nut.
- Ensure rack teeth are properly positioned and that mounting flanges on tube and housing are aligned horizontally, then torque ring nut. Ring nut torque is dependent upon thickness of snap ring (18), Fig. 1, recorded in step 8. If snap ring is .098 inch thick, torque ring nut to 87 ft. lbs. If snap ring is .138 inch thick, torque ring nut to 108 ft. lbs.
- Install seals (88) and round seals (87) onto pinion valve body, ensuring round seals are positioned on top, then coat assembly with hydraulic fluid.
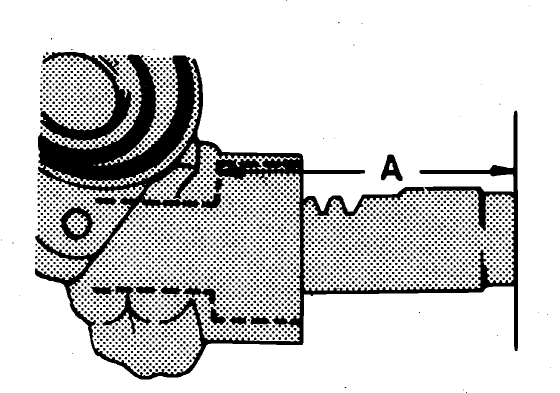
- Center rack in gear housing, ensuring distance between ends of rack and cylinder stops (A), Fig. 2, is 2.835 inches on both sides.
- Coat pinion splines with grease, then insert pinion into gear housing, ensuring marks made during disassembly are aligned.
- Install new oil seal in valve body housing with open end facing in, then install the bearing, ensuring both bearing and seal are fully seated.
- Position valve body seal on gear housing, install valve body housing ensuring matching marks are aligned. Tighten to specifications.
- Pack spindle cap with grease, then install cap, aligning tab on cap with slot in housing.
- Install new seal and plastic insulator on rack adjuster pressure piece, then insert assembly into gear housing.
- Install adjuster spring, spacer and cap. Tighten cap bolts to specifications.
- Install fluid lines, using new seals on union bolts. Tighten union bolts to specifications.
- Install rack boots, tie rod lock plates and tie rods, secure rack with suitable spanner. Tighten tie rods to specifications.
- Secure rack boots with clamps, install steering gear and check operation.

Comment
-
Thank you! I think I am going to make some calls tomorrow and see if I can find a shop that does this on a regular basis instead :)Mtech1 v8 build thread - https://www.r3vlimited.com/board/sho...d.php?t=413205
OEM v8 manual chip or dme - https://www.r3vlimited.com/board/sho....php?p=4938827Comment
-
That's not really a bad idea. If you were in Dallas, I would tell you to come to our shop. List is ridiculously high on the rack, buying used sets you up for another rack that is just as bad or soon in need or being replaced or rebuilt. Rebuilding is the way to go. Even the kit lists for $120. Let me know what prices you come up with for the repair/seal kit and I will beat it for sure... Good Luck
Comment
-
I think that i will be doing most of this, so when I get a little time over my spring break(which is this coming week for me) ill send you a message and maby you can help me get the parts I need.in the front you forgot sway bar bushings and sway bar links... I guarantee you those will also need to be changed. While I was in the front I went ahead and rebuilt my steering rack, PS pump, replaced all 3 PS hoses and the resevoir. If you have the money and time, do that as well as it will proabably be going out soon. The convenience of buying a new CA is that the ball joint already come installed. However, if you have access to a hydraulic press, I found removing and installing new ones quite straight forward. The CA lists for 150 as oppsosed to the inner and outer BJ totals just under 70.
Also, let me know what prices you are coming up with for all those components and I should be able to beat them.Comment
-
Now, the treehouse racing eyeball arms, do those replace the control arm bushings? i need to buy a god damn bentley (i would assume those have pictures of the parts and how they go on)Claus Luthe is my hero.

Comment
-

Comment

Comment