
I recently bought a rebuilt ABS hydraulic unit from Jordan. It was a real work of art, and I feel a little bad installing it since it is cleaner than just about everything else under my hood! But, I have never really felt satisfied with the performance of the ABS system in my car, and the ABS unit was one of the only original functional parts left on my car (other than the transmission and ECU). So, I shelled-out the cash for one of the units he sells and got around to installing it this weekend.
Here's the thread where Jordan describes the product:
https://www.r3vlimited.com/board/for...-e30-abs-pumps
And here's his site:
I did a bit of reading about bleeding the ABS unit, since a lot of BMW owners seem to have tales of woe about air being trapped in there, needing to go to the dealer to have them activate the unit, and a general sense that it is a real pain to bleed the thing. At this point, I think that it is mostly needless worry, at least for the E30 ABS units since they are absurdly simple compared to the units later/modern cars use. With that said, I do think that it is entirely possible for there to be problems with air being stuck in there if you have a 30+ year old ABS unit that is totally gunked up and unable to properly actuate. Now that I have this fresh unit installed, I can say with 100% certainty that the original ABS unit in my car had not worked properly since I bought it 15 years ago. Overall, I feel that general pedal-feel has improved a little under normal braking, and when the ABS does activate it absolutely works better than before. Based on Jordan's photos of the internals and my experimenting with jumping relay contacts, I am pretty sure that the pump / shuttle valves have not been working. The short story here is that replacing the ABS unit was the right choice and was well worth the significant cost.
Jack the car up, put it on stands and remove all 4 wheels. This is all so much easier with all of the wheels removed. Also, disconnect the battery 12V terminal.
Assuming you do not want a tremendous mess under the hood, the first order of business is to push all of the fluid out of the system. If you have ever bled the brakes before, then this is super easy, except you don't stop to refill the reservoir. The fastest way to empty it is to start with a front brake since the plunger in the master cylinder for those moves more fluid. Whatever the case, you need to bleed both fronts and one of the rears until nothing but air comes out. In my case, I wanted to get all of the old ATE Super-Blue out since I was going to refill the system with Motul RBF600, so I bled all 4 corners dry. For reference, I bled out all 4 corners and the clutch with the reservoir starting at the MAX line, which measured out to ~400mL of fluid. However, the ABS unit definitely still had a fair amount in it, down in the lower chambers which won't expel fluid when you are bleeding stuff. Also, I have almost-new Stoptech pads & rotors on there, so the calipers were holding nearly the minimum amount of fluid.
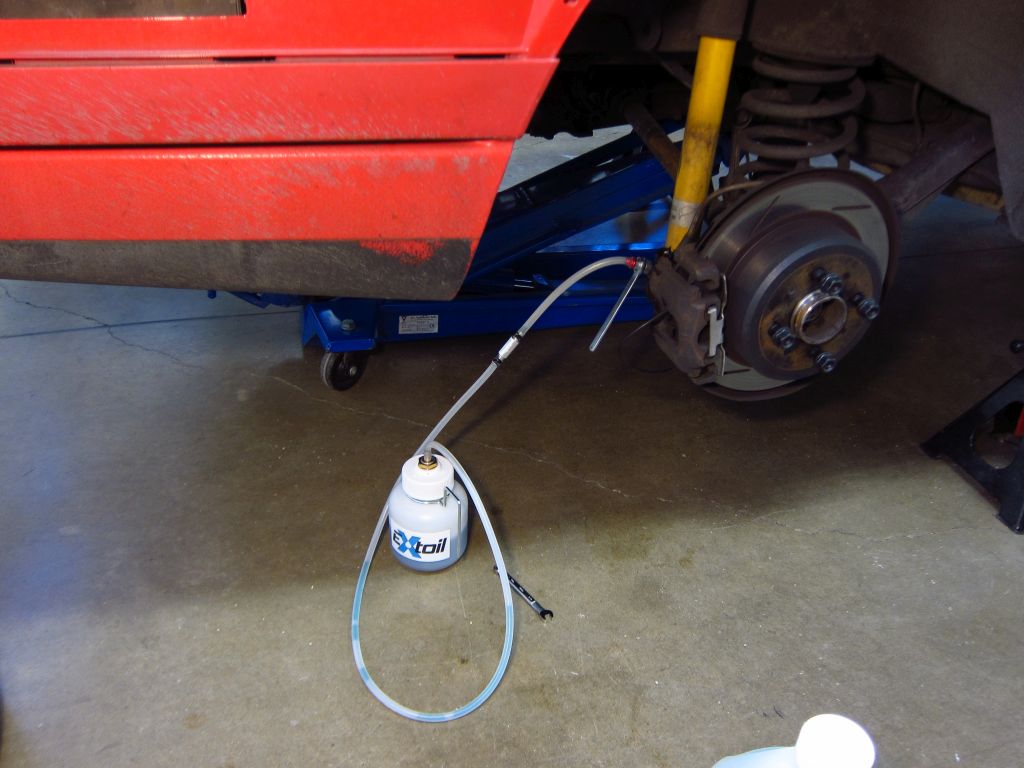
If you are aiming to fully purge the system, you will also want to get all of the old fluid out of the calipers, which requires you to unbolt them and orient them with the bleed screw pointing downward. You can use a C-clamp to squeeze the fluid out if you want, but whether or not you do that, you will want to have someone pump the brake pedal to get the last of it out.
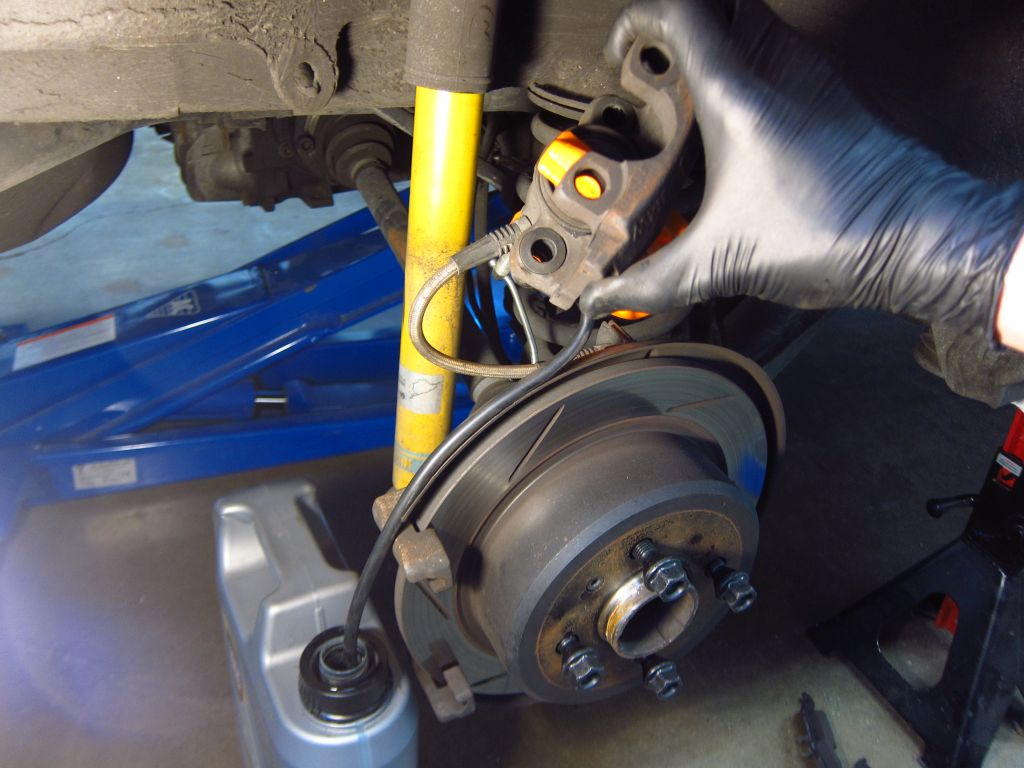
With the system as dry as it can get via bleeding, it is time to prep the old ABS unit for removal. Pop the black line-holders loose and free the lines from the slots. Do not use a screwdriver as this can damage the protective coating on the lines. A plastic trim popper tool is ideal (red-on-red is hard to see, but you can see what I used). Freeing the lines from the holders is key because you'll need a fair amount of play to move them free of the ABS unit, and you really don't want to bend them to be deformed.

Whip out your trusty 11mm flare nut wrench. I do not recommend using a regular 11mm wrench...while it may be unlikely that you will strip the flare nut, you will sure be sorry if you do. Go spend the $10 and get the right tool for the job. Even on my car, which has been in mild/relatively dry CA weather all its life, the flare nuts on the ABS unit took a good amount of torque to break free.
Remove the 13mm nut on the front rubber grommet that holds the ABS unit to the chassis. Disconnect the brown ground wire from the 10mm nut at G104 (chassis ground point on the inner fender next to the ABS unit) and route the wire free of the main harness next to it. I disconnected it from the 8mm nut on the ABS unit, and that ended up being a big pain to reconnect on the new unit, so just take the wire out with it and swap it on the bench. Also, don't yard too hard on the nut at G104...it is on thin sheet metal, and you'll really be sorry if it shears of. If it is all corroded, hit it with some penetrating oil and let it sit overnight.
When everything else is unbolted, loosen/free the flare nuts & lines one at a time. I tore paper towels into quarters, folded them and wrapped them around each hydraulic line as I removed it, with a little zip tie to hold them in place. The feed line for the rears (the long one that goes up & over the ABS unit) managed to have some residual fluid in it still and was drippy. So, keep a rag nearby and ready to pick up any seepage that comes out of a line or the ABS unit.

With the lines free of the ABS unit, you can tilt it up and out. It is tight, but tilt the inward/engine side up and toward the front of the car to slide it out. There is a little pointy tab on the chassis bracket, and I found that bending it toward the engine a bit greatly eased removal and reinstallation. Bend it straight again once the new unit is in. Also note the little alignment tab on the metal casing of the front bumper on the ABS unit. It should be somewhere in the gap on the chassis bracket, and make sure that the rubber bumper is properly sitting on the hex nut in its middle (if you try to rotate it, you will feel it jump as it aligns on the flats). Installation is the reverse of removal.
With the new ABS unit installed and the hydraulic lines reconnected, you will need to refill the system. I bought 1.5L of fluid, of which I ultimately used about 1.2L of. Really, if you are very judicious about not wasting fluid when you refill & bleed the system, you could do it with 1L, but I'd have some extra handy just in case.
Fill the reservoir and start bleeding as normal. Honestly, it does not matter which corner you start with. The conventional wisdom is to go farthest-to-nearest to the MC, but our cars have 3 separate circuits after the ABS unit (F-L, F-R, Rear) and it just doesn't matter. Do the normal bleeding procedure at all 4 corners until fluid comes out. At this point, you have a choice to make. You can keep bleeding until you no longer get large air bubbles and the pedal feels firm, and then go drive it in a dirt lot to fire the ABS system, or you can activate the ABS unit in the garage and get the last of the air our while the car is up on stands. I opted to trip the ABS unit electrically so that I would not need to jack it up and take the wheels off again, but simply going and driving it is IMO the better method (it will be faster, and does not involve questionable electrical practices).
ABS Bleed Option 1: Drive it and trigger the ABS by braking hard
I recommend this method, and knowing what I do now, I would have done it this way.
For some, this might be the easiest option. As far as I can tell, if your ABS unit is clean and clear (like it would be with a rebuilt unit), there is relatively little air that can remain in it after you refill the system and bleed it the traditional way. There are a few check valves between the pump section and the inlet lines, as well as some bypass/return tubes, so a little air can end up in there, but it is pretty miniscule. This is NOT the case with newer cars (likely even the E36) which absolutely do require ABS unit activation to bleed, so we are lucky that the E30 system is so simple from a bleeding standpoint. So, once you have bled out all of the air you can during the refill-bleed process and the brake pedal feels stiff, put the wheels on and go hit the brakes in some gravel or dirt to fire the ABS good and hard 4-6 times. Go back home, take the wheels off and bleed the system again. Personally, I would do 2-3 cycles of activating the ABS unit and bleeding. With the bleed nipples closed, the ABS unit is not creating a net movement of fluid, so the air bubbles will be pushed into the lines, but it might require multiple cycles of activating it and bleeding to get it all out of the back-end. Now, my gut feeling is that you will be 99% fine after just one cycle of this, but if you are anal retentive and want all of the air out, do it at least a couple of times.
Regardless of whether you use this method or the following one, I would re-bleed all 4 corners after a month of driving since by then the jostling and vibration from the road should have broken all of the smaller bubbles free inside the system. Is it actually necessary? No, probably not...if the pedal feels firm and you can lock up the wheels, then it is not strictly needed. In my case, I like knowing that there is no air in there, both to get optimal pedal feel, and because air pockets can allow corrosion to occur. After spending a grip of cash on the nicely rebuilt ABS unit, I want to keep it fresh for as long as possible, and will be flushing the fluid once or twice a year to keep moisture-related gunk from building up.
ABS Bleed Option 2: Sketchy electrical shenanigans
This involves all sorts of "bad practices" and is needlessly complex, so Option 1 is the way to go. But, if you like tinkering and are competent with electrical work, you might have fun with this.
ONLY do this if you are actually going to use the proper gauge of wire and are at least a little familiar with electrical work. There is minimal risk of personal injury, but you can easily cause massive damage to the electrical system, or even a fire if you cut corners. You are going to be connecting wires directly to an unfused 12V source, from a battery that can provide hundreds of amps. I take no responsibility if you start a fire or otherwise end up with a disaster: proceed at your own risk. Additionally, option 1 is the better way to go now that I went through all of this. But hey, someone has to waste the time to be able to tell others not make the same mistake!
With the ABS unit mechanically installed, ensure that the harness plug is removed and out of the way, with both relays removed. I recommend putting tape over the contact-side of the harness plug since pins 6 & 12 are unfused 12V connections, and you don't want those bumping into a bolt head or the body of the ABS unit. If you refer to the wiring diagram, I can walk you through what you need to connect in order to activate the ABS system such that trapped air will be pushed out.
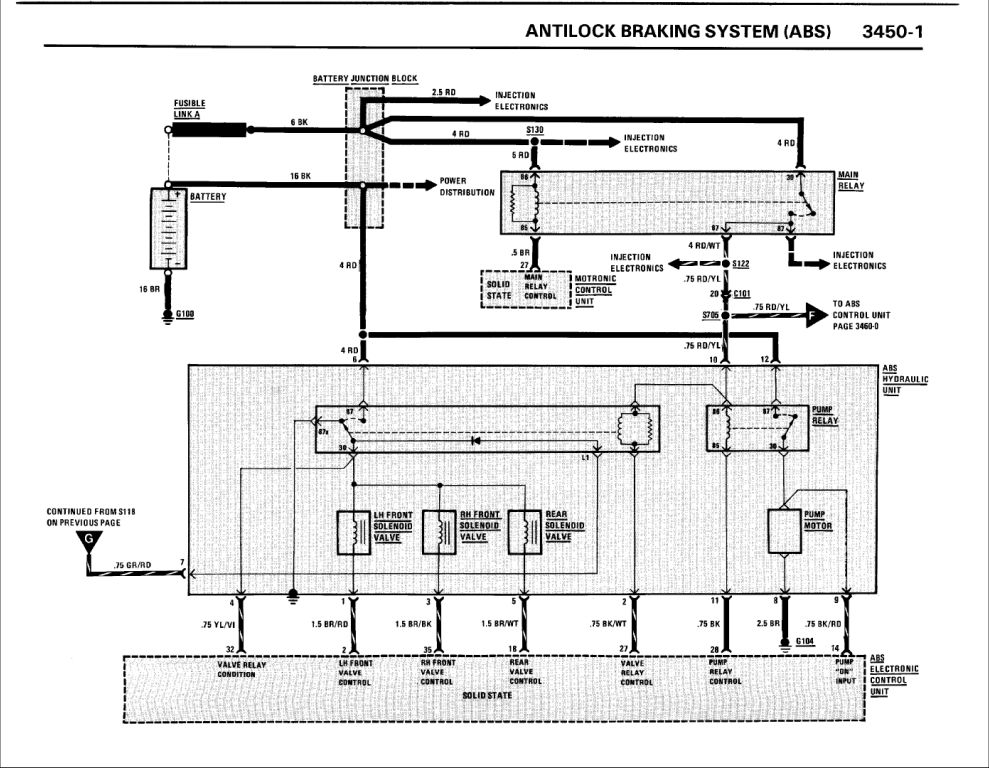
The ground strap on the 8mm nut from the motor needs to be attached to G104 (chassis ground) as usual. Additionally, you will need to be able to connect pins 1, 3 & 5 of the input connector to ground, in a way such that you can do each of them one at a time while bleeding. The tricky part involves relay terminals 30 for the two relays. The smaller 4-pin socket is where the motor relay goes, and it is rated at 50A, so this is definitely a high-current connection. The 6-pin socket is for the solenoids which open/close the inlet-to-outlet path for the brake fluid. You will want to have wires in both of the #30 terminals, but NOT connected to 12V in any sort of permanent way...you will be manually touching these wires to a 12V source, and never for any prolonged period. Last, you need that 12V source. As far as getting 12V, you will either use the batter 12V post, or the block on the firewall if you have the battery in the trunk. The absolute minimum size wire for all of this is 12ga, with 6-8ga being better. Bonus points if you have an inline 50A fuse handy, as that will add a tremendous amount of protection against "oopses."
I do not recommend just jamming wires into the #30 holes, but I have seen others do it that way. At least zip-tie the wires onto the plastic post in the middle if you do this, so that they cannot be yanked loose. As it turns out, the terminals are all 4mm size, which was a great fit for some spare audio banana plugs that I had. As for the 3 solenoid grounds, I had an alligator clip test lead head, which also had a 4mm socket, so I clipped the ground in one end and could simply unplug/plug the other end among the 3 terminals.
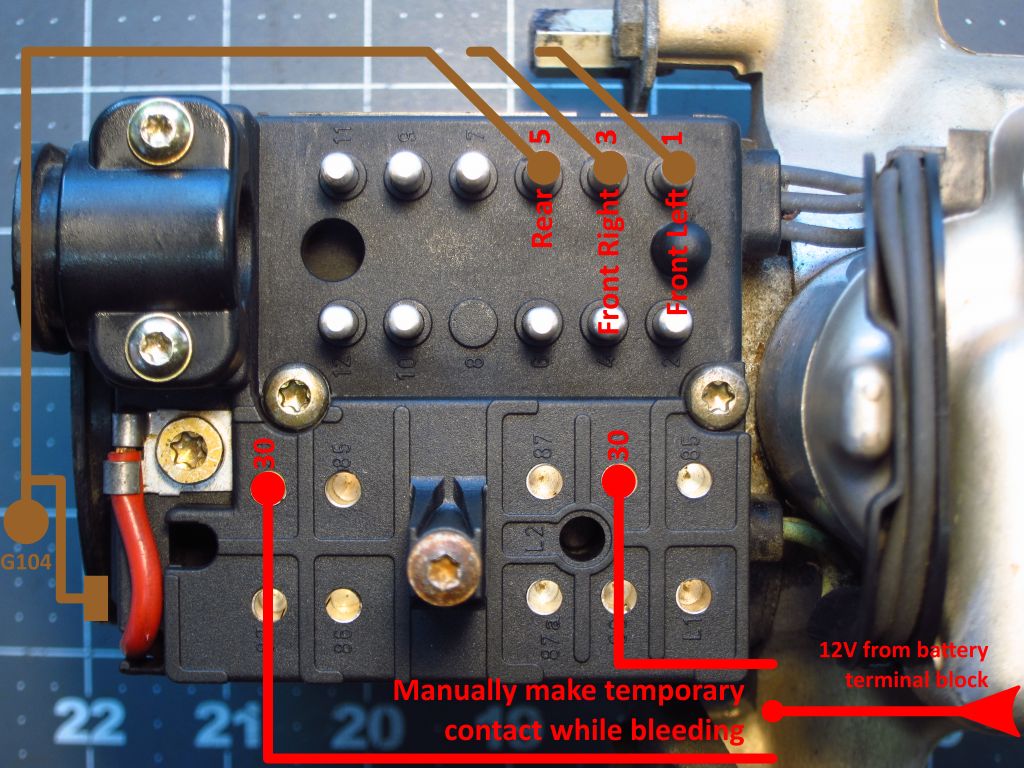
Here's a little cartoon of what you will end up needing to do.
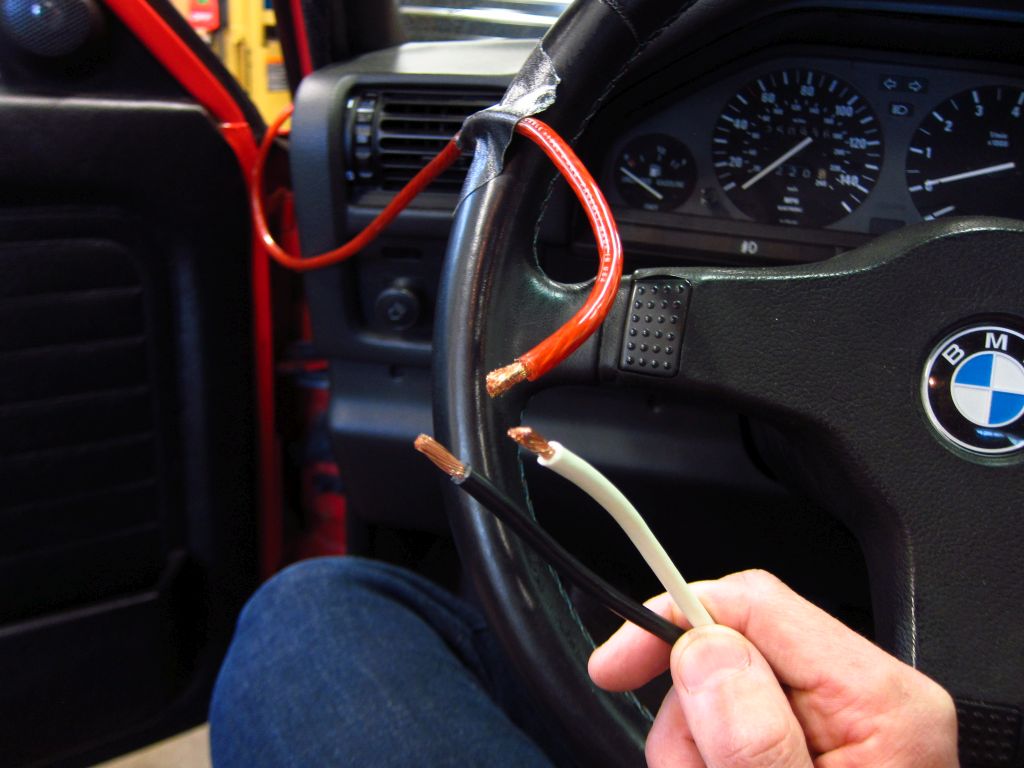
I had some spare 6ga power wire left over from my audio build, so I used that as my 12V supply. First, I attached the "working end" to the steering wheel so that it could not possibly fall onto the chassis somewhere. Again, you REALLY wouldn't want this thing shorting to ground.
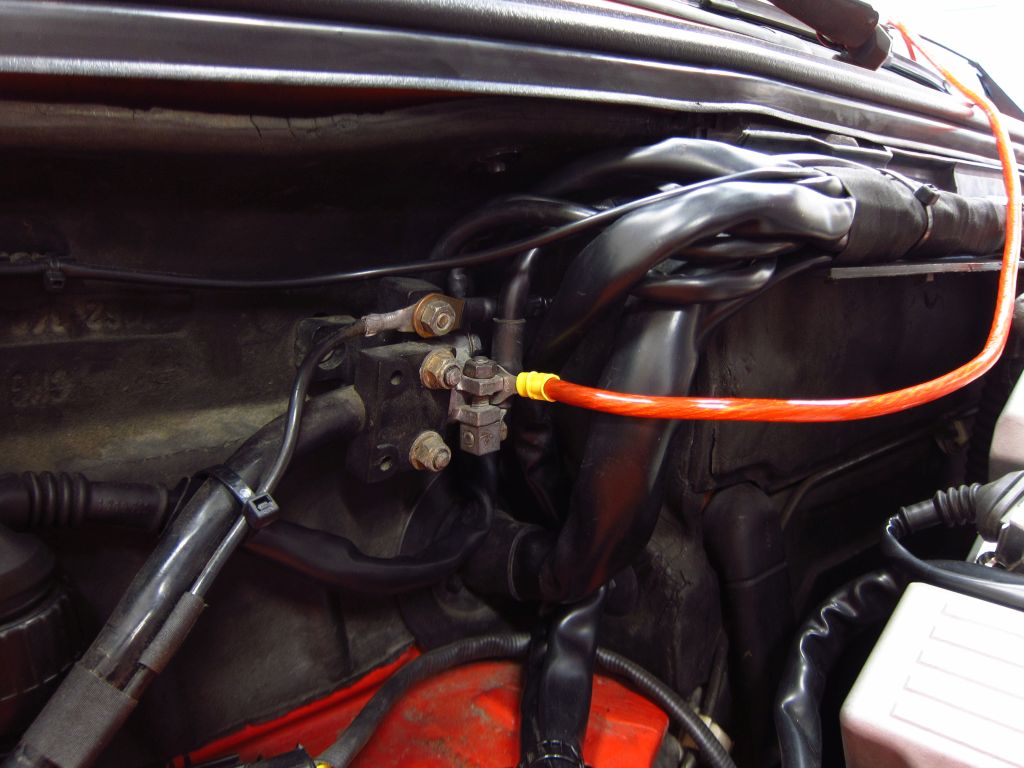
I then attached the other end to the 12V terminal block. Use the lower bigger one...this is the unfused supply for the starter. Do NOT use the smaller upper nut...this is the power supply for the fuel injection/DME, and it has an inline 50A fuse which you will be very sorry if you blow since it is hard-wired onto the supply line back in the trunk. Jamming it in there like I did is not an ideal way to do it, and you would be much better off actually securing a ring terminal under a nut. Oh, and before any of this, you should have disconnected the battery, doubly-so if you plan to get a wrench on there. Wrenching on this terminal with the battery connected is the definition of stupid, so disconnect the battery (I repeat myself). I opted to jam the ring terminal in between the existing one for the starter feed and the block body, but that is improper procedure..."trust me, I am an expert" lol.
Finally, I made the connections over at the ABS unit. Since the person operating the brake pedal would also need to intermittently connect the #30 terminals, I hooked up some spare 10ga SO cord that I had lying around. I zip tied it onto the bracket where the airbag sensors used to be so that it would not yank on the connections at the ABS unit. When everything is hooked-up and secure, reconnect the battery.
Note that in the following steps, you will be touching-off wires to that 12V wire. This generates lots of big sparks, over upholstery and carpeting. If you have a fire blanket, use it. If not, pay attention and do not walk away until you are certain that nothing is smoldering. Fire prevention is your responsibility here.
You can play around with this a little before actually bleeding stuff. Press the brake pedal firmly and activate/deactivate a solenoid by touching its wire to the 12V wire. Make contact for 0.5-1 second at most to avoid heating it up too much. You will feel the pedal drop when you release the connection, and you can probably do it 4-5 times while pressing the brake before the pedal bottoms-out. When the solenoid valves activate, they disconnect the inlet lines (from the MC) from the outlet lines, letting pressure from the outlet/caliper side bleed back down into some reservoir chambers. When you deactivate the solenoid valve, the inlet-outlet connection is opened, and the MC pushes more fluid back into the calipers. That is why the pedal drops down if you continue pressing it while cycling the solenoid, and why it seems to drop when the ABS activates normally. If you have an old ABS unit, you can actually check the functionality of it by doing this with all 3 solenoids, although if the pedal does not drop it could also be due to a dead or clogged pump in the bottom end. Speaking of which...
You just tested one half of the ABS functionality. The other half involves the motor and shuttle valves which purge the little reservoirs which the outlet-side pressure gets dumped into. Once those are full, the outlet side of the system can no longer be depressurized. That is what the motor and pump are for. If you are still holding the brake pedal down after playing with the solenoid, connect the motor line to 12V. You will feel a rapid vibration in the brake pedal as it is forced back up (and hear it as well). When fluid is being pumped out, the pump will be fairly loud. When the overflow chambers are empty, it will sound a lot quieter. You can also run the pump and press the brake pedal progressively harder (without doing anything with the solenoids) and when you press really hard you will feel & hear the pump fighting you. This is how a properly functioning E30 ABS system is supposed to feel & sound.
If you are like me, you are familiar with how the brake pedal drops when you trigger the ABS while driving. However, it should be matched with that high frequency vibration feedback, and you should feel the pedal fight back against you, not JUST drop. In my case, the pedal always just dropped (usually 2-3 drops as the solenoid valves dumped pressure). I now know that either the pump was dead, or (most likely) the shuttle valves were seized which meant that the overflow reservoirs would fill up and the ABS was only "good" for a very brief period during a hard stop scenario.
OK, time to wrap this up. With the electrical stuff connected, repeatedly activate all 3 solenoids one at time while pressing hard on the brake. When the pedal bottoms-out, activate the pump and let it force the pedal back up. Do this a 3-5 times for each one, and this will get most of the air out of the back-end and into the inlet/outlet side. Then repeat this 3 times while you have a partner operating the bleed nipple on one of the rears, then the front right, then the front left caliper. This will help to ensure that fluid is forced into the back-end, and any trapped air is able to get out into the lines. Thereafter, disconnect the battery and ALL of the wires you installed and bleed all 4 corners as usual. I got a few medium sized bubbles out of the rear and a tiny bit of air out of the front-right after running the ABS. As noted much earlier, there should be VERY little air in the ABS unit after simply refilling it and bleeding it normally, so all of the above is basically needless. Time-wise, it would have been a hell of a lot faster to toss the wheels back on and go do some hard braking cycles (live and learn?). With a fresh unit, there was so little air trapped that only one cycle of that would have been needed IMO.
Oh well, at least I know it is purged now!
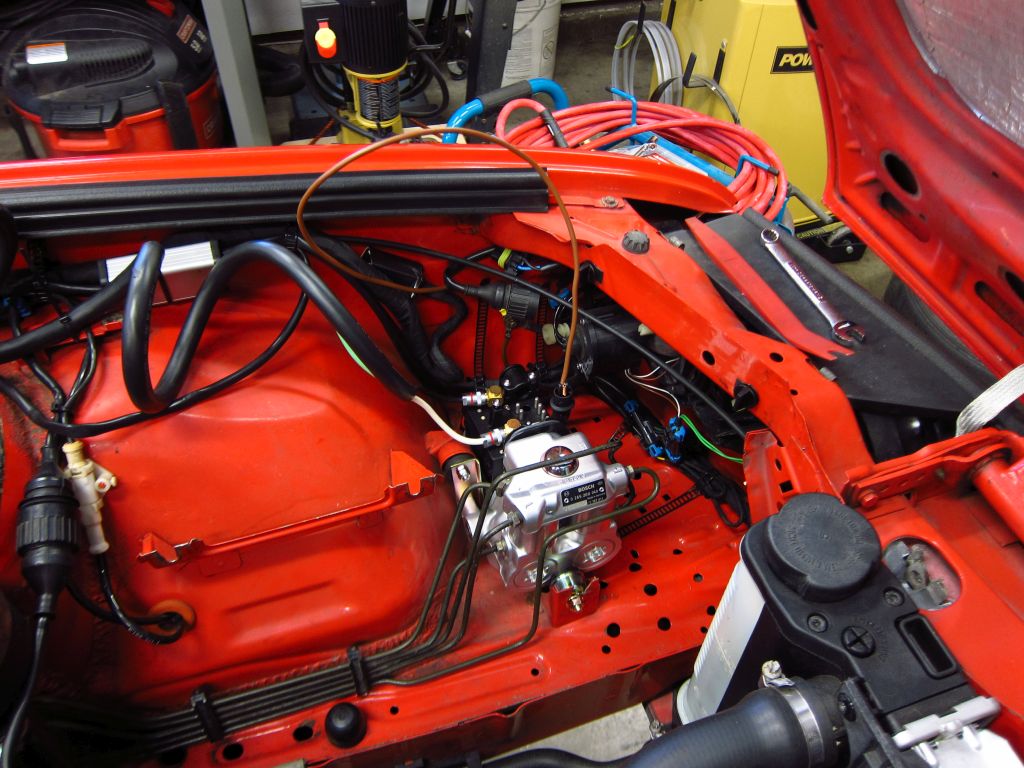
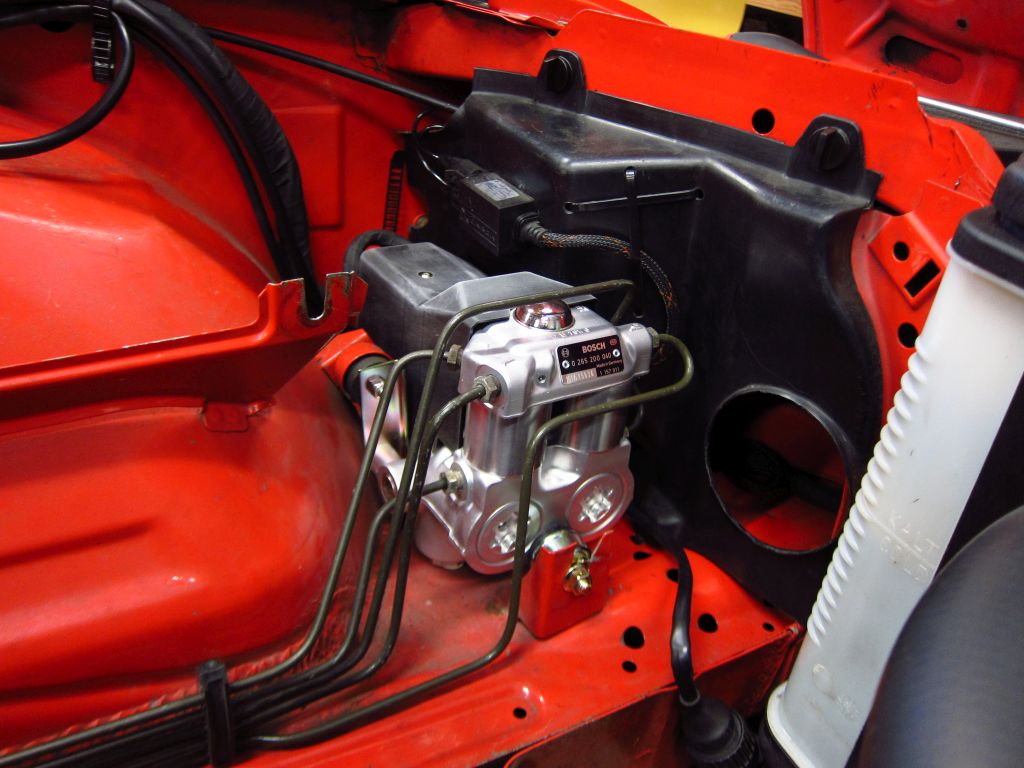
With all of that drama out of the way, here's the new unit sitting in its home. It sure is a nice looking unit!
If Jordan or someone who is more familiar with the intricate details of the ABS unit sees an error in my analysis of how the unit works, please let me know. I am going based on pictures of the guts, looking at the layout of the lines and inferring things based on how the unit behaves when I manually activate it.
Here's the thread where Jordan describes the product:
https://www.r3vlimited.com/board/for...-e30-abs-pumps
And here's his site:

I did a bit of reading about bleeding the ABS unit, since a lot of BMW owners seem to have tales of woe about air being trapped in there, needing to go to the dealer to have them activate the unit, and a general sense that it is a real pain to bleed the thing. At this point, I think that it is mostly needless worry, at least for the E30 ABS units since they are absurdly simple compared to the units later/modern cars use. With that said, I do think that it is entirely possible for there to be problems with air being stuck in there if you have a 30+ year old ABS unit that is totally gunked up and unable to properly actuate. Now that I have this fresh unit installed, I can say with 100% certainty that the original ABS unit in my car had not worked properly since I bought it 15 years ago. Overall, I feel that general pedal-feel has improved a little under normal braking, and when the ABS does activate it absolutely works better than before. Based on Jordan's photos of the internals and my experimenting with jumping relay contacts, I am pretty sure that the pump / shuttle valves have not been working. The short story here is that replacing the ABS unit was the right choice and was well worth the significant cost.
Jack the car up, put it on stands and remove all 4 wheels. This is all so much easier with all of the wheels removed. Also, disconnect the battery 12V terminal.
Assuming you do not want a tremendous mess under the hood, the first order of business is to push all of the fluid out of the system. If you have ever bled the brakes before, then this is super easy, except you don't stop to refill the reservoir. The fastest way to empty it is to start with a front brake since the plunger in the master cylinder for those moves more fluid. Whatever the case, you need to bleed both fronts and one of the rears until nothing but air comes out. In my case, I wanted to get all of the old ATE Super-Blue out since I was going to refill the system with Motul RBF600, so I bled all 4 corners dry. For reference, I bled out all 4 corners and the clutch with the reservoir starting at the MAX line, which measured out to ~400mL of fluid. However, the ABS unit definitely still had a fair amount in it, down in the lower chambers which won't expel fluid when you are bleeding stuff. Also, I have almost-new Stoptech pads & rotors on there, so the calipers were holding nearly the minimum amount of fluid.
If you are aiming to fully purge the system, you will also want to get all of the old fluid out of the calipers, which requires you to unbolt them and orient them with the bleed screw pointing downward. You can use a C-clamp to squeeze the fluid out if you want, but whether or not you do that, you will want to have someone pump the brake pedal to get the last of it out.
With the system as dry as it can get via bleeding, it is time to prep the old ABS unit for removal. Pop the black line-holders loose and free the lines from the slots. Do not use a screwdriver as this can damage the protective coating on the lines. A plastic trim popper tool is ideal (red-on-red is hard to see, but you can see what I used). Freeing the lines from the holders is key because you'll need a fair amount of play to move them free of the ABS unit, and you really don't want to bend them to be deformed.
Whip out your trusty 11mm flare nut wrench. I do not recommend using a regular 11mm wrench...while it may be unlikely that you will strip the flare nut, you will sure be sorry if you do. Go spend the $10 and get the right tool for the job. Even on my car, which has been in mild/relatively dry CA weather all its life, the flare nuts on the ABS unit took a good amount of torque to break free.
Remove the 13mm nut on the front rubber grommet that holds the ABS unit to the chassis. Disconnect the brown ground wire from the 10mm nut at G104 (chassis ground point on the inner fender next to the ABS unit) and route the wire free of the main harness next to it. I disconnected it from the 8mm nut on the ABS unit, and that ended up being a big pain to reconnect on the new unit, so just take the wire out with it and swap it on the bench. Also, don't yard too hard on the nut at G104...it is on thin sheet metal, and you'll really be sorry if it shears of. If it is all corroded, hit it with some penetrating oil and let it sit overnight.
When everything else is unbolted, loosen/free the flare nuts & lines one at a time. I tore paper towels into quarters, folded them and wrapped them around each hydraulic line as I removed it, with a little zip tie to hold them in place. The feed line for the rears (the long one that goes up & over the ABS unit) managed to have some residual fluid in it still and was drippy. So, keep a rag nearby and ready to pick up any seepage that comes out of a line or the ABS unit.
With the lines free of the ABS unit, you can tilt it up and out. It is tight, but tilt the inward/engine side up and toward the front of the car to slide it out. There is a little pointy tab on the chassis bracket, and I found that bending it toward the engine a bit greatly eased removal and reinstallation. Bend it straight again once the new unit is in. Also note the little alignment tab on the metal casing of the front bumper on the ABS unit. It should be somewhere in the gap on the chassis bracket, and make sure that the rubber bumper is properly sitting on the hex nut in its middle (if you try to rotate it, you will feel it jump as it aligns on the flats). Installation is the reverse of removal.
With the new ABS unit installed and the hydraulic lines reconnected, you will need to refill the system. I bought 1.5L of fluid, of which I ultimately used about 1.2L of. Really, if you are very judicious about not wasting fluid when you refill & bleed the system, you could do it with 1L, but I'd have some extra handy just in case.
Fill the reservoir and start bleeding as normal. Honestly, it does not matter which corner you start with. The conventional wisdom is to go farthest-to-nearest to the MC, but our cars have 3 separate circuits after the ABS unit (F-L, F-R, Rear) and it just doesn't matter. Do the normal bleeding procedure at all 4 corners until fluid comes out. At this point, you have a choice to make. You can keep bleeding until you no longer get large air bubbles and the pedal feels firm, and then go drive it in a dirt lot to fire the ABS system, or you can activate the ABS unit in the garage and get the last of the air our while the car is up on stands. I opted to trip the ABS unit electrically so that I would not need to jack it up and take the wheels off again, but simply going and driving it is IMO the better method (it will be faster, and does not involve questionable electrical practices).
ABS Bleed Option 1: Drive it and trigger the ABS by braking hard
I recommend this method, and knowing what I do now, I would have done it this way.
For some, this might be the easiest option. As far as I can tell, if your ABS unit is clean and clear (like it would be with a rebuilt unit), there is relatively little air that can remain in it after you refill the system and bleed it the traditional way. There are a few check valves between the pump section and the inlet lines, as well as some bypass/return tubes, so a little air can end up in there, but it is pretty miniscule. This is NOT the case with newer cars (likely even the E36) which absolutely do require ABS unit activation to bleed, so we are lucky that the E30 system is so simple from a bleeding standpoint. So, once you have bled out all of the air you can during the refill-bleed process and the brake pedal feels stiff, put the wheels on and go hit the brakes in some gravel or dirt to fire the ABS good and hard 4-6 times. Go back home, take the wheels off and bleed the system again. Personally, I would do 2-3 cycles of activating the ABS unit and bleeding. With the bleed nipples closed, the ABS unit is not creating a net movement of fluid, so the air bubbles will be pushed into the lines, but it might require multiple cycles of activating it and bleeding to get it all out of the back-end. Now, my gut feeling is that you will be 99% fine after just one cycle of this, but if you are anal retentive and want all of the air out, do it at least a couple of times.
Regardless of whether you use this method or the following one, I would re-bleed all 4 corners after a month of driving since by then the jostling and vibration from the road should have broken all of the smaller bubbles free inside the system. Is it actually necessary? No, probably not...if the pedal feels firm and you can lock up the wheels, then it is not strictly needed. In my case, I like knowing that there is no air in there, both to get optimal pedal feel, and because air pockets can allow corrosion to occur. After spending a grip of cash on the nicely rebuilt ABS unit, I want to keep it fresh for as long as possible, and will be flushing the fluid once or twice a year to keep moisture-related gunk from building up.
ABS Bleed Option 2: Sketchy electrical shenanigans
This involves all sorts of "bad practices" and is needlessly complex, so Option 1 is the way to go. But, if you like tinkering and are competent with electrical work, you might have fun with this.
ONLY do this if you are actually going to use the proper gauge of wire and are at least a little familiar with electrical work. There is minimal risk of personal injury, but you can easily cause massive damage to the electrical system, or even a fire if you cut corners. You are going to be connecting wires directly to an unfused 12V source, from a battery that can provide hundreds of amps. I take no responsibility if you start a fire or otherwise end up with a disaster: proceed at your own risk. Additionally, option 1 is the better way to go now that I went through all of this. But hey, someone has to waste the time to be able to tell others not make the same mistake!
With the ABS unit mechanically installed, ensure that the harness plug is removed and out of the way, with both relays removed. I recommend putting tape over the contact-side of the harness plug since pins 6 & 12 are unfused 12V connections, and you don't want those bumping into a bolt head or the body of the ABS unit. If you refer to the wiring diagram, I can walk you through what you need to connect in order to activate the ABS system such that trapped air will be pushed out.
The ground strap on the 8mm nut from the motor needs to be attached to G104 (chassis ground) as usual. Additionally, you will need to be able to connect pins 1, 3 & 5 of the input connector to ground, in a way such that you can do each of them one at a time while bleeding. The tricky part involves relay terminals 30 for the two relays. The smaller 4-pin socket is where the motor relay goes, and it is rated at 50A, so this is definitely a high-current connection. The 6-pin socket is for the solenoids which open/close the inlet-to-outlet path for the brake fluid. You will want to have wires in both of the #30 terminals, but NOT connected to 12V in any sort of permanent way...you will be manually touching these wires to a 12V source, and never for any prolonged period. Last, you need that 12V source. As far as getting 12V, you will either use the batter 12V post, or the block on the firewall if you have the battery in the trunk. The absolute minimum size wire for all of this is 12ga, with 6-8ga being better. Bonus points if you have an inline 50A fuse handy, as that will add a tremendous amount of protection against "oopses."
I do not recommend just jamming wires into the #30 holes, but I have seen others do it that way. At least zip-tie the wires onto the plastic post in the middle if you do this, so that they cannot be yanked loose. As it turns out, the terminals are all 4mm size, which was a great fit for some spare audio banana plugs that I had. As for the 3 solenoid grounds, I had an alligator clip test lead head, which also had a 4mm socket, so I clipped the ground in one end and could simply unplug/plug the other end among the 3 terminals.
Here's a little cartoon of what you will end up needing to do.
I had some spare 6ga power wire left over from my audio build, so I used that as my 12V supply. First, I attached the "working end" to the steering wheel so that it could not possibly fall onto the chassis somewhere. Again, you REALLY wouldn't want this thing shorting to ground.
I then attached the other end to the 12V terminal block. Use the lower bigger one...this is the unfused supply for the starter. Do NOT use the smaller upper nut...this is the power supply for the fuel injection/DME, and it has an inline 50A fuse which you will be very sorry if you blow since it is hard-wired onto the supply line back in the trunk. Jamming it in there like I did is not an ideal way to do it, and you would be much better off actually securing a ring terminal under a nut. Oh, and before any of this, you should have disconnected the battery, doubly-so if you plan to get a wrench on there. Wrenching on this terminal with the battery connected is the definition of stupid, so disconnect the battery (I repeat myself). I opted to jam the ring terminal in between the existing one for the starter feed and the block body, but that is improper procedure..."trust me, I am an expert" lol.
Finally, I made the connections over at the ABS unit. Since the person operating the brake pedal would also need to intermittently connect the #30 terminals, I hooked up some spare 10ga SO cord that I had lying around. I zip tied it onto the bracket where the airbag sensors used to be so that it would not yank on the connections at the ABS unit. When everything is hooked-up and secure, reconnect the battery.
Note that in the following steps, you will be touching-off wires to that 12V wire. This generates lots of big sparks, over upholstery and carpeting. If you have a fire blanket, use it. If not, pay attention and do not walk away until you are certain that nothing is smoldering. Fire prevention is your responsibility here.
You can play around with this a little before actually bleeding stuff. Press the brake pedal firmly and activate/deactivate a solenoid by touching its wire to the 12V wire. Make contact for 0.5-1 second at most to avoid heating it up too much. You will feel the pedal drop when you release the connection, and you can probably do it 4-5 times while pressing the brake before the pedal bottoms-out. When the solenoid valves activate, they disconnect the inlet lines (from the MC) from the outlet lines, letting pressure from the outlet/caliper side bleed back down into some reservoir chambers. When you deactivate the solenoid valve, the inlet-outlet connection is opened, and the MC pushes more fluid back into the calipers. That is why the pedal drops down if you continue pressing it while cycling the solenoid, and why it seems to drop when the ABS activates normally. If you have an old ABS unit, you can actually check the functionality of it by doing this with all 3 solenoids, although if the pedal does not drop it could also be due to a dead or clogged pump in the bottom end. Speaking of which...
You just tested one half of the ABS functionality. The other half involves the motor and shuttle valves which purge the little reservoirs which the outlet-side pressure gets dumped into. Once those are full, the outlet side of the system can no longer be depressurized. That is what the motor and pump are for. If you are still holding the brake pedal down after playing with the solenoid, connect the motor line to 12V. You will feel a rapid vibration in the brake pedal as it is forced back up (and hear it as well). When fluid is being pumped out, the pump will be fairly loud. When the overflow chambers are empty, it will sound a lot quieter. You can also run the pump and press the brake pedal progressively harder (without doing anything with the solenoids) and when you press really hard you will feel & hear the pump fighting you. This is how a properly functioning E30 ABS system is supposed to feel & sound.
If you are like me, you are familiar with how the brake pedal drops when you trigger the ABS while driving. However, it should be matched with that high frequency vibration feedback, and you should feel the pedal fight back against you, not JUST drop. In my case, the pedal always just dropped (usually 2-3 drops as the solenoid valves dumped pressure). I now know that either the pump was dead, or (most likely) the shuttle valves were seized which meant that the overflow reservoirs would fill up and the ABS was only "good" for a very brief period during a hard stop scenario.
OK, time to wrap this up. With the electrical stuff connected, repeatedly activate all 3 solenoids one at time while pressing hard on the brake. When the pedal bottoms-out, activate the pump and let it force the pedal back up. Do this a 3-5 times for each one, and this will get most of the air out of the back-end and into the inlet/outlet side. Then repeat this 3 times while you have a partner operating the bleed nipple on one of the rears, then the front right, then the front left caliper. This will help to ensure that fluid is forced into the back-end, and any trapped air is able to get out into the lines. Thereafter, disconnect the battery and ALL of the wires you installed and bleed all 4 corners as usual. I got a few medium sized bubbles out of the rear and a tiny bit of air out of the front-right after running the ABS. As noted much earlier, there should be VERY little air in the ABS unit after simply refilling it and bleeding it normally, so all of the above is basically needless. Time-wise, it would have been a hell of a lot faster to toss the wheels back on and go do some hard braking cycles (live and learn?). With a fresh unit, there was so little air trapped that only one cycle of that would have been needed IMO.
Oh well, at least I know it is purged now!
With all of that drama out of the way, here's the new unit sitting in its home. It sure is a nice looking unit!
If Jordan or someone who is more familiar with the intricate details of the ABS unit sees an error in my analysis of how the unit works, please let me know. I am going based on pictures of the guts, looking at the layout of the lines and inferring things based on how the unit behaves when I manually activate it.


Comment