Announcement

Collapse
No announcement yet.

E46 330 rack into E30

Collapse
X
 
  • Filter
  • Time
  • Show
Clear All
new posts

    #46
    I like you dedication here. I'm enjoying brainstorming. Although i do want to start piecing my car back together :(

    As far as the upper U-joint goes, if the bolt is in there and it went into the channel on the splines, you're good to go. I see the bolt so that looks correct.
    regarding the upper u joint - there is no channel on the splines up there like there is on the rack side. It's just a bolt that purely clamps down, which is why I am unsure if it's all the way in or not (probably is).

    Comment


      #47
      If there's no notch, either the splines are gummed up or the u-joint must be hitting something. Otherwise, it would be able to slide freely until one of those things happened. You may be able to gain a little there, just make sure you don't foul the firewall in the process. Spreading the pinch with a screwdriver may help as well.
      Interested in vintage cars? Ever thought about racing one? Info, photos, videos, and more can be found at www.michaelsvintageracing.com!

      Elva Courier build thread here!

      Comment


        #48
        Originally posted by ELVA164 View Post
        If there's no notch, either the splines are gummed up or the u-joint must be hitting something. Otherwise, it would be able to slide freely until one of those things happened.
        If that is the case I absolutely can gain some space there. Upset though as I couldn't get this out for the life of me during the first go around. I am not sure why anything would change this time. Shit is not budging what so ever. Forward or backwards Full stop.

        Oh well that's not specifically an E46 rack problem so I'll keep that out of this thread.

        Would love to see someone else's free moving top coupler joint. I just can't accept it lol.

        Comment


          #49
          If it helps, mine was so corroded it took 2 days to get it off. I used a spline file on inside and outside of both ends, greased, then reinstalled.
          Interested in vintage cars? Ever thought about racing one? Info, photos, videos, and more can be found at www.michaelsvintageracing.com!

          Elva Courier build thread here!

          Comment


            #50
            Originally posted by ELVA164 View Post
            If it helps, mine was so corroded it took 2 days to get it off. I used a spline file on inside and outside of both ends, greased, then reinstalled.
            Wha-...what's a spline file? You used it after you got it out yes? I feel like a silly ape trying to pull this thing out lol.

            On a side note though, I officially have all my parts for the power steering system. All the hoses and the rebuild kit for my vickers pump. Oh wait jk, the pump kit which was back ordered from Germany for 15 days finally got here and was missing an o-ring....pelican parts you are KILLING ME.

            Comment


              #51
              I have an E46 rack waiting to install so I've been keeping an eye on this as well, although mine is an airbag car with a different steering knuckle/coupler joint.

              Anyhow, I'll just chime in and echo what's already been stated, that your first picture in post #36 looks like the steering column splines aren't fully mated to the female splines of the steering knuckle. Its a bit grimy, but if I put my face 3 inches from my computer screen, I think I can make out some female splines in the knuckle that aren't engaged to the male splines.

              Have you tried cleaning off the grit/grime on the splines? I think both of your problems stated are related to the knuckle not being engaged fully. (Not sure if you can make out any "clean" spots on the steering column splines indicating where the knuckle engaged up to when the original rack was installed...)

              EDIT: Also, there's typically a dust cap that goes over the steering rack input spline that I don't see on yours. Is it on the original rack that you can swap over? Seeing the sandy grit in that area made me want to point that out.
              Last edited by boxy30; 05-17-2017, 12:42 PM. Reason: dust cap comment

              Comment


                #52
                Found this picture on the E36 rack install How-To that seems to show how close to the firewall the steering knuckle is.

                Comment


                  #53
                  Originally posted by boxy30 View Post
                  I have an E46 rack waiting to install so I've been keeping an eye on this as well, although mine is an airbag car with a different steering knuckle/coupler joint.

                  Anyhow, I'll just chime in and echo what's already been stated, that your first picture in post #36 looks like the steering column splines aren't fully mated to the female splines of the steering knuckle. Its a bit grimy, but if I put my face 3 inches from my computer screen, I think I can make out some female splines in the knuckle that aren't engaged to the male splines.
                  I appreciate the input! We are in aggreance that there are splines in there exposed. Absolutely.

                  Have you tried cleaning off the grit/grime on the splines? I think both of your problems stated are related to the knuckle not being engaged fully. (Not sure if you can make out any "clean" spots on the steering column splines indicating where the knuckle engaged up to when the original rack was installed...)
                  That's exactly it though, I haven't moved the coupler at all on the steering shaft. In fact it won't budge, and that's why i am in this situation. That is the stock location/depth for the shaft to be inserted into the coupler.

                  So my question is whether or not it's possible to push it further on as
                  You are suggesting. That would fix my problem. I am hesitant to pound on it with a hammer/punch/wedge though if it's not actually possible. I don't want to damage things. I have attempted already to get it farther on unsuccessfully. It's much easier to use a punch to get it on that off. There is no angle to get it off, but there is one to hit it farther on. So if someone can confirm that they have slid it on farther, then I will have the confidence to "persuade" it.

                  EDIT: Also, there's typically a dust cap that goes over the steering rack input spline that I don't see on yours. Is it on the original rack that you can swap over? Seeing the sandy grit in that area made me want to point that out.
                  e30 rack doesn't have a dust cap that I am aware is transferable (at least mine did not). Also, I'm fairly positive the E46 dust cap is not a part you can purchase separately. If you a part number for that let me know. I would like it, I've been thinking about that myself. When I swapped the rack in my actual E46 a few years ago, mine was Cracked but still functional. I recall not being able to source new one.

                  Also, the sandy grit is actually just metal shavings from the coupler modification. Remember, I can't get my coupler off the steering shaft so I have to do this with it attached. Regardless, the E46 rack was off the car when this was happening, and I cleaned up afterwards. It's actually fairly nice down there as I've been wiping it down as I've been tinkering all winter.

                  Originally posted by boxy30 View Post
                  Found this picture that seems to show how close to the firewall the coupler is
                  Ok so at first I totally agreed. But the more I look at it, the more it appears to just be the firewall material plooping out that makes the coupler appear closer. If only there were some pictures from a similar angle as mine showing it farther on, or even just flush. It's that lip. I just looked through the last 40 pages the e36 rack swap thread and saw a
                  Few photos but all looked to be same distance as mine, or the inner pass through wasn't visible

                  Has anyone recently replaced a coupler and know that it is possible to insert it farther on?

                  EDIT:

                  see this post over in my other thread - long story short, I can't get this couple top joint to budge even with a 20lb sledge and some creative positioning. So i've accepted that I need to think of a different way. At a loss here (for the moment). Not sure how I can get that lower pinch bolt in without modifying the rubber guibo, which I will not do. I also would like to not drive around without the pinch bolt......but I just cannot see how it would be physically possible for it to come off with the rack bolted in and the top coupler bolt theoretically unmovable......


                  so as of right now..... I have to either do something with the guibo......ditch the gargastic stuff I bought and manufacture my own (again... total pain and possibly not realistic), or simply add some washers in there somehow. But even with that I am thinking it may not be enough to offset it. I will have to measure. Or I can just live with that lower bolt not in...... but still that just seems a bit darwiny to me (so many ellipses haha - I'm definitely not upset at all :))
                  Last edited by BaltimoreBimmer; 05-19-2017, 01:59 PM.

                  Comment


                    #54
                    Originally posted by ELVA164 View Post
                    Another idea I just had which would be mega-bonkers but would probably work would be to use a spacer in the center with an internal thread. Screw a section of threaded rod into each end so it only sticks out maybe a half inch, then place the two spacers between the halves of the steering shaft. Then you could unthread both ends of each spacer until they pop through the holes in each side, then tighten with a nut on each end. Now this is starting to feel like one of the annoying issues we encounter on our race cars, haha.
                    So a guy at work happened to have these fasteners laying around. I think these are similar to what you were talking about, or at least are a good alternative.

                    http://imgur.com/a/CdsPX
                    Last edited by BaltimoreBimmer; 05-19-2017, 02:00 PM.

                    Comment


                      #55
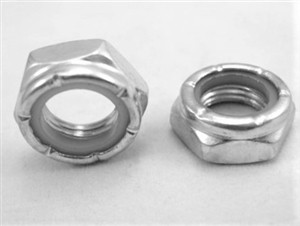
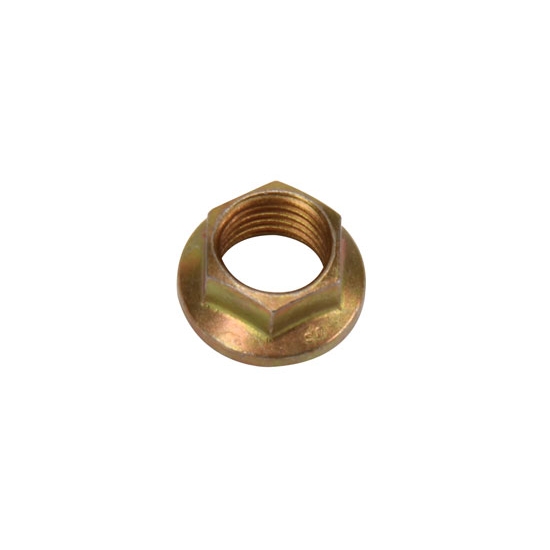
                      I've never seen anything like that, very interesting. I meant something like this:


                      Or a jet nut like this:

                      Interested in vintage cars? Ever thought about racing one? Info, photos, videos, and more can be found at www.michaelsvintageracing.com!

                      Elva Courier build thread here!

                      Comment


                        #56
                        Got it working!

                        Ended up adding 4 extra washers per side in addition to the spacers. Used M10 flat washers. It was pretty tough getting this all hooked up. It was quite literally back breaking as this was all done with the coupler on the car. The spacing is now spot on though. I can put in the pinch bolt with no interference when everything is bolted up.

                        A couple things to watch out for:

                        First of all - this is a total bear to get together and at times I seriously questioned whether I would be able to fit it together. After it was all said and done though, I managed to do it without grinding down the bolt heads or the coupler.

                        Secondly, there are plastic inserts in one side of the coupler 'S'. These are the key to success. They originally have a bit of material above the coupler itself, however I ground them flush with the coupler when removing the rivets earlier. I accidentally pushed one of those inserts out while trying to fit all the extra washers. This ended up creating the extra space I needed to get the bolts through. So you are going to want to remove them to install the hardware. After I finagled the bolts through I was able to reinsert the plastic piece between the bolt and the coupler. Others have removed them completely but then you have extra space. Here is how it looked before I reinserted the plastic piece:


                        Then I put some green locktite ont the bolts and tightened them. I wasn't able to use a washer on the nut side, due to the space and amount of washers needed to clear the rack splines. ALso, don't bother using the 8mm allen wrench on the bolt, you will just get your tool stuck (even with the round end). Clamp on so vice grips onto the bolt head. Before that though I did use a lot of the screwing action from an 8mm bolt/wrench to guide the bolts into their holes. This probably would have been less difficult if I was able to get the coupler onto my work bench, but it would still be difficult to get the bolts through.


                        here is a picture showing the fit with the pinch bolt in. this is before I had the plastic piece reinserted (wanted to be sure everythin was good)


                        closeup after torqued down, you can tell there really wouldn't have been room for ever one more washer!:


                        I'm reading elsewhere that using an e30 rack to pump hose is actually better than an e36 one. I think I will tackle the hose situation tomorrow and update this

                        Hose Update: the 2 low pressure hoses line up fine. The fluid container to the rack hose could possibly be bent just a bit, up to you. The e36 high pressure hose I got however has the incorrect fittings. It has one large and one small banjo end, whereas the e30 HP hose has both ends the same. I was able to bend my original e30 hose to work as a test. Now I will be ordering an e30 HO hose. Here is a picture of how the hoses will look installed:


                        other side/better angle - notice the high pressure line is bent quite a bit to make it fit (this is just the hose flexing, not actual bending of metal - although you will still have to slightly bend the end that goes to the rack)


                        and here is how the rack looks - new looking one goes to fluid container, gross one is the old e30 rack to pump hose that I am replacing with a new e30 one.

                        Last edited by BaltimoreBimmer; 05-22-2017, 04:54 AM.

                        Comment


                          #57
                          Awesome, I'm glad to hear you got it sorted out.
                          Interested in vintage cars? Ever thought about racing one? Info, photos, videos, and more can be found at www.michaelsvintageracing.com!

                          Elva Courier build thread here!

                          Comment


                            #58
                            Thanks for the moral support through the process! Having everything out helps a bit in terms of organizing/routing hoses. Even if the e36 hose had fit, it would have required
                            Quite a bit of bending.

                            Ended up putting in all the water hoses last night as well as routing most of the electrical harnesses. Looks like there is still no interference with the hoses so it should be good. Have to get the intake on though to be 100% sure. Won't get my HP hose till Friday. It should be at least another week before I turn her on and really see how it is (still need to put the subframe and fuel tank in)

                            Comment


                              #59
                              Nice to see this done. Good to learn that the e30 PS hose works.

                              Were you using the Garastic spacers set?

                              Comment


                                #60
                                Originally posted by socreates_wk View Post
                                Nice to see this done. Good to learn that the e30 PS hose works.

                                Were you using the Garastic spacers set?
                                Yup. Went with garagistic over akg as it was cheaper and included the steering rack spacers as well. I'm curious if others will need those washers or if my coupler was indeed somehow not fully seated (highly doubt the later). Ordered the rack to pump e30 hose yesterday. Hopefully will be here before the weekend.

                                Got my subframe ishings pressed in finally so this weekend i can make some serious progress buttoning her back up. One step closer to actually testing this out lol

                                Comment

                                Working...
                                X