
I haven't ridden in a stock E36 M3 in years, so I can't really compare it to that. The TC Klines are definitely firm, but they are compliant enough that it's not an issue. And they are leaps and bounds better than the tired H&R / Bilstein combo that was on the car previously.
-
A few small updates. My factory key fob wasn't working, so I took it apart to find one of the battery solder joints had cracked. I used my soldering iron to remedy that and replaced the battery. I also used some plastic weld to fix a cracked screw hole. It now works every time.
 PXL_20240130_195854148 by mike.bevels, on Flickr
 PXL_20240130_194853774 by mike.bevels, on Flickr
 PXL_20240130_194039843 by mike.bevels, on Flickr
 PXL_20240201_183006756 by mike.bevels, on Flickr
While I have 5 "Stamped" Style 24s, I wanted to pick a 5th DS2 to go with the original set that came with my M3. I found an original spare on FB Marketplace still wearing its original tire (which I'll replace if I ever switch back to DS2s). A few scratches from being in storage for so many years, but overall very nice!
 PXL_20240202_210209250 by mike.bevels, on Flickr
 PXL_20240202_210222936 by mike.bevels, on Flickr
Other than that, I've just been driving it and enjoying the new TC Kline SA coilovers.
 20240129-DSC_7255 by mike.bevels, on Flickr
Comment
-
Because the factory rear floor mats were coming apart in my E36 M3, I bought a set of rear Coco Mats to match the fronts. The classic blue/black pattern pairs with the Boa Boa upholstery nicely.
It was actually quite an experience. After placing the order, Coco Mats sent a kit with a material sample, floor mat templates to verify fitment, and a branded pen! After I confirmed fitment and material choice, I was placed into the production queue.
The mats were delivered faster than expected, in about a week. They match the fronts and fit perfectly. As The Dude in The Big Lebowski said, the mats "really tie the room together."
The last items on my interior checklist are dying the rear deck black and fixing the sunroof.
 20240209-PXL_20240209_170647116 by mike.bevels, on Flickr
 20240209-PXL_20240209_171629843 by mike.bevels, on Flickr
 20240209-PXL_20240209_171703847 by mike.bevels, on Flickr
 20240209-PXL_20240209_171724337 by mike.bevels, on Flickr
 20240209-DSC_7785 by mike.bevels, on Flickr
 20240209-DSC_7784 by mike.bevels, on Flickr
Comment
-
I've started focusing some attention to this M345's exterior. It's very presentable as is, but there are a few items that need to be addressed.
I decided to start things out with some dent removal. I've always wanted to try my hand at PDR, so I ordered a basic set of tools from Amazon for $50. Going into this, I knew proper PDR requires a TON of skill, none of which I possessed, but I like to learn.
The biggest offending dent was one in the nose panel, about half the size of a golf ball. It's kind of shocking how not noticeable it is in photos. I took removed some plastic under the hood gently applied pressure with a few of the tools. the dent is mostly out, but the paint (which was already cracked and chipped) needs to be addressed. So, this wasn't truly paintless dent repair. When I paint the passenger door (more to come on that later), I'll sand down this area and apply prime/paint/clear. There's another large chipped area under the passenger-side headlight that also needs paint.
 20240222-PXL_20240222_220236236 by mike.bevels, on Flickr
 20240220-PXL_20240220_213344186 by mike.bevels, on Flickr
 PXL_20240224_181016260 by mike.bevels, on Flickr
I also addressed a small dent in the hood, which likely needs a pro to clean up... but I'll keep trying. :-)
 PXL_20240223_174106985 by mike.bevels, on Flickr
There's a small section of clear-coat failure on the front passenger door, which exposes some primer where the base was buffed away. I already have color-matched paint and clear (aerosol), so when it gets warmer I'm going to sand that area and paint it.Comment
-
Nice results with the dent removal. Came out pretty good considering it's right on a hard body line.
I've done the hammer and 2x4 style before, but never tried my hand with real PDR tools.
My E28 certainly needs some attention, maybe I should buy a real set of tools.
How much did the kit from Amazon run you?Comment
-
Thanks! Yeah, it's far from perfect, but should look good with some sanding/painting that I'll do when I tackle the passenger door.
The kit was $50 and came with ~8 different rods and a little "punch" with various interchangeable tips.
I bought the S hook at Home Depot and already had the circular metal hook which I used as a leverage point for the hood dent.Comment
-
Brake fluid flush
I bled the brakes on my '98 M3. With a power bleeder it was pretty straightforward. There was one hiccup with a clogged bleeder valve, which I took off and cleaned. Other than that, the most time consuming part was getting it on jack stands. 😂
I used Motul 5.1 fluid. The previous owner had replaced the brake lines during his ownership and they still looked good. 250,678 on the clock!
 20240228-PXL_20240228_184139114 by mike.bevels, on Flickr
 20240228-PXL_20240228_184948364 by mike.bevels, on Flickr
 20240228-PXL_20240228_185217011 by mike.bevels, on Flickr
 20240228-PXL_20240228_185621778 by mike.bevels, on Flickr
 20240228-PXL_20240228_185917761 by mike.bevels, on Flickr
 20240228-PXL_20240228_195417110 by mike.bevels, on Flickr
 20240228-PXL_20240228_203504113 by mike.bevels, on Flickr
Comment
-
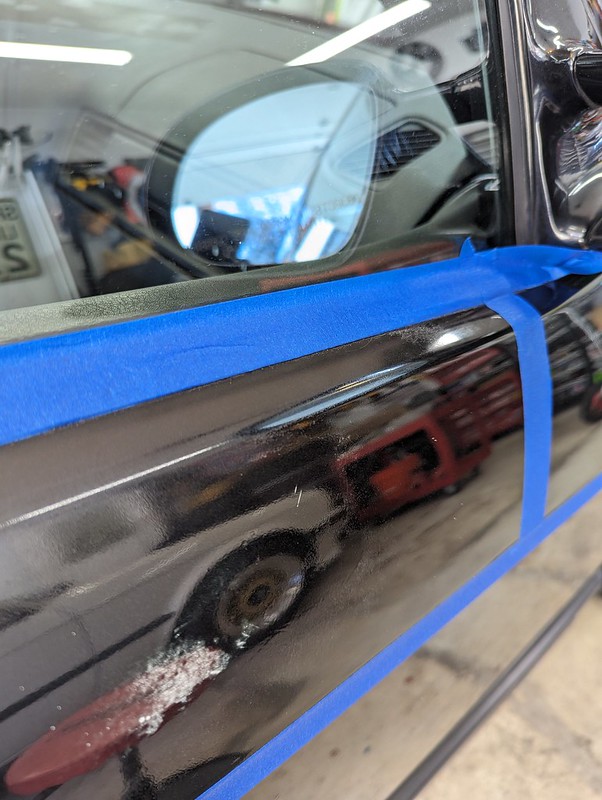
I finally painted the door on my E36 M3. There was a section of clear coat failure, which was a dull spot on an otherwise presentable car. Since purchasing the M3 in November of 2022, I've been meaning to get around to doing this. I've even had the supplies for the last six months! Honestly, I've been quite anxious about attempting it, but last Sunday I finally built up enough courage to do it.
 PXL_20240303_151555182 by mike.bevels, on Flickr
I'll preface this next part with the fact I know where I've made mistakes and I will have to repaint the door again at some point—when I build up enough courage and patience to tackle it. (And a couple of 70-degree days would be nice, too.)
After masking, I sanded (dry) with 800 grit. Where the clear coat stopped flaking off, it feathered into the existing base layer nicely. I then used a tack cloth and panel wipe to clean the sanded areas. Next, I further masked the passenger side of the car to prevent overspray hitting the paint.
 PXL_20240303_152901151 by mike.bevels, on Flickr
 PXL_20240303_154013610 by mike.bevels, on Flickr
 PXL_20240303_160607322 by mike.bevels, on Flickr
 PXL_20240303_160856574 by mike.bevels, on Flickr
Then it was painting time! With the panel above 70 degrees, I applied four coats of base, with 10 minutes between each coat. 30 minutes after the last coat of base, I applied 5 coats of clear at 10-minute intervals, with the later coats being wetter/heavier.
 PXL_20240303_171028711 by mike.bevels, on Flickr
 PXL_20240303_173841019 by mike.bevels, on Flickr
After 24 hours (today), I wet sanded the panel. I started with 1500 grit, then 2000, then 3000. Lastly, I used my orbital and rubbing compound to bring back the shine.
 PXL_20240304_165024886 by mike.bevels, on Flickr
 PXL_20240304_170108275 by mike.bevels, on Flickr
Does it look better than before? Yes, much better. The finish is mirror-like with no orange peel and no dust or contaminants that I can see. Not bad for painting in my garage!
 PXL_20240304_175654578 by mike.bevels, on Flickr
Did I do a good job of blending the panel? Absolutely not. You can see faint vertical lines where I masked. If I had painted it panel's edge to panel's edge, this would look great and I'd call it a day. But I didn't do that, so I'll need to repaint the door a second time. Live and learn!
 PXL_20240304_174712571 by mike.bevels, on Flickr
 20240304-DSC_0209 by mike.bevels, on Flickr
That's one of the things I love (and sometimes hate) about project cars: I'm always learning something new, but it can become frustrating when having to redo things two (or three!) times.Comment
-
I took my wife and kids to check out the cherry blossom trees in Washington D.C. yesterday. Peak bloom wasn't predicted until later this week, but we lucked out as last night the news outlets declared peak bloom to be yesterday. We got there at sunrise (7am) and left a couple hours later. It wasn't too crowded and the weather was great.
 20240317-DSC_2267 by mike.bevels, on Flickr
 20240317-DSC_2348 by mike.bevels, on Flickr
 20240317-DSC_2292 by mike.bevels, on Flickr
 20240317-DSC_2280 by mike.bevels, on Flickr
 20240317-DSC_2394 by mike.bevels, on Flickr
 20240317-DSC_2499 by mike.bevels, on Flickr
 20240317-DSC_2594 by mike.bevels, on Flickr
 20240317-DSC_2238-2 by mike.bevels, on Flickr
 20240317-DSC_2331 by mike.bevels, on Flickr
Comment
-
As I've said on the social medias - I love this car! Great work so far and incredibly photography.Comment
-
Mike,
your photos are amazing. This is just another reason I really enjoy our Forum & not the watered down crap on Facebook.
CAPPComment
-
Comment
-
A box from FCP Euro, what could it be?
The E36 alternator cooling pipes are back in stock! These had been on backorder for a while, so I was making due with Gorilla tape. For only $16, the Uro brand is a steal as it fits and looks just like the original.
The engine bay looks good for 251,000 miles, right?
 20240403-DSC_4390 by mike.bevels, on Flickr
 20240403-DSC_4395 by mike.bevels, on Flickr
 20240403-DSC_4410 by mike.bevels, on Flickr
 20240403-DSC_4411 by mike.bevels, on Flickr
 20240403-DSC_4425 by mike.bevels, on Flickr
 20240403-DSC_4417 by mike.bevels, on Flickr
Comment
-
When project threads overlap...
 20240417-DSC_7249 by mike.bevels, on Flickr
 20240417-DSC_7364-3 by mike.bevels, on Flickr
 20240417-DSC_7400 by mike.bevels, on Flickr
Comment
-
The thin sheet metal surrounding the E36 trunk latch is a common failure point. Cracks will develop around the T30 latch mounting screws, eventually allowing the screws to rip through the metal.
Even if you don't currently have any signs of cracking, a cheap stainless reinforcement plate will save your trunk sheet metal and prevent failure. I ordered this one up on Amazon. Two days later, it arrived at my door.
Installation is a breeze. Remove the two T30 latch screws, put the reinforcement plate in place, reinstall the screws through the reinforcement plate. Success.
 PXL_20240425_215431424~2 by mike.bevels, on Flickr
 PXL_20240425_215511413~2 by mike.bevels, on Flickr
 PXL_20240425_215939767~2 by mike.bevels, on Flickr
 PXL_20240425_220201404~2 by mike.bevels, on Flickr
Comment


Comment