
I just checked out Stim Tech. Dang they got some cool shit! That carbon fiber kick panel is now on my "to purchase" list. Carbon the e30!
-
-
Right?? I was real impressed with the rear suspension setup they’ve been working on too.Originally posted by jeenyus View PostComment
-
Still at it and edging ever closer to turbo dreams...
First off, I finally replaced my headlight that I cracked on my first road trip to New Orleans. I think I had a replacement for something like two years... one of those back burner projects, ya know?
Pulled off the outer ring of the cracked offender:

Removed the broken lens and picked out as much of the factory sealant as possible. Also, lightly polished the reflective element with a microfiber towel as a bit of dirt and dust built up on it.

Used silicon to re-seal the headlight, I'll try something else in the future if this doesn't prove to be a long lasting solution.

Reinstalled!

After I got the AC working a while back the only piece of the system I hadn't replaced with new was a condenser fan. Well the bearing went bad and it chewed a hole in my last parallel flow condenser dumping all my refrigerant into the environment. Sorry world :(
New parallel flow condenser with slim Spal fan:

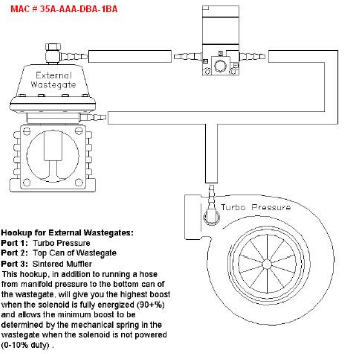
Next I moved on to some more boosty bits and got my boost controller installed. I chose a cheap MAC Valve (35A-AAA-DDBA-1BA) to handle that.
First step was getting power to it, so I picked up a double leaf spring contact (#61131370691) and wired that to switched power in the auxiliary fuse box.
Double leaf spring contact:

Added a 5A fuse for the connection, the boost controller power demand is very low so 5A should be plenty.

Ran that wire across the firewall to the boost controller that I tucked away on the battery tray. I plumbed the boost controller based on the "Second method" below, which in a nutshell provides greater wastegate control resulting in slightly better spool.


Moving on, I had a friend tig the beginning of my down pipe, and temporary "hater pipe"

Welded and installed on the car. Again, don't fret this is only a temporary solution:

Next, I started on one of the more difficult parts of the install. Packaging the front-end consisting of a condenser, aux fan, oil cooler, and intercooler. If I still lived in PA I would have ditched the AC for simplicity, but down in Texas this decision comes with great consequence.
Crafted some simple brackets using existing through holes in the radiator support to mount the 10-row oil cooler. I ended up twisting the brackets a bit to angle the 90 deg fittings as far inward as possible to facilitate intercooler install height.

Satisfied with the oil cooler position I moved the intercooler as far upward as possible and crafted another bracket with home depot bar stock. I used a bench vise and 5lb sledge to get the 90 deg bracket angles. Note the 90 deg fittings on the oil cooler tuck slightly behind the intercooler bracket, this is why I twisted the oil cooler brackets.
I drilled a hole in either frame rail to attach the intercooler bracket to the car. The frame rail nuts are accessible after removing the bumper bump stops(?).

The intercooler is lower than some setups, but I was able to get it in-line with the bottom of the radiator support. Feeling pretty good about that, and the beef boy skid plate is still the lowest point.

Pulled the brackets off and shot them with some Rustoleum:

Feeling content with the front end packaging, I made some AN lines, which was surprisingly satisfying:

Installed and routed under the headlight

The mess of oil feed, drain, and cooler lines. I protected the frame rail with some edge guard so the lines don't chafe.

Added oil feed line:

Bled the oil cooler, what a god damn mess:

With the oil lines installed and the turbo oil feed checked it was time for a first start!! Fired first try, this old machine is eager to hit the streets.
(Click me!)

Next, no one told me how stressful drilling holes in your car would be...
I understand this path isn't for everyone, but realize this car was left to die before I found it and isn't a "clean example" by anyone's definition. I view it as my testbed to hone my wrenching skills and learn something new, all while maximizing the fun factor.
Boosting down the road in Texas summer with AC cranking is the goal!
Intercooler pipe provision #1:

Pipe routing:

Intercooler pipe provision #2:

Another perspective:

Final product:

All the intercooler piping has some jiggle so I'm hoping for no issues from engine movement, but ya never know!

I picked up a valence a while back from Conrad311 that was in much better shape than what was on my car, albeit red! I straightened the dings out of it the best I could and got to chopping to fit the intercooler brackets and intercooler.
Final install and chop:

I cracked a beer to celebrate the death of this valence immediately following it's dumping:

Anddddd looking like a car again! Next step is have an IAT bung, ICV barb, and BOV flange welded to the intake tubing. Then exhaust and tuning are the only things in my way of making cool noises.
Like lipstick on a pig
 Last edited by zwill23; 05-23-2020, 10:49 AM.
Comment
-
The car is looking awesome!! I have the motor out of my car now planing.....but one of my biggest things was m20 cooling with a/c and intercooler so please let me know how it stays cool with a/c on etc ! But very nice againPERSON 1 - "It whispers to me at night...and convinces me i have to spend all my earnings on it...and buy all this stuff....to be cool...and be euro."
PERSON 2 - "Oh your married too?? Oh you mean the car....yes ....yes i agree...:shock:"Comment
-
Thanks!! I'll let you know. I have a mischimoto radiator and it kept things real cool previously, so I'm hoping it will be up to snuff still but we'll see. If I start seeing higher temps I'll upgrade the radiator and continue down the rabbit hole...Originally posted by Mpolito3355 View PostComment
-
Yes but.... maybe you would need a pusher fan instead. I'm just really curious since I want to pretty much run the same setup ....I know another of people are like "no need for a/c " I like to disagree lolOriginally posted by zwill23 View PostPERSON 1 - "It whispers to me at night...and convinces me i have to spend all my earnings on it...and buy all this stuff....to be cool...and be euro."
PERSON 2 - "Oh your married too?? Oh you mean the car....yes ....yes i agree...:shock:"Comment
-
Pusher fan if I install a larger radiator you mean, because the clutch fan is pretty large? Possibly, I prefer a mechanical clutch fan if I can get away with it. I'll cross that bridge if and when I get there.Originally posted by Mpolito3355 View Post
Yeahhh, I've gotten away without a few summers in Austin and you get kinda used to no AC as long as it's not an hour+ drive and you're moving. My passengers however... are not used it
Comment
-
Quick update to bring everyone up to speed. I am very happy to say I am finally living boost dreams! The car still has some things left until it's at its full potential, but very excited to just be driving it after 6 months on jackstands.
Here's what I've been up to over this never-ending quarantine.
Picked up one of the last pieces of the puzzle... a welder! This thing is a lot of fun and has me pondering projects beyond cars. It was a lot simpler than I expected to get into MIG welding, especially using a gas setup. My little garage is starting to feel like a novice machine shop, I'm sure it's only downhill from here.

First step in getting the exhaust together was tacking the downpipe:

Once I was happy with the downpipe exit, I added a flex pipe and a couple 45 deg bends to follow the OE exhaust routing.

Probably one of the least fun ventures was tacking the exhaust hangers in place. Really not bad though if the car is jacked up high enough.

Feeling pretty tucked!

Down pipe and first half of exhaust, notice I had another bung added to the side of the downpipe for better O2 sensor fitment.

This is about the point where I was getting the hang of this whole welding thing:

Getting longer!

Lowest points on the car:


Rear muffler placement! Forgot to take pics showing the rear muffler hangers and rear exhaust section of the car. I need to remove the exhaust again to spray some high temp paint on it, so I'll snap a few pics then.

Stopped by my welders place and had a couple bungs and a flange welded onto my intake for the air temp sensor, idle control valve, and blow off valve respectively.

Pretty happy with how it came out after a splash of paint:

Installed, also note I added a 45 deg elbow for the intake just to push it into a cooler spot in the engine bay.

I'm particularly happy with how the ICV connection came out. I was able to cut and remount the original ICV bracket and flip the orientation to keep it OEMish. Bonus points for reusing bimmer hose clamps.

Added some heat protection for the AC line, wastegate vacuum lines, oil drain, and O2 sensor. All these components were in particularly bad spots, so trying my best to cover my bases and prevent any heat related problems. I am in Texas afterall...
Also, not pictured is my turbo blanket over the turbine housing. Pretty sure it was sitting on the bench when I took this pic.

Top of the oil drain was only a 1/4" or so away from the exhaust manifold. Got it wrapped up!

Shortened O2 sensor wiring with a bit of heat wrap:

Living those boost dreams :) I currently have the car running on a max of 8 psi while I've been going through the tuning process. It's definitely a bit daunting, but I'm learning more and more every time I take it out. The end result will likely be in the hands of a proper tuner, but I at least want to get some healthy shakedowns and familiarize myself with Megasquirt before that.
Let me tell y'all, this thing is making all the right noises

A well deserved beer, thank you very much:

Comment
-
Next on my To Do list:- Plumb wastegate into downpipe
- Ceramic coat downpipe
- Paint exhaust with high temp paint
- Fill AC
- Convert to wasted spark
- Get a damn tune
- Road trip

Comment
-
I love subscriptions ! lol nice work like always man , and does the *speaks in German accent* Das boot full of da beer come from the German motherland.
If your ever pasting through tennessee let me know ! Since you have a road trip in your plans.PERSON 1 - "It whispers to me at night...and convinces me i have to spend all my earnings on it...and buy all this stuff....to be cool...and be euro."
PERSON 2 - "Oh your married too?? Oh you mean the car....yes ....yes i agree...:shock:"Comment
-
Thank you sir!Originally posted by Mpolito3355 View Post
Hah! It sure did, I picked that up in Rothenburg a few years ago and managed to get it back here in one piece. You can't visit Germany and not come back with Das Boost, c'mon son!
I'm hoping to drive the car up from Texas to Pennsylvania over the winter to visit family and I believe one of the routes passes through Tennessee. If it all works out, I'd be happy to make a stop
Comment
-
Decided to take a side step from my previous To Do list and address a brake booster problem I've had for a while. Since the purchase of bronzit four door, affectionately named GoldE, the first thing I noticed was how good the brakes felt. For the past couple years I believe the booster gradually went out on the black car, to the point where it largely feels like operating manual brakes. With the added power bump, I wanted to make sure my brakes were in order to handle romping around a bit.
Perusing around for E30 boosters I found big price tags for new units, and equally pricey used units given the gamble that I may end up with the same problem. Fortunately, most of my E30 friends from these parts are swappers and pointed me to the E90 booster setup that's common with the M5X swaps. Kid8 threw me a bone as he had an E90 booster and master laying around the garage, so for $50 and another $20 in adapters and brake lines I was ready to try the swap with my M20.
E9X booster and master w/brake line adapters:

First, I measured the distance from the base of the E30 booster to the clevis through-hole and found the E9X booster was off by 1/4". Fortunately, the E30 clevis adds an additional 1/4" since it's a tad longer than the E9X clevis.
Lopped off the E9X clevis:

Made a lil jig to eyeball the E30 clevis onto the E9X push rod:

Welded the whole way around, might not be prettiest but I'm confident this clevis isn't going anywhere:

Test fit, and it slides right in. Side note - I despise removing the E30 booster, it's so god damn wide and awkward to remove. Installing the E9X is incredibly easy in comparison, so from a maintenance perspective this is a big win in my book.

Clevis lines up right where I want it and I was able to re-use the E30 clevis pin.

Pedal placement, ready for some heel toe action:

Pulled the booster back out for some paint, so while I was in there I swapped the clutch master cylinder which was presumably 30 years old, but surprisingly leak free. I also swapped the rubber clutch line while I was at it with a fresh line.

Performed the ol'nipple swap:

Bent some brake lines to adapt the E90 master to the stock E30 lines:

Anddd final install. It's pretty incredible how well the fitment works out, everything fits back in the stock location without any trouble. One item to note is the E9X firewall must be at a tilt in comparison to E30, so the E9X brake fluid reservoir is tilted in the engine bay. The reservoir is nearly double in size though, and I was still able to get the brake fluid level above the clutch line nipple, so I believe this reservoir will work fine. If I experience issues I'll swap over a 2002 reservoir.
Also, I don't have the vacuum line hooked up in this pic, but there are no funny line adapters or anything necessary. The same size vacuum hose hooks up to the E9X check valve and the intake elbow to pull vacuum.

Feels pretty great to have this ugly chunk out of the engine bay.

Wasted Spark Install!
I used the write up on myE28 as a guide: https://www.mye28.com/viewtopic.php?t=68448
Took a trip to the junkyard and pulled the coil pack and mounting plate from an old Pontiac:

Pulled the face plate off the igniter board to gut the stock circuitry:

Removed the base plate and used a liberal amount of goo gone to remove all the circuit jelly:

I checked continuity to verify I was making the right connections and soldered a direct path from the input wires to each coil pack:

Soldered connections:

Chipped off the original igniter circuit and wire wheeled the base plate:

Reassembled:

Mounted the coil packs to the battery tray:

I picked up a quad spark since it's Megasquirt friendly and the stock GM igniter board wasn't going to cut it. The quad spark happens to fit pretty nicely on top of the glove box latch so I went ahead and mounted it there with some self tapperz

Picked up an MSD plug kit along with some screw style plug boots to maintain the stock connection:

Made a test plug to figure out how to make the wires, pretty straightforward but tedious:


Cut all the wires to length and fitted them within the stock plug wire casing after lopping the back off:


Cleaned up the engine bay after an initial test fire:

Glove box was a complete rats nest, did my best to clean it up and add some organization.

Semi-functional glove box, the megasquirt is attached with zip ties to the stock ecu bracket. Functional for now, but I'll craft up a bracket of some sort in the future. Low on the priority list :)
Happy to say the car starts right up and runs with the wasted spark setup and even the junkyard coils, however driving around the block it does feel more sluggish and misfire-y. The car wasn't running fantastic before, but it was at least running and driving pretty decently. I didn't expect to require re-tuning after a wasted spark install since the spark table and ignition settings are the same (beyond wasted spark input and the dwell setting), but maybe it makes sense to do so? Going to give that a shot before attempting any trouble shooting.
If anyone has any insight to share I'm all ears, I'd like to have everything ironed out the best I can before showing up to a tuner.

Take this as a warning R3vers, take too long on your turbo build and your machine will be turned into a hippie drying rack :P

Moving closer to launch!
 Last edited by zwill23; 08-28-2020, 03:52 PM.
Comment
-
I just caught up. Awesome work on all the intake and exhaust plumbing. Looks very clean!Comment
-
Thanks! Looking forward to hiding it all under a closed hood soon, I'm getting tired of looking at itOriginally posted by mike.bmw View Post
Comment
-
A quick update for the people!
Pulled the exhaust again to check for leaks with a smoke machine, pretty impressed how well this thing works. Thanks for the borrow Jay!

Having a one piece exhaust (two piece technically) feels a bit ridiculous but at least it made checking for leaks a breeze. Discovered four or five pin holes I remedied with some grinding and tacking:

I have to thank the city of Austin for providing this wonderful paint booth outside of my apartment. I used POR15 high temp exhaust paint, hoping that holds up pretty well:

Picked up some fresh rubba, I'll still be running 205's but I dropped to 200tw. Hoping that's enough to not completely roast the tires when boost kicks in, but I'm honestly not sure. The miata boys claim it'll be fine at 300whp or so.
The euroweaves are good for 225 tires, but the most common size is 225/45 which I have concerns about how low that would put my car at. I currently only have a few inches of ground clearance, and I wasn't okay losing nearly an inch compared to the 205/55 I normally run.
If it proves to be an issue I'll go wider, but I have a feeling the euroweaves will have to go.

Put GoldE to work and dropped the wheels and tires off:

Fresh meat

Removed my down pipe for ceramic coating and had the experience of snapping my first v-band bolt. I get the feeling this won't be my last:

Ceramic coated down pipe! Enigma Coatings in Leander was able to knock it out:

I've had a surprisingly difficult experience trying to get my waste gate plumbed into my down pipe without paying someone a small fortune. To keep the ball rolling I decided to go the fast route and install a dump pipe... sorry world. If it's awful I'll work on getting it plumbed in, but it's coming up on a year since I've properly driven this car so sometimes sacrifices must be made.
Dumpy pipe:

I swear you hardly notice the weld on it:

Here's a final engine bay pic, it could use a quick cleaning but everything is finally in it's home:

Back on the ground for the time being :)

The last items on the list are filling the AC and troubleshooting a wasted spark issue. After installing the wasted spark I now get break up as soon as the car sees boost. It also seems to break up if I slowly raise the rpms to 4-4.5k without getting into boost. I swapped my coil packs for another junkyard set a friend had lying around, and the car would barely make it past 1.5k rpms.
I'm suspecting my junkyard coils are well, junk. But a friend of mine thinks it could be a grounding issue so we'll see. I have a new set of coils coming in the mail today so hoping to narrow this one down in short order.Comment


Comment