-
-
No real progress on the project in the last week or so. Just waiting on parts and trying to make money for more parts.
Adapters showed up today so that's sweet, probably do a quick test fit tomorrow and then realize just how much fender rolling I'm gonna have to do..
Adapters are 25mm and 35mm so I'm gonna run the 35s up front and the 25s out back. Wheel specs are 16x7 et 25 and 16x8 et 12, preferably I wanted to run 20/25mm adapters all around but for the money there was no way I could pass up these adapters. So final offsets will be -10 up front and -13 out back, if my research is correct, then the wheels should fit just fine with a roll and some stretch, no big deal. I'll get some test fit shots tomorrow as well.
Waiting to purchase some gaskets and a dash flock kit right now. Been thinking about getting rid of the A/C and abs so I need to continue researching the abs delete/new lines/ T valve setups.
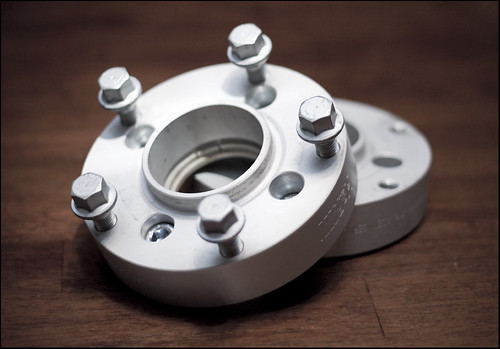
Adapters gonna adapt by m_colby, on Flickr
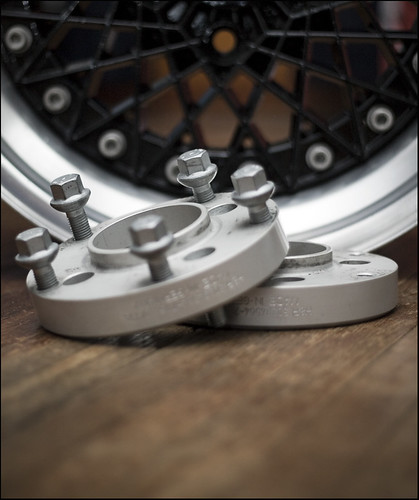
365-33 Feb 8 by m_colby, on FlickrComment
-
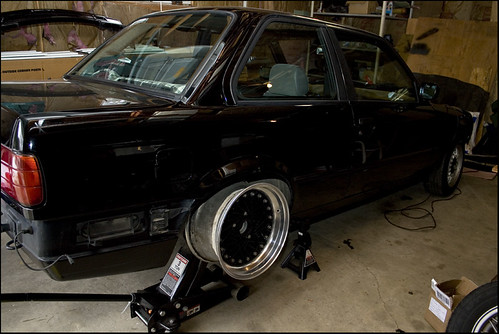
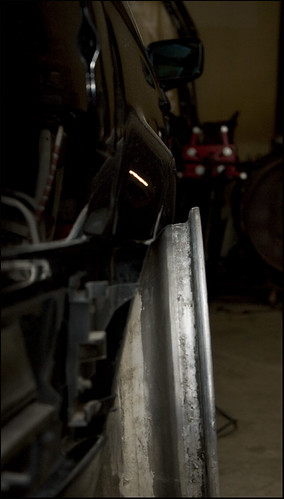
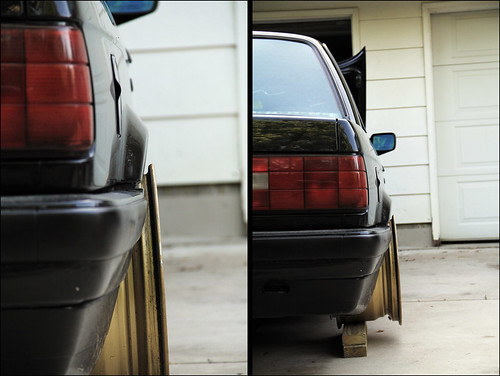
Wheel test fit today. It's gonna be a tight fit but it should work out just fine with a roll and new coils this spring. In these pics I just jacked the wheel up to simulate the car being lower than it is now, currently its on hr sports.
IMG_0087 by m_colby, on Flickr
IMG_0078 by m_colby, on Flickr
Rear fitment. Gonna need a roller for sure! I'm pretty sure it will work out, if not I'll try hunt down some 20mm adapters instead of the 25s on there now.
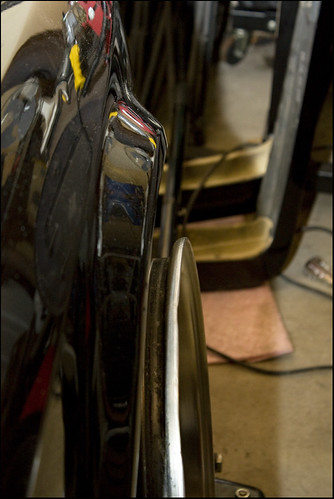
IMG_0106 by m_colby, on Flickr
Front fitment, In this pic I couldn't jack the wheel up any further due to the hr sports being bottomed out, with shorter/lower suspension it will fit much better.Comment
-
While currently building a stock pile of parts (brand new bilsteins and some misc stuff) I decided to flock my dash while it was out of the car. After reading this thread, http://www.r3vlimited.com/board/showthread.php?t=234996 , I knew that flocking the dash was definitely the best way to fix the cracks besides buying a new one.
Flocking the dash pretty simple process but It's time consuming as hell and you are guaranteed to make mess imo. Basically you're going to want to fill the cracks with some kind of plastic epoxy and then sand everything as smooth as you can. I noticed that because of the way our dashes crack, it can be quite tough to get it smooth, the dash has a tendency the kinda curl up at the edges of the crack. Those curled edges will need to be trimmed/sanded out. My cracks weren't very extreme so I opted to fill and sand as smooth as I could.
At this point, when you get your dash completely dust free, you are then ready to flock it. You will need to apply a thick/wet coat of the adhesive to ensure you get a solid coating of the fibers. I had a few issues with spots that didn't quite get covered enough, I re-applied the adhesive and flocked the areas a second time.
Here's a few pics of the finished product:

Flocked e30 Dash by m_colby, on Flickr
Don't mind the white specs, it's just dust that should brush off.
Close up to show texture

Dash Flock Close Up by m_colby, on Flickr
The dash should be reinstalled this coming weekend.Comment
-
Amazing build thread! I'm definitely going to stay subcribed and contact you. I plan on doing what you did to my car.Comment
-
Those are really low offsets to start with, to get those wheels to fit well at all you really need the thinnest adapters you can find.
The money you saved on the adapters will be lost in extra work to try to get the setup to look half decent and work okay. You aren't going to be able to get any meaningful amount of stretch on 7s or 8s to overcome the deficit you're working with right now.
Flocked dash looks awesome, thinking about doing this myself and curious to see how well it holds up.Last edited by 8380 Labs; 02-23-2012, 02:56 PM.Comment
-
I completely agree about the wheels. The adapters were cheap enough that i can always run them on another set of porsche fitment wheels and still afford to find some 20mms adapters. Originally i was hoping to rebuild the wheels to 8"/9" but its proving difficult to find spare lips/barrels for these wheels.
Who knows, I may pick up completely different wheels and save these for a rebuild down the line.
The dash seems to be decently durable, I let it dry for about 24hrs and then rubbed my hand across the top of it and it didnt seem to come off really. I would assume if you or your passengers don't pet the dashboard everyday then it should hold up fairly well.Comment
-
Dude, those IE headers are GORGEOUS!/______\_o_/______\
l{(OO)=[//][\\]=(OO)}|
\ #___======___# /
|__/-------------\__|
"Took me an hour to do this..."
took me like three seconds to copy/paste it- FOR SCIENCE!!

Barney Fucking RubbleComment
-
Comment
-
Yet another long awaited update. Been working steadily on the car just havent been taking photos to keep track I guess. Either way here goes.
Where I'm at now..
Sold my Canon xsi to upgrade to a Canon 60d, I can finally post photo updates again.
Epsilons sold today!
IE camber plates from the GE group buy showed up 3 days ago
Rear GE coils installed, waiting to section my front strut housings.
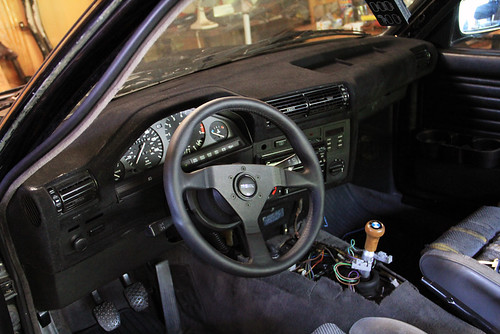
Dash is back in, fully flocked this time.
Engine bay is back together with new m42 radiator and some fresh paint on the VC and IM.
New MOMO monte carlo wheel and hub installed.
Waiting on a new sunroof/visor panel to show up, ditching the plaid covered one I had before.
Need to find a new sunroof crank as I broke mine..
Need to source a good glove box as my rear tabs on mine are broke off.. pm me if you've got either of these parts^.
In the process of stripping and re-polishing my shadowline that I had previously painted black. I plan to run wheels with a polished lip and I like how the polished trim accents the lips. Serious pain in the ass.. More on that later.
On to the pics!
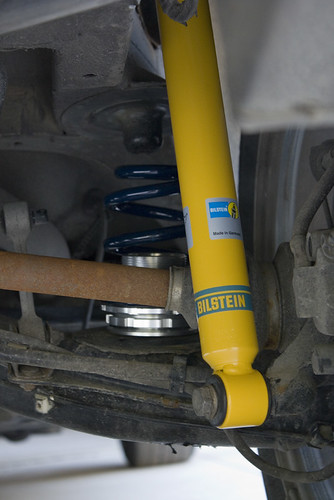
Rear GE coils installed with Bilstien IX HDs and IE rear shock mounts. H&R sports up front (one cut coil) waiting to section my front strut housings before I install front coils. Tucking a decent amount of tire on 195/60/14, coils threaded all the way down with both adjuster/lock ring installed.
IMG_0198 by m_colby, on Flickr
H&R Sport on the left and new GE rear coil on the right, 4" and 650lbs.

IMG_0182 by m_colby, on Flickr
Rear install, ignore the rusty components and sand. It gets nasty up here in the midwest..
IMG_0200 by m_colby, on Flickr
Flocked dash, MOMO Monte Carlo, Ripped to hell sport seats (will be replaced soon)
IMG_0117 by m_colby, on Flickr
Freshly painted valve cover and intake manifold, m42 radiator, front strut delete.
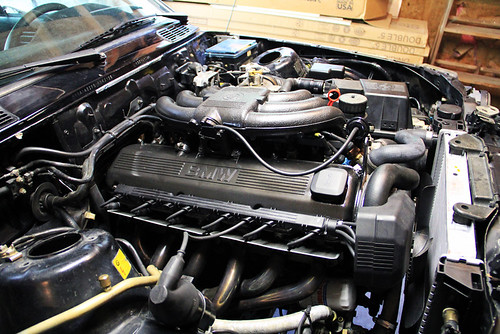
IMG_0118 by m_colby, on FlickrLast edited by noE30; 04-08-2012, 09:23 PM.Comment
-
Re-Polished Shadowline you say? Oh yea, so you've painted your shadowline and now you hate it? Well here's how we fix that:
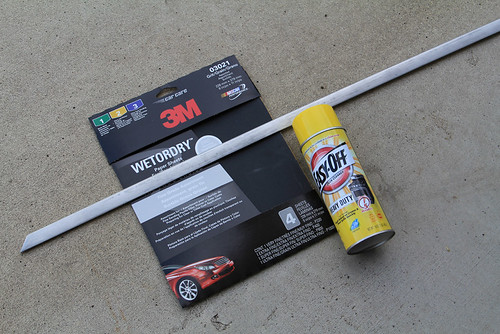
Necessary tools:
Assorted sand paper (200 grit-1000 or so, can go higher if you want)
Paint Stripper (I find that the aerosol kind works best)
Easy Off oven cleaner (eats that anodizing off the trim)
Free time and lots off it (pain in the ass process)
Mothers aluminum polish
First off, remove the trim:
Second, strip paint:
sorry no photos
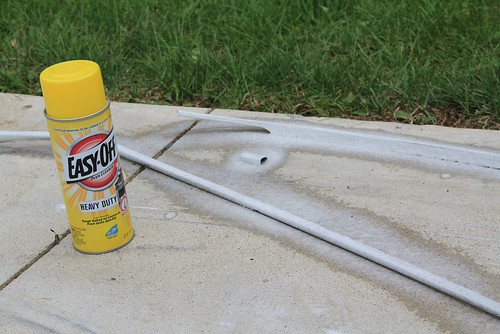
Third, remove anodizing. Thats right, our window trim is actually anodized aluminum. Looks nice unless you've sanded and painted it in the past, all anodizing must be removed in order to re polish the trim.
IMG_0119 by m_colby, on Flickr
^trim had already been stripped and easy off'd at this point
Spray on easy off and let sit for 5-10 min, works better the longer it sits. Rinse off and prepare to sand.
IMG_0131 by m_colby, on Flickr
Fourth, start to sand/re polish. Start wet sanding with 200 grit, then 400, 800, 1000 and so on depending on how much work you want to do. Then polish with mothers aluminum polish.
I believe this photo was taken after 800 grit, I attempted to polish a section of it to see how it looked so far, notice a little hazyness, this will all come out as you sand with higher grit sand paper.

IMG_0128 by m_colby, on Flickr
Fifth, continue sanding all the trim and re-install. I'll post some more photos of the trim as I finish it tomorrow, I've got one piece left on the drivers side and the entire passenger side to do still...Comment
-
^ nice, keep goingComment
-
Comment
-
Yet another one month later update.
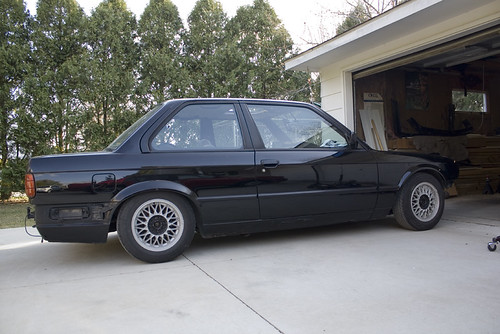
The e30 is back on the road! Finished up the front suspension last week, I'm running IX hd bilstiens, 2in shortened housings, GE coils 450 front 650 rear, IE race camber plates, and IE rear strut mounts.
In the mean time, I have since sold the epsilons to a friend of mine with a Porsche 944 (perfect fit), with the cash from selling them I picked up a set of Porsche fitment BBS RS's.
Specs are:
RS131 16x8.5 et56
RS018 16x9 et36
With my 25mm adapters the rear fits perfect imo, with the 35mm adapters in the front, the wheel hits the shock assembly just barely (can still bolt up just wont allow the wheel to rotate) looks like I'm gonna try hunt down some 40mms. The wheels need to be repainted and a quick re-polish on the lips anyway , so I've got time to work with.
Here are some photos of the wheels test fitted.
RS test fit 1 by m_colby, on Flickr

RS test fit 2 by m_colby, on Flickr
combo by m_colby, on FlickrComment
-
Ill just leave this here for now..
This is after repainting the centers and hand polishing the lips and caps. The photos ^up one post don't really show how rough they really were when I first got them.

IMG_0815res by m_colby, on Flickr
Mounted pics some time next week.Comment


Comment