-
Last edited by garretvs; 12-24-2011, 07:20 PM.E30-LS1 aka. 357is
email us to pick up our LS1 swap guide
E30-LS1 KITS now available!!
E30LS1@gmail.com
e30ls1.com
-
much nicer....I retract my previous statement :)Comment
-
AWESOME guys! That is really an awesome product! Once the E36 is finished might just have to do an e30 to support you guys and your hard work!Comment
-
have you all figured out a final full kit price?? also what headers do you all use and what do you gotta do with the oil pan.
E30 Turbo 2.8L - 60ft - 1.70 :: 1/8th - 6.99 :: MPH - 105.47 :: 1/4 - 10.66 :: MPH - 132.53
*RIP* E36 M3 - 60ft - 1.944 :: 1/8th - 8.64 :: MPH - 80.00 :: 1/4 - 13.55 :: MPH - 99.95
Comment
-
The final full kit price is $1200 for
Engine Mounts
Transmission Mount
Brake Booster Linkage System
Second Differential mount
Radiator Mount
Swap Guide CD - 200 page how to guide with every step and part we used to make our car
As far as headers go, two different sanderson headers fit nicely (part numbers are in the swap guide)
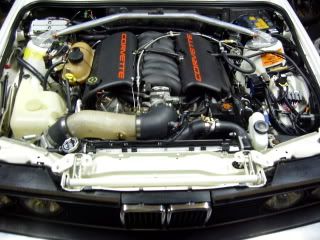
A GTO oil pan (or similar) does need to be located and notched to fit over the cross member. You can get any shop that welds aluminum to do this for you.
-GarretE30-LS1 aka. 357is
email us to pick up our LS1 swap guide
E30-LS1 KITS now available!!
E30LS1@gmail.com
e30ls1.com
Comment
-
Damn if only I had a job. :(
When are they gonna be available for purchase?
MattMatt
Originally posted by slammin.e28guyOriginally posted by kronusOriginally posted by chadthestampedeComment
-
how much for the booster linkages alone?Your resource to do-it-yourself and interesting bmw and e30 stuff: www.rtsauto.com
Your resource to tools and tips: www.rtstools.comComment
-
Now that the prototype kit is complete they are available for purchase.
To get your E30-LS1 kit email me right away at E30LS1@gmail.com to put in your order. I will email you and let you know if you are one of the first ten orders. Some slots are already filled via the reservation list. Don’t worry if you’re not in this first group because you can be in on the second set of parts we get from the lasercutter. For those who respond for the first set of kits, upon receipt of my confirmation of your order, send $1200 or the proper amount for your selected parts to E30LS1@gmail.com via PayPal. These first orders should ship by approximately August 20th.
here is the price breakdown for individual pieces
Engine Mounts : $400
Transmission Mount: $300
Booster Linkage System: $350
Second Differential Mount: $250
Swap Guide CD: $100
-GarretE30-LS1 aka. 357is
email us to pick up our LS1 swap guide
E30-LS1 KITS now available!!
E30LS1@gmail.com
e30ls1.com
Comment
-
Firstly, my compliments on designing this conversion kit. It's guys like you, enthusiasts who bring interesting stuff to market for the e30,who I like to see succeed. Best of luck selling your kits.
I do have to ask though if you are doing the welding, how much experience do you have? Do you have whatever the certification in your area would be?
The reason I ask is because the weld on the left in particular while it does look pretty good, could infact be prone to failure. Its hard to tell especially from just looking at pictures and I really don't like to analyze peoples welds online but it doesn't look completely fused. It doesn't look like the edges of the weld have fused to the base metal. It is a really common problem with MIG often called "cold lap". Basically the wire just melts on top of the plate rather than melting into the plate.
Also good on you for posting close-ups of your welds. I don't post my welds online hardly at all because no matter what they look like there is always an armchair welder at home waiting to try and pick them apart. I hate to be that guy, but if that is infact cold lap it can be a very serious weld fault. Again best of luck with your kits.Comment
-
E30-LS1 aka. 357is
email us to pick up our LS1 swap guide
E30-LS1 KITS now available!!
E30LS1@gmail.com
e30ls1.com
Comment
-
hey would these mounts work with an lt1 ?Comment
-
I agree with those welds not being up to par, you really shouldn’t be MIG welding something that needs to be very precise and have good penetration. Ideally you should TIG everything, and then post weld heat treat so your stress testing/finite analysis can be correct. As of right now, it’s not really being true to the actual product being produced I don’t mean to shit on your product, but if those welds were to fail someone could possibly loose there life. This isn’t something that you should be doing if you aren’t a certified welder, and I would know since I am preparing to take my certification test.Comment
-
Anyone use one of these kits?
What else is needed on top of the kit, LS1, tranny?Your signature picture has been removed since it contained the Photobucket "upgrade your account" image.
1989 BMW 325i SOLD
1998 BMW Estoril Blue e36 M3/4/5 SOLD
1987 BMW 325 (The Piece) SOLD
1991 BMW 318is S52 swap (The Beast) Now Driving Project Thread: http://www.r3vlimited.com/board/showthread.php?t=234207Comment
-
Great idea for the second diff mount! I would add some return flanges between the fastener locations and the diff bushing to provide a better load path and further strengthen your second diff mount. It looks like it will not carry much load in your current configuration compared to the stock mount just based on relative stiffness.Comment


Comment