

Build looks really nice. New to posting on the forum but have been watching for a while. Cant wait for more updates, yours is inspiring my future build. keep up the great work!
-
1985 325e......v8?
1994 boosted miata track rat
1993 mazda rx7
2010 m3
2008 c350 daily -
Hey guys,
I know it's been a while since there were any updates... SOME stuff has gotten done, but for the most part I've been pretty busy. About a month ago, my sister decided to surprise the house with this:

It's a pomeranian something or other. When she's not sleeping or eating, she's chewing my hands, the furniture or pooping in the kitchen. LOTS of puppy duty lately... which is o.k. in the end. pu$$y magnet in training? Check
In any case, here's what I've gotten done so far. The clutch went in and I got the tranny in... only to find that it was sitting about... 3 inches too far to the passenger side of the trans tunnel. I was suspicious that the engine wasn't sitting straight at first, but it wasn't too obvious until the trans went in. After slotting the mount everything looks to be OK.

Got the fuel pressure regulator in - turns out that there's a flat spot on the blower cover that is the PERFECT size for the holley FPR bracket. Not only that, it's decently far away from the engine, and if anything starts leaking (unless it sprays) gas shouldn't be running all over the headers.

FYI - couldn't figure out which one of the 'return' hoses were the actual return. The curved 3/8" hose pictured is actually an evap hose, per Funfgan.

Finally got the right tensioner sleeve from March - since it had been over a year since I purchased the kit from Summit, they couldn't find anything in their system about my purchase. I was quoted $30 for the sleeve... oh well. Later, when the part came in the mail, the attached invoice was for $48... I was like WTF?!?!?! The kit only cost me $70! Turns out they almost charged $20 for shipping and handling... I won't be doing business with them any more. :letitout:

Last pic for the day - go the starter in. Haven't decided yet if I'm going to wire the solenoid in through the factory harness or just do a toggle switch for it... depends on if I can get a good diagram of the wiring and actually find the wire for the solenoid. Guess we'll see.

Aside from all that, I hooked up my oil pressure gauge (the sending unit can be seen in the tensioner pic, right side and in the middle. MASSIVE unit compared to the factory one... although the factory ones are supposed to be super inaccurate) and spun up the oil pump - my drill battery was on the last legs of its charge and got the pressure up to 50psi in a few seconds before dying... which is a good sign. Guesstimating I'll be at least 70psi at idle.
Good updates not too far! Hoping to fire this thing up once Funf helps me build a duplicate of his exhaust!Comment
-
New updates, albeit short this time. Got the exhaust figured out for now:


Got the idea from Funfgan - amazingly simple... all I did was buy a 'spherical flare' exhaust end + flange from Salvo auto parts and a 90 degree pipe. Granted... it's not pretty or sophisticated... but it will get the job done until I get the car to the point where I can drive it to an exhaust shop. The finished product (or pre-product?) will depend on how the car sits with my xxr's. I'm also thinking I'm going to have to put a heat shield up to protect the oil pressure sending unit - I can't imagine all that heat could be good for it, or the wire coming off of it for that matter.
Coming updates:
*Installing the shifter
*Making sure the trans is straight
*Getting my driveshaft made
*Wiring up my starter, alternator, gauges
Also, anyone ever see the factory tach being replaced with say, an autometer gauge? And when I say replaced, I mean remove gauge cluster, remove tach, install aftermarket tach in its place. I've seen pictures of the tach removed, but couldn't really tell how much space there was (the diameter of the tach housing is about 2.5-3" or so) or if removing the factory tach will affect the way the rest of the gauges work.Comment
-
Ok, so updates I guess. Did a bunch of stuff:
*Wired the starter into the factory harness
*Got my driveshaft made and installed it
*Fired this thing up for the first time :)
So I kind of made a rookie mistake when I was yanking the m20 out - since the main engine harness was (or seemed to be) tied into these relays at the side of the car, I was like "eff these guys" and just pulled them out with the engine. I'm sure you all might realize that I'm talking about the main relay, fuel pump relay and that third one (can't remember)
Anyway, after figuring out that the engine wasn't firing up due to fuel, and the fact that I couldn't hear the pump priming, I did some research. Turns out on the junction block side of the C101 connector there's a fairly thick purple wire with a red stripe on it. This is the fused wire that feeds power to the pump(s)[not sure which setup I have]. Anyway, hotwired that up and boom. We've got fuel. Let that run for a minute or so to make sure the bowls were filled up, then disconnected it. Fired it up and let it run for 15 seconds or so initially, then made the video - guess the bowls ran dry or something, because the engine cut off. Anyway...
Stuff left to do:
*Paint the driveshaft (yes, should have done that first... but i wanted to make sure the shop made it right)
*Put in all the cooling stuff (including heat. definitely not driving this in the winter without heat)
*Run the clutch hydraulics
*Finish wiring up my gauges
*Weld up the exhaust
*Wire up the alternator
*Misc stuff that I'm forgetting right now
Pics later, I'm tired.Last edited by jalopi; 08-26-2013, 07:46 PM.Comment
-
-
If you need a good radiator with great fitment and correct inlet/oulet order this part # GRI-1-46222-X from SummitRacing. I will post pics of this setup in my car. You can use the orginal plastic e30 mounting radiator bracket and some "L" brackets at the bottom. My e30 mount blocks were removed. I isolated the radiator top and bottom with rubber mounts (stock on top) and some others I had laying around but you could use a e30 set on the bottom as well. You'll understand with pics.sigpicComment
-
Summit doesn't list what that is, but I'm gathering that it's a single core rad? Is it any more efficient than the e30 rad? Dimensions seem to be roughly the same... you've got the turbo 5.0 car, right? How's it working for you?
On another note, just ordered a Zirgo 3k CFM fan last night. Hopefully that'll work good enough for my setup.Comment
-
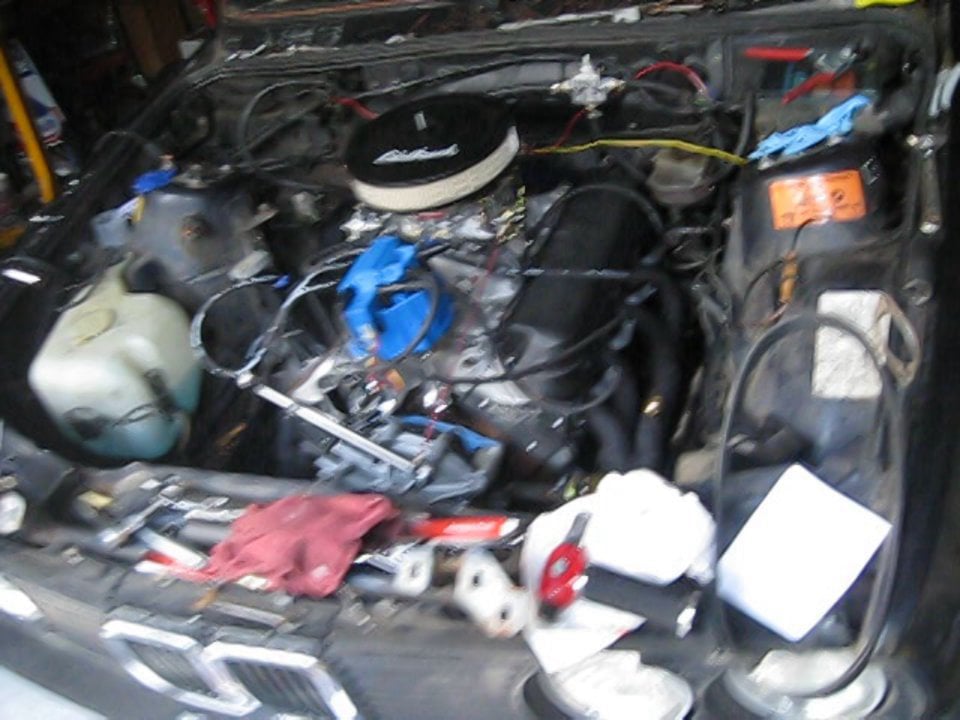
So, picture updates as promised.
Here's a shot of the engine bay as it stands now... nowhere near as clean as it used to be, which kind of upsets me. Oh well. Most of the 'messy look' can be attributed to the heater core hoses... all I had was generic 5/8" hose and without some pre-bent stuff and some mustang heater pipes, it's gonna stay ugly. Something to do in the future... but I'm more focused on getting the car running than aesthetics right now. Hopefully it'll look better once I tuck all the wires.

Next we've got hoses. Turns out that yes, hacking up the factory upper rad hose works quite well. Had to shorten the middle by 2-3".

As for the lower - I was in Salvos the other day and noticed a hose that just might work. Today I brought in an old water pump and an old hose and bam - it'll work. Granted, it's going to have to be shortened and have a coupler pipe installed, but it does work. It's a Goodyear hose, part ## 62043. I'll take a shot of it once it's properly fitted.

It was kind of tough to take this shot, but here's a pic of what I'm working with on the heater core. It was... not easy to get those hoses in there, let alone tighten the clamps up. I've got a set of 'hose pliers' - they're like long needlenose pliers, except the tip is shaped in a circle to clamp onto hoses. Even with those that's as far as I could get them. They did fit on there pretty tight, so I doubt they'll pop off... at least I hope they don't pop off. I reallllly want heat for the occasional cold day drive :) ... also, scalding coolant on the feet/legs? Not cool.

Here's what I've got going on for my gauges and toggle switches. 6 fuse junction blocks, each circuit good for 30 amps. Not sure if any locals are familiar with Baynesville electronics... they usually have stuff noone else has. Went there to buy these originally. $37 a pop... went to the local Salvos later to buy some other stuff and saw the same item (in a slightly different box)... for $15. I do like to support small businesses... but that's almost a $25 difference!! Not even competitive! Needless to say, I bought two of them from Salvos and returned the other two.

So when I was tearing out my old engine, it seems that I accidentally removed the main relay and fuel pump relay. Doh. Anyway, here are two wires identified:

The black wire with the yellow stripe is the factory starter solenoid wire.
The purple wire with the red stripe is the wire that comes from the fuel pump relay (at least after the C-101 connector. Before that, it's a brown wire with a green stripe)
Last update for the night - too much stuff has been done right in this build, so I felt the need to remedy that.

Yes, that is a mother fuckin bungie cord throttle return "spring" :DComment
-
Video update
So yeah... I got real lazy and stopped taking pictures of my progress... sorry bros.
Anyway, here's a mediocre video of me doing a mediocre job of drifting at summit point this weekend:
Last edited by jalopi; 10-13-2013, 01:54 PM.Comment
-
How to: God-level radiator fitment
So, when I was at the track my car was running a little hot... and I'm not having any of that shit, not with those aluminum heads. So a few people suggested buying a z3 radiator, assuring me it would fit - and yes, they were referring to the thick-ass Mishi rad. I was skeptical (I took measurements) but I thought to myself "If you could get that 302 in there, you can get a radiator in"
Here's the fitment so far:

Guess I'll be notching the core support a little bit... as-is, I'd be afraid to think what would happen if the trans mount broke.Comment
-
-
So i fought cooling problems with my 5.0 89 for months before i finally figured it out. Long story short, I was running under drive pulleys and I had the radiator cap munted in the upper radiator hose like yours.
Apparently if the cap is in the upper hose and not on the water pump side of the radiator it looses most of its effectiveness and pumps the water out, which causing overheating.
With the BMW radiator (i was running an aluminum e36 rad) the rad cap is remote mounted in a surge tank not on the water pump side of the rad, which you need with the SBF setup.
I switched to stock pulleys and a aluminum generic summit racing radiator and the car has not gone above 200* since.
This was my old setup that didn't work. It would creep to 220-240*+ if i would sit still fot to long and it would pump the water out at high RPM on track.Attached FilesLast edited by 89 5.0; 01-26-2014, 01:16 PM.89 5.0 http://forum.ih8mud.com/atlanta-cust...-5-0-swap.html
87 SpecE30Comment
-
-
Interesting read.. I've been telling myself that I need a regular size pulley for a while now, but recently I haven't had an issue with the temps going over 160-170 (in 50-60* weather, not just in the weather we're having now). What temps were you having when the car was overheating? I'm assuming fucking hot since you're in Atlanta.
This is in Summit Point WV - they don't let you out on the track with other people unless you've got a full cage and a fire suit. Basically it's you do one lap then get back in line.
The donuts were moreso accidental though
Comment
-
Im running a 180* t-stat and the temp problems were consistent with outside temps ranging from 65-100* outside air temps. It would run at 190 if I was driving around at any speed over 20 mph and rpm~ 1500-2000. If i would stop at a light or drive-through it would start to creep. Short lights were no issue but long drivethroughs it would get to 220*+. (This was with a good electric pusher fan wired to run all the time, that i still have) If you stayed stopped it would creep to 240+ if you didn't start to move or turn it off.
At track speeds (Road Atlanta) it would run fine for 2-3 laps before the high rpm pushed the water out and it would begin to run hot. Outside temp was ~70*89 5.0 http://forum.ih8mud.com/atlanta-cust...-5-0-swap.html
87 SpecE30Comment


 i have no idea what i am doing with my life
Comment