
Fast as my Ducati was :devil:
And comfortable as hell - wife and I ride it regularly
-
pretty low key actually.. so sorry gents I know this update is lame.
engine's been perfect, butter smooth but definitely lower on torque. looks and sounds great though.
lots of parts on hand, but I haven't pulled the trigger on M20 stroking and MT1 yet. Been working the wife's allroad, emissions, turbo boost leak and a leaky arnott air bag. so a little distracted.
here are the parts waiting for install
-- RD long tube headers
-- full MT1 body kit ready for prep and paint
-- brand new front and rear console, top front trim and weatherstrip
-- new chrome for doors and rear quarters (original chrome pitted)
-- electric top frame and new tension straps in hand. still need to get an electric top cover though. hoping to swap a new manual top for one.
-- thinking about upgraded brakes but haven't pulled the trigger on anything.
lots of little gremlins have been creeping up.
-- broke my alpina wheel key, fortunately found 2 replacements via eBay australia.
-- my 2nd rack doctor E36 rack is leaking. super ticked about that. will probably end up buying a new one this time.
-- pass rear window motor died. found a replacement on ebay and swapped the motor portion of the mechanism out (kept the original gear box). replacement motor is from an 88 and I wanted to keep the original gear housing since it was molded slightly differently and has a date stamp on it.
-- pass rear wheel bearing replaced. car was completely quite for a couple of weeks but now I have a small squeak in the rear again. will probably bite the bullet and replace the other 3 bearings. will do the rear pads too.
-- my class C power amp seems to have failed.. when I pull the center stack apart I'll probably swap out the OBC with the euro clock i bought. missing the connector though so not too keen on hacking wiring.
-- windshield washer system is wacking. not getting fluid on the windows now. headlamp washers working fine though. had to disconnect the wire I added because it was temporarily shorting the entire car out. bizarre - wire never got hot or anything, but the car would go completely dead.
-- one of the euro headlights was intermittently flaking out. no problems lately. I assume it's related to the washer wiring issue.
-- also still need to deal with the hardtop headliner.Leave a comment:
-
Uhh, that's not true. take a close look at the pic on the left. that is a BROWN/GREY wire, exactly what's supposed to be there.
I've cleaned up the previous posts above, and everything is working correctly now.
My problem was forgetting to extend the brown/grey wire from the driver side headlight area up to the fuse box.
YES, the PS and TS wires must short via the S switch for the intensive clean pump to turn on.
so hurray for me, but I still don't know how that brown/grey wire got to the intensive clean pump lol.Last edited by bradnic; 09-03-2017, 06:23 PM.Leave a comment:
-
thanks Raul.. more HLCS stuff for everyone as I figure things out.
quick review of the standard wiper setup helps explain what all the wires do.
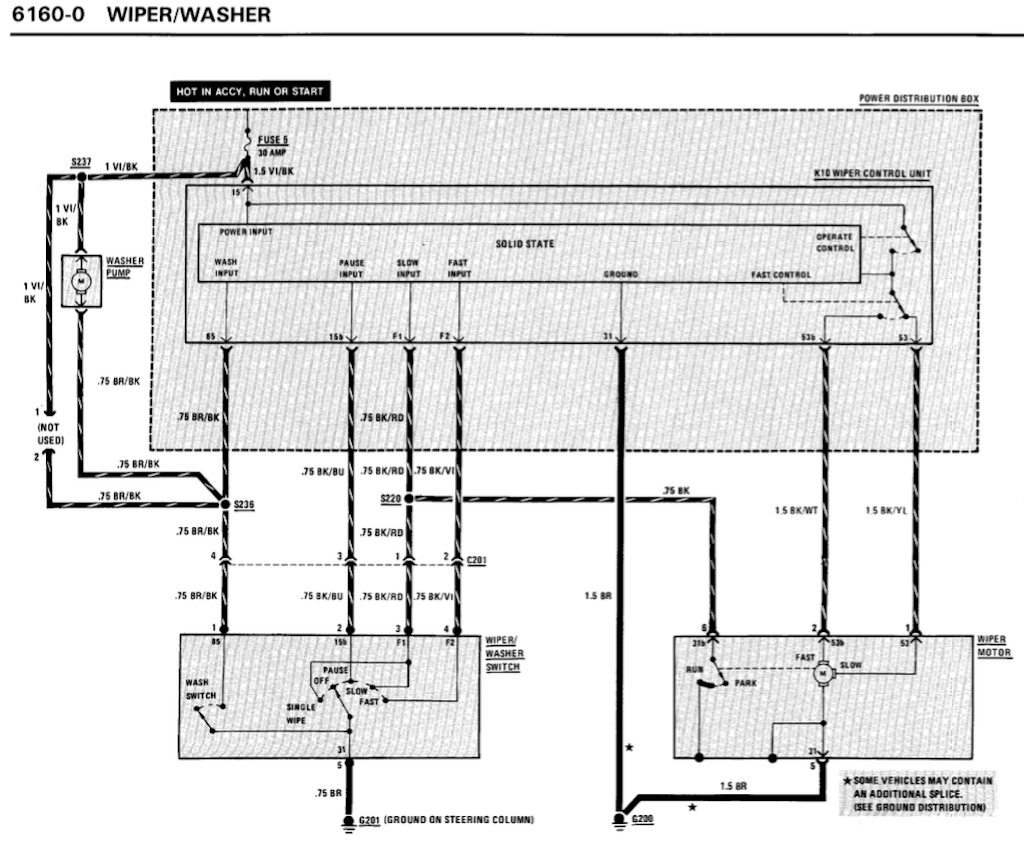
I prefer this version as it shows everything concisely
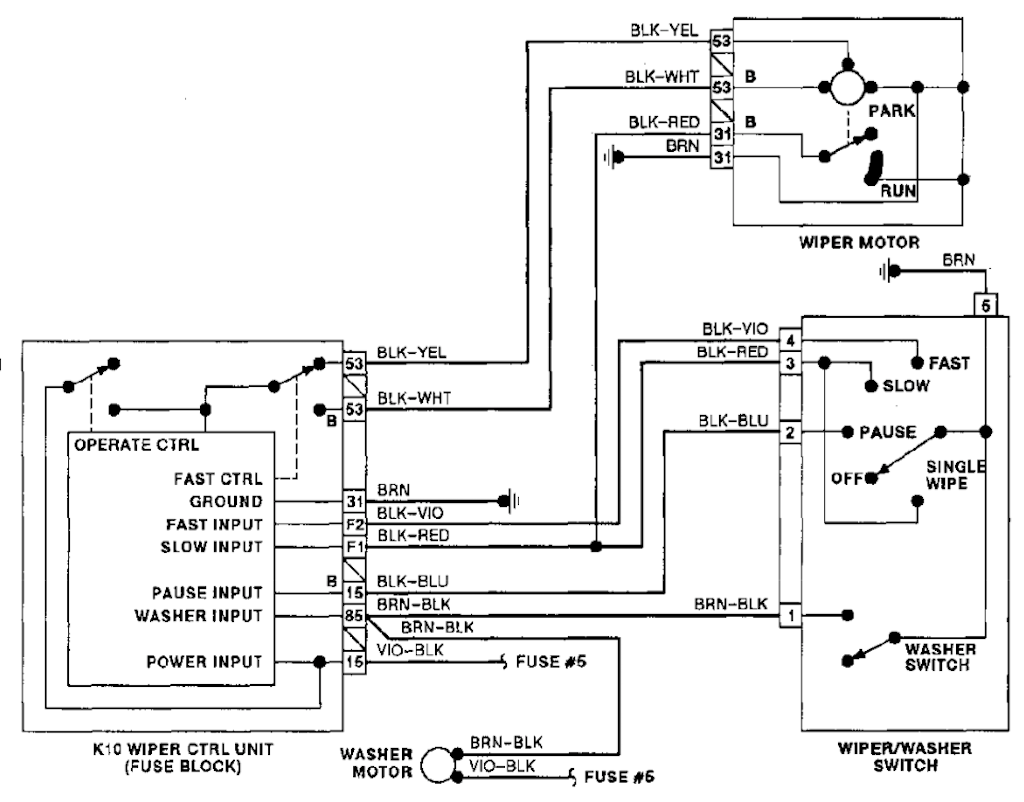
You can clearly see the 4 stock wires on the wiper switch and K10 relay in the diagram and what they do, but for HLCS the important wires are the brown/black (washer switch input) and violet/black (fast wipe input).
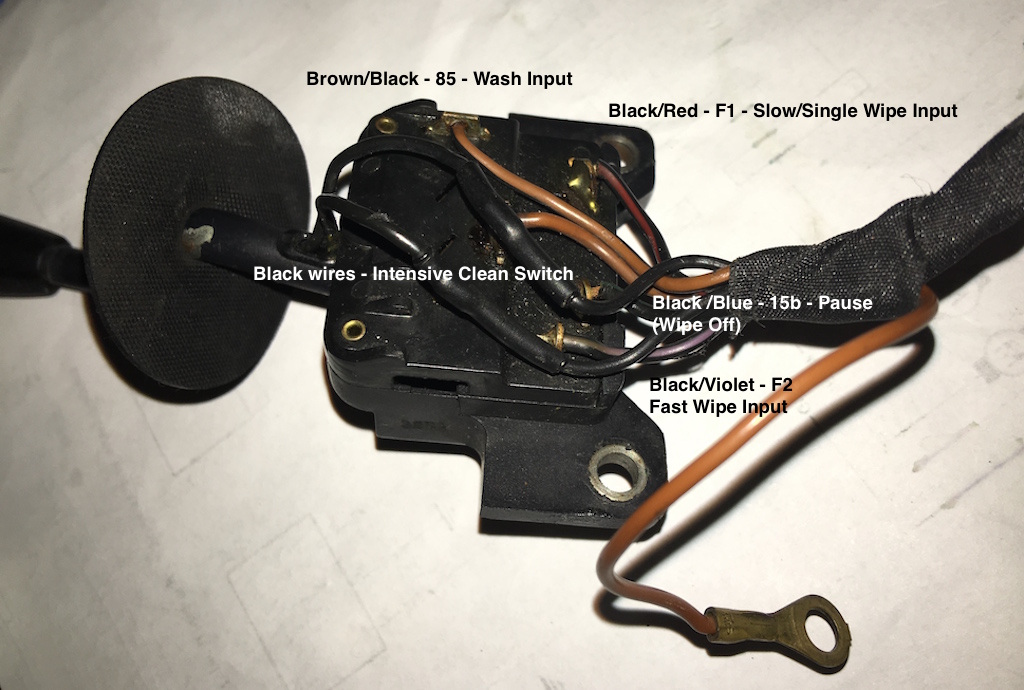
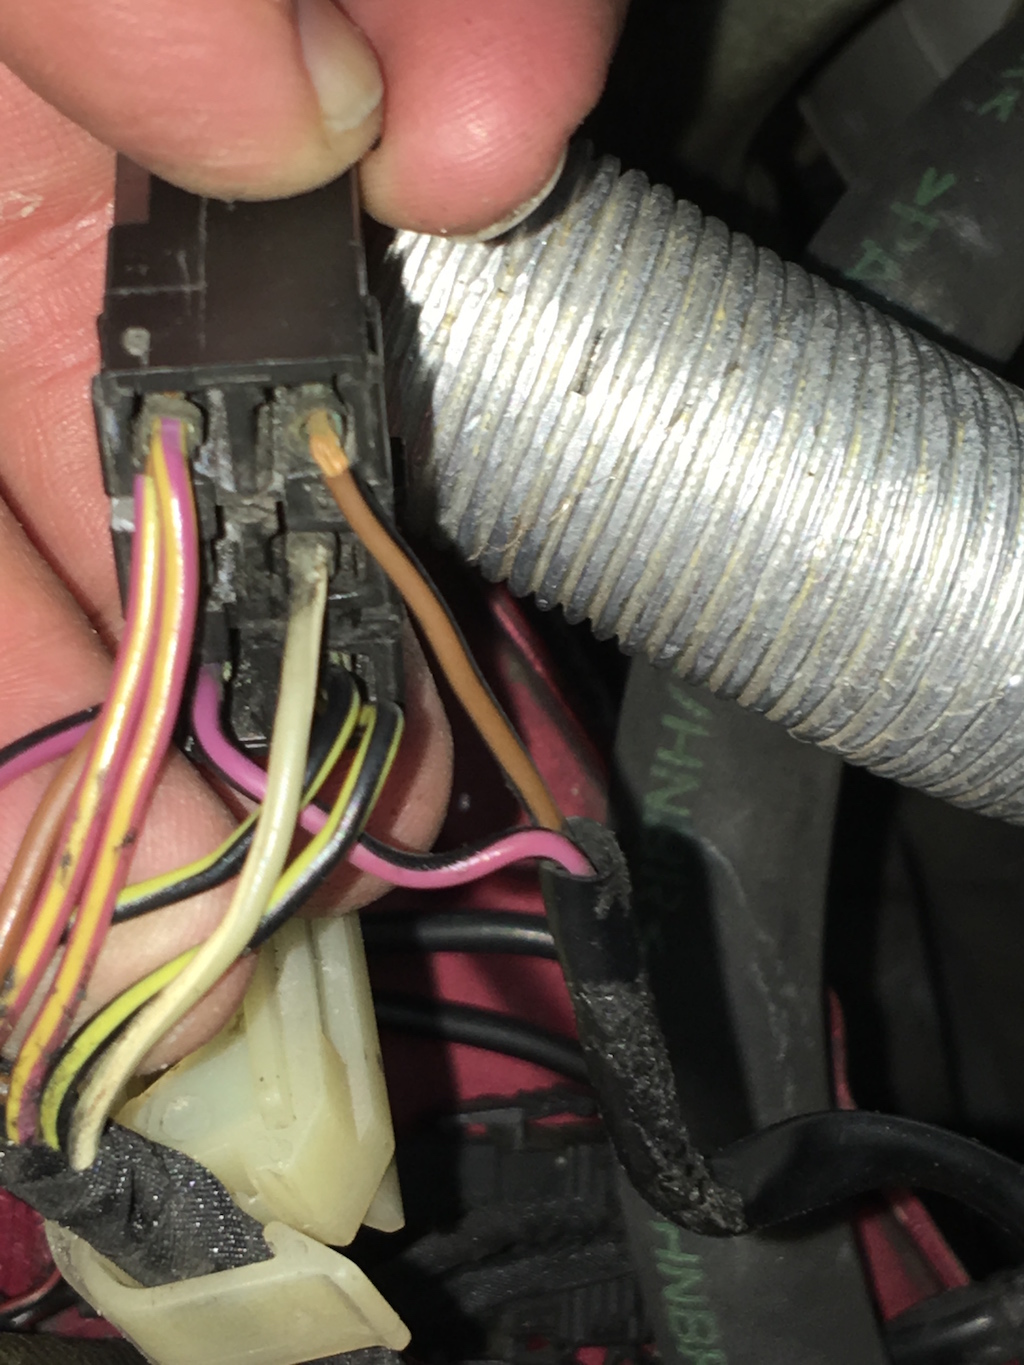
This pic shows the wires on the intensive clean stalk, both on the connector and the switch body. note 2 things:
1) the colors match the stock drawing for 4 of the wires
2) there are 2 extra black wires. these go to the S switch at the end of the stalk. A simple check with a meter shows the switch is normally open (i.e. when you push it the 2 black wires are connected).
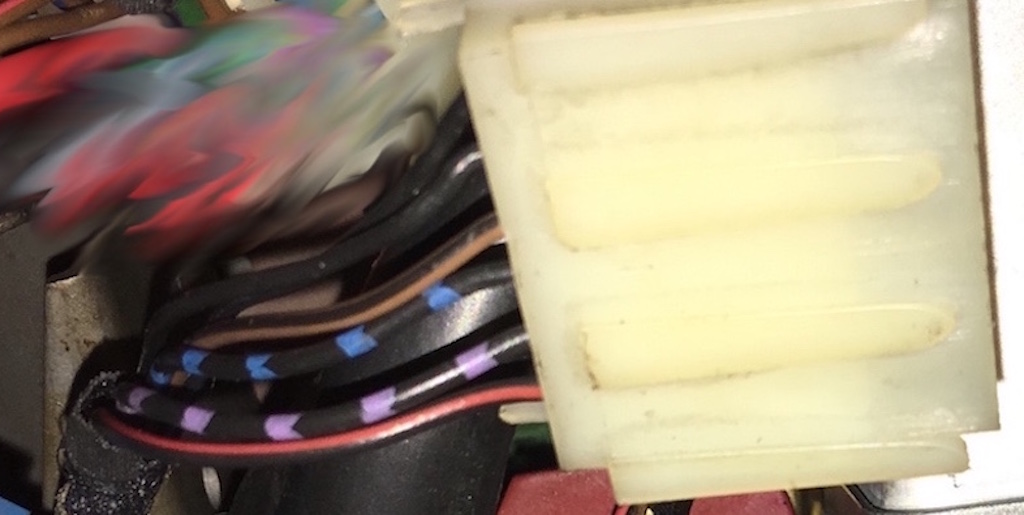
you already know the HLCS K10 relay has 2 extra pins, PS and TS. Note the numbering under the relay matches the stock wire numbers. This really helps you figure things out.
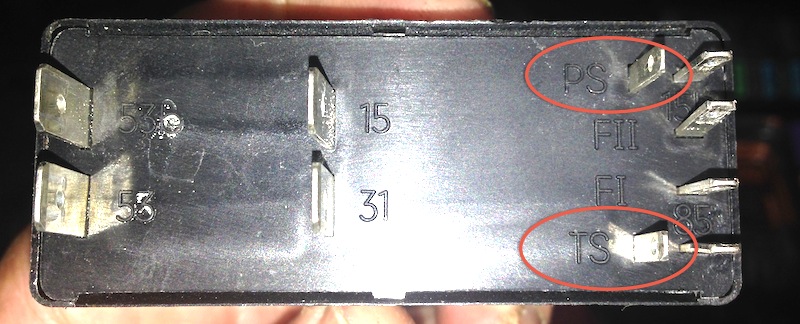
HLCS install requires you to wire those 2 pins. the stock colors for the wires are supposed to be Brown/Blue for TS, Brown/Grey for PS. This pic shows the mod, and also shows the stock wiper relay wires which is really helpful.
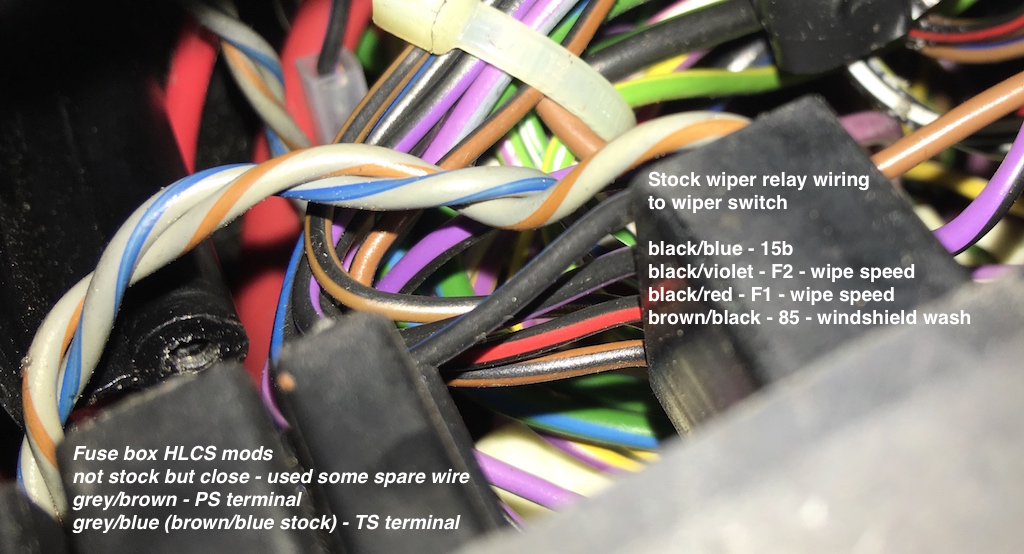
The 2 fuse box PS and TS wires then go to the black wires on the intensive clean stalk. Supporting info (other than I know it works)
- the stock wiper switch receptacle has 2 extra slots for the intensive clean wires, which match the 2 black wires.
- that's exactly what the headlamp wiring diagram shows - PS and TS go from the fuse box to the wiper switch, PS also goes to the brown/grey HLCS harness wire and eventually the intensive clean pump
So I did the switch part of this originally (you can see those 2 extra fuse box wires changed colors, because I was re-using some headlamp bushing wires I had laying around), but I didn't do the intensive clean pump connection.
So of course this never worked as intended, since the brown/grey wire is not getting from the S switch to the intense clean motor. Once I added that leg of the circuit everything worked as intended.Last edited by bradnic; 09-03-2017, 06:22 PM.Leave a comment:
-
I like the headlight wiper write up. I will go back and read up on it.
I am glad you are getting your euro parts...
Leave a comment:
-
thanks! Need to get some other stuff out of the way and replenish the budget.. so hope to have it the MT1 done by September. I'll do some trial fitting before then. The parts definitely need some repair and prep before they're ready for paint.
All the hardware is finally here finally except for one lower reinforcement. I'm reusing my chrome bumper trim so no MT1 versions of those - front left end cap is NLA anyway afaik. Also gonna re-purpose my old re-chromed euro bumpers and paint them calypso. We'll see which look wins out!Leave a comment:
-
Ugh, this is my dream build and was really hopping to see the m tech 1 installed. Definitely sub'd!!!Leave a comment:
-
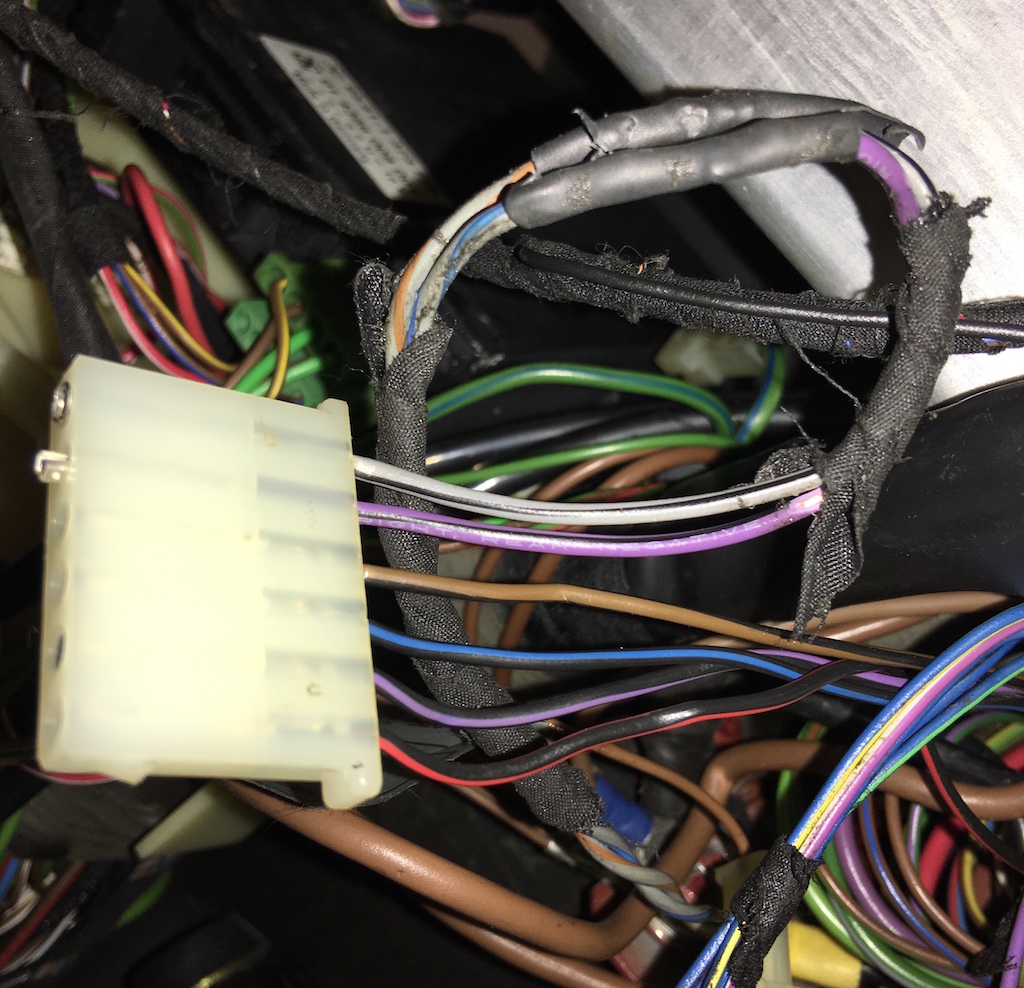
The last part of the wiring that's different are the control unit connections. The only difference I see is that there are pink/yellow wires connected to pin 15 in my current setup and violet/black to that pin on the 2nd harness.
control unit connectors on installed harness - the pink/yellow, yellow/black, grey/white and brown wires come from the front harness
2nd harness with the newer washer connectors - top row is identical to installed harness, lower left has different color wires. the connector is rotated 90 degrees counter-clockwise compared to the installed harness pic

Even though the color is the same between pins 15 and 53a on the 2nd harness, they are not connected electrically.. the pin 53a wires go to the washer motors and the others to the front harness. I don't think this really affects anything, but in this respect the color coding on the 2nd harness is confusing. I assume pins 15 and 53a get connected by the control unit when power is applied.
it's also interesting that the intensive clean brown/grey wire does not go to the control unit mounted on the washer bottle. on the 2nd harness it goes straight to the intensive clean pump all the way from the driver's side of the car. so basically the "S" button goes to the K10 intensive clean relay in the fuse box, and then straight to the intensive clean pump. this is the circuit that's missing in my setup.
So bottom line, here's the washer bottle control module wiring:
85 - brown/black (washer stalk)
58 - grey/white (power to washer system on driver's side)
53 - black/yellow (to headlamp washer motor)
53a - purple/black
31 - brown (ground)
15 - pink/yellow on installed harness, purple/black on 2nd/newer harness
just to add some final confusion to all this, the schematic I posted a couple of spots earlier matches my installed wiring, but not the 2nd harness. It even shows the violet/black wires bridged together between the intensive clean pump and the front washer pump.
Oh and since you're dying to know - Streuscheiben-reinigungsgeber means "lenses-cleaning encoder" per google translate - headlamp cleaning control unit.
EDIT: Other than the wire insulator color difference for pin 15, the harnesses are electrically the same.Last edited by bradnic; 09-03-2017, 06:17 PM.Leave a comment:


Leave a comment: