
I am writing this thread on behalf of my brother, Bimmian89. The e30 is his car and we are doing the work together over the summer. I hope you all enjoy seeing the progress of this car and feel free to lend advice and ideas of things to do as this is an entire teardown and rebuild type project. The goal is basically to have a mechanically brand new e30--only with a bit more power than it had when new :p
About the car:
We started with a 1986 325, a fairly clean early model delphin-metallic coupe. Car was automatic non-sport package and the cluster is absent so milage is unknown. Only thing included with purchase was a shell rolling on completely fubar-ed suspension, carpet, a dash, and brakes. Apart from some rust in the floorboard, a leaky sunroof, and busted suspension which will be replaced with coilovers anyways, it is in good knick. Best of all, the entire wiring harness has been left unmolested(Yes, I was shocked too). Rolling shell on weaves- $750 bucks and a drive to the lower end of the state.
The day we brought her home. Trim bits are inside the car.

First couple days of disassembly.

Since that^ picture, the entire car is stripped of almost every single part excluding the dash.
The Ugly:
I guess it is to be expected that a nearly 30 year old neglected car could be purchased for cheap and have nothing wrong. I'm not certain but it appears the car has been sitting for a good while so it needs a good bit of TLC. Anything can be fixed!

The Passengers side.. not too bad.

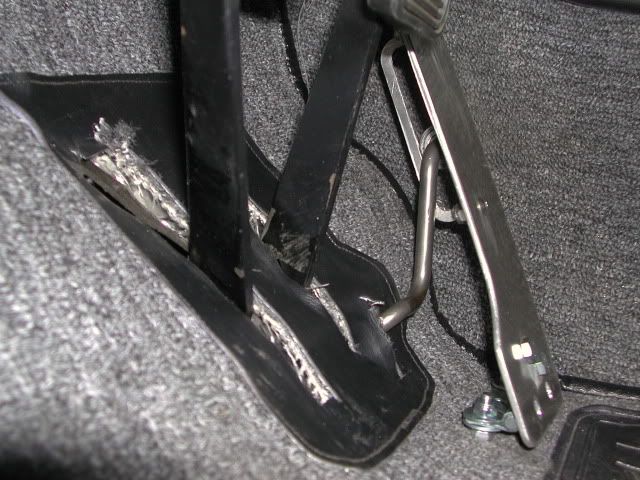
Drivers side.. little worse and broken gas pedal mount.

No pics yet, but I relieved some stress this morning with a grinder and cut out all the rust areas and picked up a sheet of 18 gauge sheet metal. 18 gauge is a little thicker than the body of the car but not greatly larger. It was the thinnest the metal shop had and it will be nice to have the added rigidness in areas such as the throttle pedal and fender well. The worst spots are where the wheels kick debris up so I didn't want to use that flimsy, paper thin garbage that Lowes carries.
Speaking of throttle pedal, you will notice that the factory pedal mount is gone. Currently in the works is a hinged pedal that uses a different mount such as a normal door hinge. I went ahead and traced an outline and cut the new pedal out of a 1/8th inch think piece of aluminum and I think it will turn out quite nicely. No pics of the pedal yet but for an idea, I am using this guys 2002 pedal for inspiration:
Back to the rust holes...
I know there is a ton of information online and some of you guys make rust repair and metal fab look so simple, but I am considering alternative methods. One day I will fork out for a quality mig, but currently I have a stick welder that belonged to my grandfather. Stick welders are great and all if I were welding a 1/4 inch piece of iron, but im afraid for thin sheet metal, it won't do. Right now I am looking at the possibility of simply using rivets to fasten the panels as flushly as possible while also using rtv and a couple coats of undercoating on the underside. Ive been reading about POR15 and considered that on the interior side. Anyone have any thoughts or suggestions for how to repair the holes and do not include welding?
The Motor:
s52b32 w/ 95k from a 99 m3. PO converted to obd1 so we went ahead and sent the harness to Dave Markert himself for a re-pinning.
-TRM tune
-Lightweight flywheel(appears to be a JB)
-Replica supersprint headers
-ZF transmission
-2.93 limited slip


Sorry for the lack of epicness thus far, I will work to get updates and take pictures as much as possible along the way!
About the car:
We started with a 1986 325, a fairly clean early model delphin-metallic coupe. Car was automatic non-sport package and the cluster is absent so milage is unknown. Only thing included with purchase was a shell rolling on completely fubar-ed suspension, carpet, a dash, and brakes. Apart from some rust in the floorboard, a leaky sunroof, and busted suspension which will be replaced with coilovers anyways, it is in good knick. Best of all, the entire wiring harness has been left unmolested(Yes, I was shocked too). Rolling shell on weaves- $750 bucks and a drive to the lower end of the state.
The day we brought her home. Trim bits are inside the car.
First couple days of disassembly.
Since that^ picture, the entire car is stripped of almost every single part excluding the dash.
The Ugly:
I guess it is to be expected that a nearly 30 year old neglected car could be purchased for cheap and have nothing wrong. I'm not certain but it appears the car has been sitting for a good while so it needs a good bit of TLC. Anything can be fixed!
The Passengers side.. not too bad.
Drivers side.. little worse and broken gas pedal mount.
No pics yet, but I relieved some stress this morning with a grinder and cut out all the rust areas and picked up a sheet of 18 gauge sheet metal. 18 gauge is a little thicker than the body of the car but not greatly larger. It was the thinnest the metal shop had and it will be nice to have the added rigidness in areas such as the throttle pedal and fender well. The worst spots are where the wheels kick debris up so I didn't want to use that flimsy, paper thin garbage that Lowes carries.
Speaking of throttle pedal, you will notice that the factory pedal mount is gone. Currently in the works is a hinged pedal that uses a different mount such as a normal door hinge. I went ahead and traced an outline and cut the new pedal out of a 1/8th inch think piece of aluminum and I think it will turn out quite nicely. No pics of the pedal yet but for an idea, I am using this guys 2002 pedal for inspiration:
Back to the rust holes...
I know there is a ton of information online and some of you guys make rust repair and metal fab look so simple, but I am considering alternative methods. One day I will fork out for a quality mig, but currently I have a stick welder that belonged to my grandfather. Stick welders are great and all if I were welding a 1/4 inch piece of iron, but im afraid for thin sheet metal, it won't do. Right now I am looking at the possibility of simply using rivets to fasten the panels as flushly as possible while also using rtv and a couple coats of undercoating on the underside. Ive been reading about POR15 and considered that on the interior side. Anyone have any thoughts or suggestions for how to repair the holes and do not include welding?
The Motor:
s52b32 w/ 95k from a 99 m3. PO converted to obd1 so we went ahead and sent the harness to Dave Markert himself for a re-pinning.
-TRM tune
-Lightweight flywheel(appears to be a JB)
-Replica supersprint headers
-ZF transmission
-2.93 limited slip
Sorry for the lack of epicness thus far, I will work to get updates and take pictures as much as possible along the way!


Comment