-
Thanks! The car was indeed pretty rusty. Not worth saving, someone might say but a very good lesson in doing body work. I was planning to run the engine on the video but it turned out there was a small electrical gremlin at play. When wiring the fan I accidentally lost power in half the fuse box so the engine wouldn't start. It's fixed now and I will run the engine on a future video. There are couple of older clips of the engine running on my channel.Last edited by Skarpa; 01-18-2021, 12:25 AM. -
The video was great, didn't even realize how far you broke the car down initially for all the rust repair. Very impressive, also would have loved to hear the engine!Leave a comment:
-
Enjoyed your video...you do such good work.
I wish I had the know how to do more on mine.
I was hoping you would of fired up the engine...I bet it sounds amazing!Leave a comment:
-
Finally I fot the electric fan and the thermo switch wired. Meanwhile I also made a new wiring loom for the A/C from scratch. I chose FAE 37935 as the heat switch and placed it in the radiator return hose. The switching temps are 74/78 the idea was that the fan only comes on when the radiator isn't able to cool down the coolant enough by itself. In short testing it seemed to work well. The fan isn't running all the time butreacts fast when the heat starts rising. Next I startedworking on the rear pop-out windows.

The chrome trim was in a sorry state. I decided to go with a facelift look and have the top trim painted black. The bottomtrim I had to save some way. I tried polishing but it didn't work so I had the bottom trims taped with chrome tape and they came out great. Time will tell how well they last. The roof edge trim was luckily in better condition and only needed a little polishing.

Next I took off the fixed side windows that I had on as a sort of mock up.

All trim was of course fixed with new hardware.

It was also a good time to install the B pillar trim to the inside of the car. The foam behind them had deteriorated over time so I got rid of the remnants and replaced it with thin foam by StP. It was annoying to glue to such complex shape but otherwise worked well.


Then it was time to install the pop-out windows.


Adding the trim sure improved the look of the car. I installed the feont door trim as well apart from the window bottom trim. That'll need to wait unril the windows are in.

Leave a comment:
-
Made a super awkward vlog post about the project on youtube. Nothing new to people who are familiar with this project thread but go see it for the laughs or if you want to know what I look like.
I've made some actual progress as well but more on that later.Last edited by Skarpa; 01-04-2021, 04:46 AM.Leave a comment:
-
The extension is for the loose spring as the stiffer spring was no longer available for that side. But yeah, installing the springs is not very pleasant. I was wearing gloves and still managed to get my hands mangled a bit. Thanks for the kind words!Last edited by Skarpa; 12-03-2020, 11:52 PM.Leave a comment:
-
Installed my MTech springs a couple weekends ago, wow that was tough. Busted my knuckles a good few times, can't imagine how tight it must be now with the extension on the bracket. Car is looking great brother! Nice work on the steering wheel tooLeave a comment:
-
When I go to the garage I work on stuff I feel like doing. That of course sometimes leads to me putting off less favorite stuff like wiring but I'll get there eventually. Of course I also need to consider the sequence of work. Often you need to do one job before being able to start another. Actually I've reached a point where I have a pretty straightforward path of work ahead to completion of the the build. I've kinda already done all the stray stuff. Last of them were various little jobs for the trunk. The trunk lid seal was worn out so I replaced it with a new one. I also worked on the trunk lid springs. The M-tech 1 deck lid spoiler is so heavy that the lid wasn't holding up securely. The cars with a deck lid spoiler actually came with stiffer springs for keeping the lid up. The stiffer spring for left hing was still available so I ordered it. For the right side hinge I made an extension that increases the tension in the spring even more than the original two slots.

This part and the new spring of course got a coat of paint. I also had another issue with the hinges. I suspect I welded the support for the right hinge in slightly wrong position when replacing the right rear wheel well as the lid rested a few millimeters below the correct position in that corner when shut. That was luckily easy to fix with some shims.

When you shut the lid and then loose the screws of the hinge the lid cannot move anywhere while you add shims between it and the hinge. That of course means you need to be in the trunk. I'm glad I don't have claustrophobia. While I was ordering stuff I pulled the trigger on a heckblende, a beauty cover between the rear lights. I got a black one. Actually I would have liked a reflective panel to tie together the rear lights but unfortunately that doesn't look as good in an early model as it does in late models because the rear lights and the indentation between them are of different height. But I really like the black one as well. To do the things right I also got the trunk lock seal with a small collar around it to avoid any red peaking from the crack between the panel and the lock.


A crisp new license plate ties it all together. The rear of the car is basically finished and I really like the look. The garage door was behind me when taking this pic so every time I come to the garage this is what greets me. I take great pleasure in it especially now that it already looks like a real car. I suspect that's also the reason why I was eager to get the car finished from this angle.Last edited by Skarpa; 12-03-2020, 04:37 AM.Leave a comment:
-
Last weekend's small project was restoring the steering wheel. It wasn't that bad even to begin with:
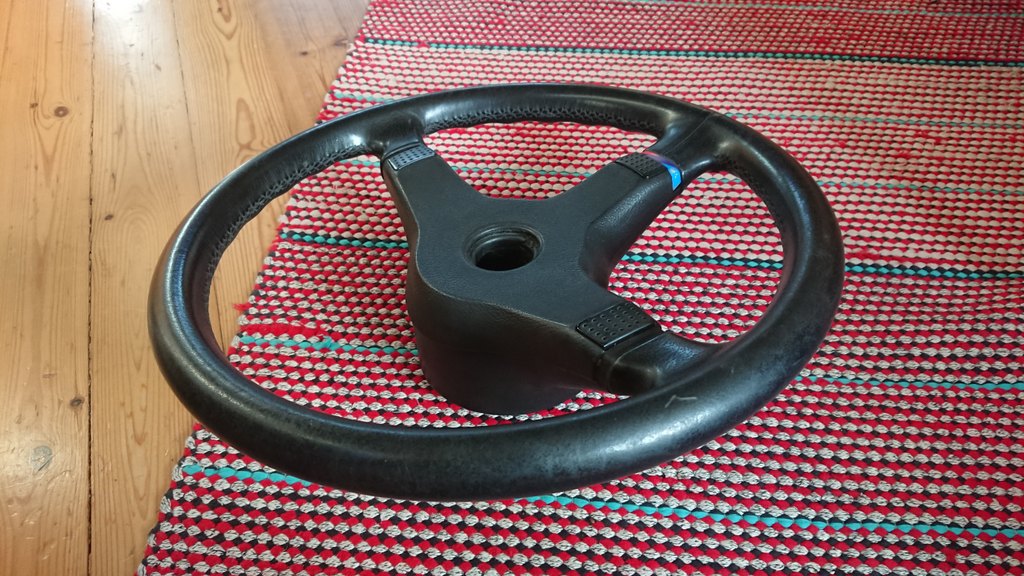
The leather was in pretty good condition except the finish had worn through where the left hand rests. It also had a few assorted scratches and the stitching had ripped above the left spoke. As the first step I refinished the leather meaning I wiped it with degreaser, sanded it matte with 320 grit sanding paper and gave it four thin coats of Furniture Clinic leather paint. It improved the look tremendously. Next I took care of the worn stitches. I figured out the stitching pattern by looking carefully at the intact areas. Then it was just a matter of grabbing black stitching thread and a needle and copying what I saw. Before closing the leather I spread some glue under the leather where it had detached.


It turned out pretty well. Not quite as even stitch as originally but not bad for a first try. When pulling the thread tight to close the seam you need to be careful not to snap the thread. It helps if you use the other hand to squeeze the leather together and then just take in the slack in the thread. I should have repaired the stitches before painting the leather. When stitching, I left some scuff marks on the leather so I gave it another coat of leather paint to tidy it up. The M-stripes at the center spoke were pretty worn with the paint chipping at the blue and the red stripe so I mixed up right colors and gave them a touch up.


The end result is pretty nice

It's a little shy of an actually reupholstered steering wheel but repairing something old and doing it all myself is just very satisfying for me. Still I might buy a new M-patch for the wheel as I just learned that they are available individually.
Doing small updates like this might not give you very clear picture of where we are with this project. I have a detailed to-do list of about four pages in Google docs. but here's a small summary:- Electrics:
- Wiring for the cooling fan, AC and the rest of the engine bay (wiring loom requires modifying)
- Installing the power windows and the central locking - door wire looms require some repairs
- Finishing the connections for the cruise controls
- Finishing the work on the oil temp gauge
- Wiring up the radio
- Sound system speakers (with some new speaker elements)
- A small active subwoofer under the passenger seat or behind the rear panel
- Mechanics:
- Sort out the problem with the hydroboost - relocate the pressure regulator?
- Windcsreen washer (custom reservoir)
- AC lines
- Body:
- Adjust the panel gaps - front fenders need to be modified a little at the bottom edge.
- Install the rear pop-out windows
- Assemble and install the front bumber with M-tech valance
- Blinkers and foglights
- Repair and install the plastic undertrays
- Install the side skirts
- Touch up and install various trim
- Install all the interior
- Finishing:
- Wheel alignment etc.
- Test drive and tune the engine
- Inspection and registration
Last edited by Skarpa; 11-09-2020, 09:59 PM.Leave a comment:
- Electrics:
-
-
Nice series of updates. That wiring cover turned out great and has a real OEM look with the contour matching the opposite side of the main cover.
I have heard that an electric carving knife works well for shaping seat foam - I've not tried it myself but it seems like a reasonable option and not too expensive. I have also seen upholstery folks use a rotary palm sander to complete the final contour of the foam, however the foam would need to be fairly firm for a good outcome.
Keep up the good work.
MJLeave a comment:
-
Back to this matter:
I had an initial test version of the wiring cover end printed on a filament-type 3D printer. After the test fit I quickly learned I need to change some things.


Where the cover end meets the original cover they don't quite match. Also the piece didn't have enough room for the cables so I needed to hack off a chunk of it to be able to test fit it at all. So I made the required changes:


As suspected the filament printing doesn't really work on a thin shell-like piece as this. Even with the reinforcement ribs I added on the inside of the piece it still felt brittle and the layer adhesion wasn't great. So I ordered the new piece from Weerg who use powder bed type machines. When I got my hands on the part I was very happy with it. It felt like one piece of sturdy but flexible plastic instead of separate layers glued together. The piece could sustain quite a lot of bending and abuse. Also the surface finish was nice. It was media blasted and dipped in matte black dye. The surface matches the original parts quite closely.


The fit was good as well. I could still tweak a few minor things. The shape should taper off towards the passenger's side fender more steeply to match the contour of the wiring cover. Also there should be a bit more space for the edge of the hood seal and I should see if I can decrease the surface element size in the print file. Now you can see pretty clearly how the round shapes consist of flat surfaces. I made the changes in the 3D file so if I ever need to order a new one, these things will be corrected. But I'm already very happy with the current piece.Last edited by Skarpa; 10-30-2020, 01:34 AM.Leave a comment:
-
Lately I hven't had quite as much time for the project as before but I've still gotten some stuff done.
I got the wiring under the dash sorted out and neatly in place including finding the correct spot for the cruise control ecu. I've never seen one in place so it took a little time to figure out.

I installed a windscreen radio antenna and threaded the wires in the A-pillar. After that I was able to install the A-pillar covers and the check panel.

I had to move the throttle cable attaching point in the throttle pedal linkage to match the pedal movement to the throttle arm movement.

Despite me trying to measure it beforehand, the TPS plug fouled the hood so I cut off the plug from the sensor and replaced it with a wired connector.


I also did some details on the engine bay:

I added 90-degree elbows to the brake fluid lines of the remote reservoir to tidy them up some.


The car also got it's identity back. The pop-rivets are of course original parts from the dealership.
Next I need to sort out the engine bay wiring. I need to swap some connectors because the body wire loom is from a late model and the car is early model. Also half of the A/C wiring loom is missing but that's fine, it wouldn't fit the compressor or the temp switch anyway. I've been avoiding the wiring so far because working on and repairing old wire looms is not my absolute favorite work. But it's all right once you clear the initial step and figure out where every wire should be going. Once I have the wiring in place I can run the engine longer. I haven't done it yet as I don't have an operational cooling fan yet.Last edited by Skarpa; 10-24-2020, 05:53 AM.Leave a comment:
-
That would work well for a single plate edge but this is the case:

Plates are welded together into triangle profile so I doubt a product like that would stay there. But welding the frames is no problem once the seats are taken apart.Last edited by Skarpa; 09-25-2020, 08:06 AM.Leave a comment:
-
Maybe try some heat shrink edging depending on how thin the plates are? Low profile and faster than welding/grinding, and looks like it's available for up to 5.4mm panel thickness.
There are probably cheaper options, but something like this:
https://www.newark.com/raychem-te-co...ack/dp/18J8521Leave a comment:


Leave a comment: