

My journey began as a desire for a cheap car that would easy to work on and fun to drive (ie. a manual transmission). At first I was looking at Miatas and early-00s Subaru WRXs. Then I stumbled across the massive cult following of the E30.
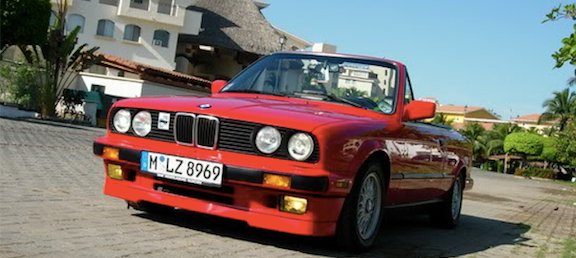
Many hours spent on Kijiji lead me to see a lot of cars with rust, which was a big no-no in my search. Ultimately finding a 'rust-free' car in Toronto is pretty challenging unless you buy brand new. Alas, I found this 89' vert. It had only 172,000km with a fresh head (courtesy of a previous owner not changing the TB), and from what I could see no rust.
The person that did the work on the head certainly has experience with the cars and gave me some photos of his work (clearly took pride in it).


At first, I just wanted to do some paint correction, clean it all up and drive it. I quickly began ordering parts and it all spiraled a bit out of control.
Here is the car when I picked it up in March of 2016.

It looks OK, but had a mismatched fender (wrong red), a bad muffler and the paint was oxidized. Also was sitting on very low springs and needed some love. It did have Bilstein shocks and struts.
After having the muffler replaced with some custom stainless steel pipes I had the car delivered to Bavarian Motorsport for Steve (for those who know him) to give the car a once over and list everything 'wrong' with it. He gave the car the safety check that I needed for licensing and then I let him do a bit of work:
- Brake lines (including the ones above the rear subframe)
- Replaced fuel tank, fuel lines, and filter
- New engine rear main seal
- New trans in and out seals
- New shifter bushings
- Fresh oil and brake fluid
- Checked to make sure that engine was in good health and that it would pass emissions (which it did 1-week later with near perfect results).
His recommendations were to replace my brakes and subframe bushings ASAP.
After getting the car back from Steve I did a valve adjustment and replaced the transmission and diff fluids.
My first big parts order included:
- H&R springs (to replace the FK springs that were too low for me)
- Revshift polyurethane rear bushing kit
- Zimmerman brake rotors
- Pagid brake pads
- Front strut mounts
- Valve cover gasket
- Parking brake cables
- Lots of other odds and ends
I was supposed to have a 'budget'... that concept didn't last long.
This was my first car that I was going to do such extensive work on, and at this point I was getting anxious, but extremely excited.
I tackled the brakes one morning and then the front springs and mounts were replaced the next. Was making very quick progress...
Then I decided that I was going to do the rear bushings. Armed with the knowledge of the online guides I figured it wouldn't be too difficult.
I picked a random night and started working on dropping the rear end, all of the work being done in the bowels of my apartment's underground garage.
It was going pretty smoothly, and I was able to use the lag bolt and threaded rod trick to getting the bushings to drop without leaving the sleeve embedded in the car.

BUT, it took me a loooong time as I was only working an hour here and there after work in the evenings.
I brought the subframe, trailing arms and the diff up to my in-laws house where I could brush off the rust and apply some new paint. Having them painted in their garage was where I planned to leave this project before going on vacation for 10-days. I received a call at 3pm the day before I was supposed to get on a 6:30am flight. My landlord was freaking out about the car (which was sitting with its driveshaft and exhaust next to it for almost 3 weeks). He said that the building owner was calling the fire-department to have my car removed due to safety concerns.
Here is what my parts looked like when he called:


I've never worked so hard, but I started at 5pm and by about 2:30am I had the subframe back in and was able to lower the car onto its wheels again.

It looked good enough, despite not having working brakes or parking brake. Showered, packed my bag, and woke my wife up to get into the Uber and off to the airport (slept well on that flight).
Crisis averted!
Next step was to compound and polish the paint. Went well but there were some dents that would need to be fixed. I did do a lot of PDR on the trunk.

Replaced the ignition system except for the wires (they looked new already). Meant ordering new plugs, rotor, cap, etc.
Also put in rebuilt M50 injectors from MEPEH.
Before the car was put away for the winter I had the A/C system overhauled for R124. New compressor, condenser, aux fan and relays. Blows nice and cold.
Wasn't a lot of flow coming from the vents... we quickly found out why.

I picked up a hardtop for the colder months so that I could drive when the roads were dry. My wife helped me strip out the old headliner and put in some nice perforated black material (no photos).
After the winter I put in a refurbished AFM from Gregory and rebuilt my throttle body with a working TPS.


Had a smoke test done and found the valve cover hose to be bad. Once replaced my idle was dead steady at 700rpm, but the car still shook a bit while idling. Solved this more recently with the HD mounting kit from Garagistic. Now it's nice and smooth.
I stripped the anodizing off of one bumper with oven cleaner and then sanded/polished it to a mirror shine.

Coolant gauge was only going to the first white mark, so put in a new thermostat, new fan clutch and put in some nice red silicone hoses.

Bled the system and now it quickly goes to half-way and stays there.
It took some time, but I started to fix up the dents and dings in the paint to prepare it for a proper paint job.


Used 2k epoxy primer to ensure nothing would rust.
Then the car was sanded back, coated with a sealer primer, and a few coats of base followed by a few coats of PPG ceramic clear. While the trim was off I wrapped all the chrome with black-chrome vinyl wrap. Mutes it all nicely.


Was told to not polish or coat the paint for 90 days so that it could off-gas.
So I started to tackle a bunch of smaller projects.
Rebuilt the brake calipers and gave them a coating of paint. Installed some Garagistic SS brake lines too.


Red calipers look great with the gun-metal wheels (Enkei Compe in 16x7, w/ 205/50R16 Firestone Indy 500 tires)

OBC light went out, so soldered in some LEDs.


I bought some Leatherique, Leather World Tech's kit, and a nice Badger airbrush. Seats were disassembled and then sat soaking in the Leatherique oil for a few days before being resprayed with new dyes.


Picked up an E46 ZHP rack locally and installed it with new E36 tie-rods only a few weeks ago...

While the car was up on the lift the car got a new oil pan gasket to stop some leaks.
So far the rack has been the best money I have spent on this build!!
Disassembled my cluster to adjust the fuel gauge and speedometer. Resoldered the resistor for the brake-pad wear indicator while I was in there.


After waiting the 90-days I finally had a chance to polish and seal the fresh paint. I may go back and wet-sand/compound some parts, but for now I just polished and put on some Klasse glaze/sealant.


There are still a few things to do:
1) Flock the dashboard
2) Cover some of the trim inside with micro-suede to match the flocking
3) Install my Renown steering wheel (waiting for my Momo hub to come in - apparently it's sitting at customs)
4) Figure out why one of my mirrors isn't working (the wiring into it comes out with the same polarity rather than alternating).
5) Find a nice set of carpets
6) Long term I'll need to replace the soft-top.
7) Find a type 4-2 coding plug for the OBC
I still can't believe how much has been accomplished since last year. This car gets A LOT of attention and is great fun to drive.
There are so many parts that I have put in to keep this car in top-shape. Things such as fuel senders, missing trim pieces, seals, etc. One day I will need to pull out all of the receipts to figure it all out, but scared to think of just how much this has all cost me.
Sorry for taking so long to post the build progress, but I didn't want to show the car until it looked presentable.
Many hours spent on Kijiji lead me to see a lot of cars with rust, which was a big no-no in my search. Ultimately finding a 'rust-free' car in Toronto is pretty challenging unless you buy brand new. Alas, I found this 89' vert. It had only 172,000km with a fresh head (courtesy of a previous owner not changing the TB), and from what I could see no rust.
The person that did the work on the head certainly has experience with the cars and gave me some photos of his work (clearly took pride in it).
At first, I just wanted to do some paint correction, clean it all up and drive it. I quickly began ordering parts and it all spiraled a bit out of control.
Here is the car when I picked it up in March of 2016.
It looks OK, but had a mismatched fender (wrong red), a bad muffler and the paint was oxidized. Also was sitting on very low springs and needed some love. It did have Bilstein shocks and struts.
After having the muffler replaced with some custom stainless steel pipes I had the car delivered to Bavarian Motorsport for Steve (for those who know him) to give the car a once over and list everything 'wrong' with it. He gave the car the safety check that I needed for licensing and then I let him do a bit of work:
- Brake lines (including the ones above the rear subframe)
- Replaced fuel tank, fuel lines, and filter
- New engine rear main seal
- New trans in and out seals
- New shifter bushings
- Fresh oil and brake fluid
- Checked to make sure that engine was in good health and that it would pass emissions (which it did 1-week later with near perfect results).
His recommendations were to replace my brakes and subframe bushings ASAP.
After getting the car back from Steve I did a valve adjustment and replaced the transmission and diff fluids.
My first big parts order included:
- H&R springs (to replace the FK springs that were too low for me)
- Revshift polyurethane rear bushing kit
- Zimmerman brake rotors
- Pagid brake pads
- Front strut mounts
- Valve cover gasket
- Parking brake cables
- Lots of other odds and ends
I was supposed to have a 'budget'... that concept didn't last long.
This was my first car that I was going to do such extensive work on, and at this point I was getting anxious, but extremely excited.
I tackled the brakes one morning and then the front springs and mounts were replaced the next. Was making very quick progress...
Then I decided that I was going to do the rear bushings. Armed with the knowledge of the online guides I figured it wouldn't be too difficult.
I picked a random night and started working on dropping the rear end, all of the work being done in the bowels of my apartment's underground garage.
It was going pretty smoothly, and I was able to use the lag bolt and threaded rod trick to getting the bushings to drop without leaving the sleeve embedded in the car.
BUT, it took me a loooong time as I was only working an hour here and there after work in the evenings.
I brought the subframe, trailing arms and the diff up to my in-laws house where I could brush off the rust and apply some new paint. Having them painted in their garage was where I planned to leave this project before going on vacation for 10-days. I received a call at 3pm the day before I was supposed to get on a 6:30am flight. My landlord was freaking out about the car (which was sitting with its driveshaft and exhaust next to it for almost 3 weeks). He said that the building owner was calling the fire-department to have my car removed due to safety concerns.
Here is what my parts looked like when he called:
I've never worked so hard, but I started at 5pm and by about 2:30am I had the subframe back in and was able to lower the car onto its wheels again.
It looked good enough, despite not having working brakes or parking brake. Showered, packed my bag, and woke my wife up to get into the Uber and off to the airport (slept well on that flight).
Crisis averted!
Next step was to compound and polish the paint. Went well but there were some dents that would need to be fixed. I did do a lot of PDR on the trunk.
Replaced the ignition system except for the wires (they looked new already). Meant ordering new plugs, rotor, cap, etc.
Also put in rebuilt M50 injectors from MEPEH.
Before the car was put away for the winter I had the A/C system overhauled for R124. New compressor, condenser, aux fan and relays. Blows nice and cold.
Wasn't a lot of flow coming from the vents... we quickly found out why.
I picked up a hardtop for the colder months so that I could drive when the roads were dry. My wife helped me strip out the old headliner and put in some nice perforated black material (no photos).
After the winter I put in a refurbished AFM from Gregory and rebuilt my throttle body with a working TPS.
Had a smoke test done and found the valve cover hose to be bad. Once replaced my idle was dead steady at 700rpm, but the car still shook a bit while idling. Solved this more recently with the HD mounting kit from Garagistic. Now it's nice and smooth.
I stripped the anodizing off of one bumper with oven cleaner and then sanded/polished it to a mirror shine.
Coolant gauge was only going to the first white mark, so put in a new thermostat, new fan clutch and put in some nice red silicone hoses.
Bled the system and now it quickly goes to half-way and stays there.
It took some time, but I started to fix up the dents and dings in the paint to prepare it for a proper paint job.
Used 2k epoxy primer to ensure nothing would rust.
Then the car was sanded back, coated with a sealer primer, and a few coats of base followed by a few coats of PPG ceramic clear. While the trim was off I wrapped all the chrome with black-chrome vinyl wrap. Mutes it all nicely.
Was told to not polish or coat the paint for 90 days so that it could off-gas.
So I started to tackle a bunch of smaller projects.
Rebuilt the brake calipers and gave them a coating of paint. Installed some Garagistic SS brake lines too.
Red calipers look great with the gun-metal wheels (Enkei Compe in 16x7, w/ 205/50R16 Firestone Indy 500 tires)
OBC light went out, so soldered in some LEDs.
I bought some Leatherique, Leather World Tech's kit, and a nice Badger airbrush. Seats were disassembled and then sat soaking in the Leatherique oil for a few days before being resprayed with new dyes.
Picked up an E46 ZHP rack locally and installed it with new E36 tie-rods only a few weeks ago...
While the car was up on the lift the car got a new oil pan gasket to stop some leaks.
So far the rack has been the best money I have spent on this build!!
Disassembled my cluster to adjust the fuel gauge and speedometer. Resoldered the resistor for the brake-pad wear indicator while I was in there.
After waiting the 90-days I finally had a chance to polish and seal the fresh paint. I may go back and wet-sand/compound some parts, but for now I just polished and put on some Klasse glaze/sealant.
There are still a few things to do:
1) Flock the dashboard
2) Cover some of the trim inside with micro-suede to match the flocking
3) Install my Renown steering wheel (waiting for my Momo hub to come in - apparently it's sitting at customs)
4) Figure out why one of my mirrors isn't working (the wiring into it comes out with the same polarity rather than alternating).
5) Find a nice set of carpets
6) Long term I'll need to replace the soft-top.
7) Find a type 4-2 coding plug for the OBC
I still can't believe how much has been accomplished since last year. This car gets A LOT of attention and is great fun to drive.
There are so many parts that I have put in to keep this car in top-shape. Things such as fuel senders, missing trim pieces, seals, etc. One day I will need to pull out all of the receipts to figure it all out, but scared to think of just how much this has all cost me.
Sorry for taking so long to post the build progress, but I didn't want to show the car until it looked presentable.


Comment