

Wow- this is looking fantastic! I'm picking up my first 4dr e30 this weekend, so it's good to see this amount of effort and detail going into a sedan project. Powdercoated parts are looking great as well.
What are you doing for front seats?
Also how's the mountain biking in Indiana? I ride a lot myself down here in the Charlotte area and have a roof rack and tray waiting on my 4dr car so I can use it to tote my bike around instead of my W212 e63 / Sea Sucker rack setup.
-
And with that, it was time to nut up and tackle the intake manifold. Pretty daunting given my powdercoating experience up to this point, but presented plenty of learning opportunities, not least, just what I'm now capable of in my own workshop!
The intake was stripped of all hardware, washed, outgassed (to burn off any oils left inside), blasted, outgassed again, and blasted a final time to ensure impeccable cleanliness


Spent a few hours (so it seemed...) of masking with Kapton tape and bought a bunch of hardware specifically for masking threads and hanging parts for coating. I blocked sanded and swiped the stripes but left the roundel. The casting is fairly thin and uneven, so a crisp finish was going to be unlikely. I'd seen examples of it both ways and stripes-only always looked cleanest.

Masking and trimming all the tape on the ends of the runners was great fun...

Silicon plugs were used in all the injector bores to ensure a good o-ring seal on reassembly

Super stoked on the finished article! They are going to look mega against all the vapor honed castings, re-plated brackets and fresh hardware


Leave a comment:
-
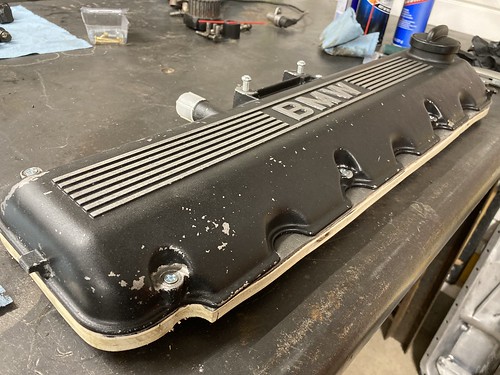
There's a sneak peek of a blasted valve cover in post #114, so on with the reveal...
I was going to go with black for the valve cover, but the dirty, flaky finish on the donor part wasn't going to cut it.

I made up a masking board for blasting and plugged the breather (note more paint came off while washing and blowing off with compressed air. A quality paint job).
However, after blasting, I wasn't fully convinced no media or dust could possibly get by...

So... out came the baffle.

Soaked in Chem-Dip which got it pretty clean


Then it went on the mill to level out the baffle mounts and drill & tap them to accept M4 hardware

98% clean isn't good enough...


I blocked down the stripes and letters to make 'masking easier' (another sneak peak.... intake to come!). I actually just swiped the powder off before baking, which came off nice and cleanly from the smooth finish rather than cast texture.

I went with a 'flat' black powder and relied on the cast texture, rather than a crinkle finish. Came out just as I'd hoped, just a bit more matte than a satin black, with enough sheen that it'll clean up easily when needed. Manky old spare cover for comparison

Leave a comment:
-
-
Keep up the great work man! The small details are really going to send this thing over the top!Leave a comment:
-
Hiding from the next big challenge, I picked the easy job of cleaning and refinishing the sump.
Whoever refinished the donor motor back in the day repainted a number of parts in a kinda steel blue-silver. Stripper made short work of that...

...then went over it with some Scotchbrite

The inside's immaculate after much patience, brake cleaner and the end of a few bottle brushes

Leave a comment:
-
Did a few more pieces that were to be powdercoated semi-gloss black.
Nasty old coolant crossover pipe

After washing & blasting...

...it was joined by a few other extra doodads

I don't have any before pics of the pulleys, but they look much better in fresh Prizmatic Poison Spyder black anyway!

All done and cooled down. I masked the coolant pipe spigots figuring the blasted finish would provide a bit more purchase than the super slick powdercoat. I hit the bare metal with some matt clear for protection.

Pretty proud of these bits, they came out really nice!Leave a comment:
-
Alright, let's get into some fun stuff... engine things.
Recap - The bottom end and head for this build came fresh from the machine shop, but I was lacking pretty much everything else. So I bought a spare engine to strip for parts...

This was stripped to a short block...

...then the timing components pulled, with the bottom going to AWDBOB for another awesome stroker build, and the 885 cylinder head on the shelf awaiting a buyer.
I'm going the vapor blasting route with all the parts that want to remain raw cast aluminum, so all the nasty, greasy old covers were stripped off and washed


Then glass-bead blasted in prep for vapor blasting

The thermostat housing was pretty crusty

Stripping, washing and blasting revealed some pitting that will need attention before reassembly

This is everything that was prepped to go to vapor blasting, including a couple of pieces that may elude to some of those little 'sub-restorations' in progress. I also had to get the vapor honing guys to dry blast those couple of timing covers as the regulator on my compressor outlet failed (leaking) which scared the crap out of me when I realised the compressor wasn't turning off!

It all came back looking great. Can't wait to get to bolting some of this stuff back together!

Leave a comment:
-
Before putting the A/C panel in the dash, I needed an A/C switch. I had managed to acquire one with good buttons that was otherwise knackered in every conceivable way (including rotten retaining tabs) and another that was functioning but you couldn't tell which button you were pushing...


Popped them both apart and shuffle all the parts around

Interesting to see how the latches work and I cleaned & greased the good set

All snapped back together into one tidy looking switch.

And with that, we can turn this mess...

..into this. The Pioneer headunit is pretty non-descript in person, if a little shiny in the pictures. It'll look nice when the backlight is tuned to match the rest of dash illumination and offer hands-free calling and high quality audio.

Leave a comment:
-
So we left off with having buttoned up the rear deck and speakers, the bluetooth mic and amp in place, so front speakers would be a logical next thing to look at.
The front is getting Pioneer TS-A1306C 5-1/4" components. While technically the same size as the original speakers, the OEM woofers had a huge flange and corresponding pocket in the kick panel pressing. A test fit of the Pioneer midbass rendered an undesirable gap around the speaker.

A tape template...

...was transferred to card for testing...

...and then detailed in CAD and sent out for waterjet cutting. Came out lovely.


Earlier in the project, I mentioned bringing my powdercoating in-house. This is perfect for finishing small pieces like this, as and when required.

May need black oxide washers to satisfy my OCD...

You might have noticed the extra bit of material I left and broke to form a return. This provides a soft edge for the wiring loom to run against.
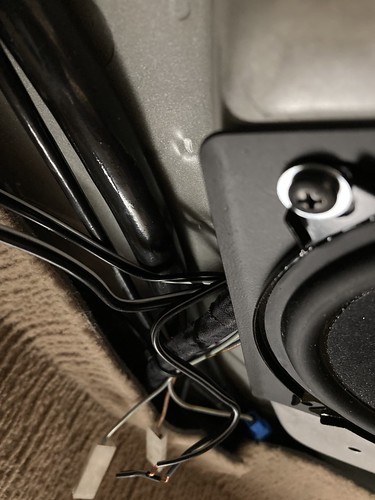
The kick panels have been cleaned up. Just waiting to finish the dash (more on that to come...) before install. As a reminder, one of the speaker retaining screws also holds the kick panel down, hence only 3 pictured.Leave a comment:
-
Oh man, has it been that long...?!
Much has happened and I'll try to get up to date over the coming weeks. I get busy working weekends and fitting as much mountain biking in as I can through the summer, so don't get sat down in front of the screen too much. Many balls are rolling right now, though I'll probably wait until the numerous little sub-restorations are finished and do a full write up on each. In the meantime though, I'll try to get somewhat caught up!Leave a comment:
-
Mic integration is very clever! I like it.
I wonder if throwing scrap bits of sound deadening behind sunroof access panel would help a bit? Probably not.Leave a comment:
-
That microphone integration is well done - I like to see how everyone handles all these little details. Looking forward to seeing that radio mounted up in the center stack and your thoughts on the sound.Leave a comment:
-
Looking forward to your stereo set up review. I swapped in some Pioneer speakers in the rear housings for me and my system was poor and couldn't hear music at highway speeds and windows down haha.Leave a comment:


Leave a comment: