
What steering rack were you using?
-

-
Comment
-
Wow, awesome work with that hood.sigpic
Always chasin'Comment
-
Epic build thread is epic!! You definitely know your way around cars, you must make a living building racecars. :up: :up:sigpic
IcWhatUdidThereComment
-
Well built and on a budget! I enjoy your build thread so far, cant wait for more posts
91 Alpinweiss2 318is OBD2 S52Comment
-
Pikes Peak Drive, Problems, and Starting
Well after working on the e30 pretty much every day besides work can get a little overwhelming and tiresome.
So a good way to get some motivation was to drive Pikes Peak!

This is my least favorite drop off...not that I have a favorite lol, to my knowledge no one has gone off here.

I believe this is from that corner... Scary and badass!
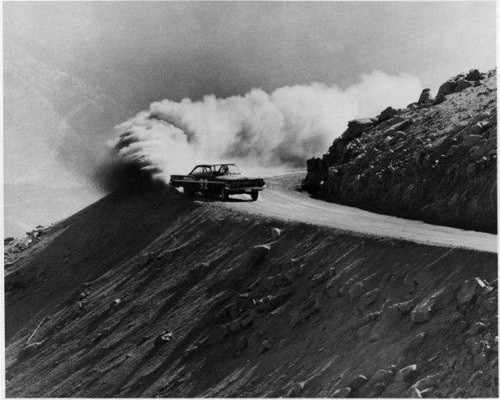

Driving it at slow speed's you really get to see the potential for serious injury/death. Makes you really respect the guys who push for record times. There are several places where the road looks exactly the same and it's easy to confuse them at speed.
One that seems to get guys every year is engineer's corner. Its a pretty sharp corner with a little drop off. There is a somewhat sharp turn right after the "horseshoe" that looks similar to eng. corner and can be easily confused with it fooling guys into thinking they are past it and heading toward halfway picnic grounds at full speed when in reality they are headed toward Engineers. Fortunately most guys realize before going off at full speed, lock em up and usually come out unhurt, car takes a beating though.
Another big one is the two left blind w's before devils playground, First blind left you can go full speed, second you cant... Im sure you've seen the crash(s) on this corner.
Driving the road in the speed limits, and following the cars that go like 5 mph! :-x it takes a long time to get up and down. My buddy Pat and I each managed two trips up in a day.

Wish I could race it every weekend.
So about a month before the race was scheduled to be I realized that I might not finish the car in time.
I had several problems that I had been trying to solve and more would pop up.
I swear I felt like I was building a house at times.
One large problem was the drive shaft.
I had grabbed the driveshaft out of the 95 m3 that had the transmission that I was going to use, so I figured I could use that, checked the length early on to make sure, so I thought I was set. The only unknown being the rear diff mount was a 6 bolt so I figured I could just swap the mount on the diff with a 6 bolt one from the junkyard...

Well the 6 bolt that I found from a 5 series(i believe) would fit on the diff of an e30, but the bolt size and pattern was different on the m3 driveshaft!
So I tried taking off the 6 bolt adapter from the 5series drive shaft and put that on the m3 shaft but the splines were larger on the m3 as well. ehh!
So I grabbed another shaft from the junkyard from e28 I think(i have a terrible memory sorry) and it was all lining up. Right length, right bolt patterns all that... except I couldn't get it apart to replace the center support bearing which was shot. Ended up getting it apart with a vice and a crazy strong ratchet strap to pry it out. figured something was wrong at that last part and turned out the splines were tweaked so there wasnt anyway to get it back together! Back to square one.
I tried to use a 7 series 6 bolt diff flange which fit the m3 part but not the e30 diff. Grrr!
I ended up using half of a shaft from an e30 and half from a e36.
I still would like to use the m3 shaft... But I dont know what I need... Ideas?
Another large problem was getting the engine running and broken in before the race.
My buddy Skylar once again came down from Denver to help me get the beast started. We had a weekend to get alot of stuff figured out. One thing was where to find a tourqe wrench that goes up to ~350 for the crank bolt... all mine stopped at 250... I had looked at a few places in town but the cost was crazy and none of the tool rental torque wrenches went up that far. Fortunately a girl at advance auto of all places let me take one that they sell out as a rental as long as I didn't break it and cleaned it up. Pretty sweet :)
I took care of the last wiring of the engine harness to the mega squirt harness as my dad and Skylar hooked up the rest of the parts and we managed to get it started on the first try with out any big problem that sunday night.
The next day I was having major trouble with what I thought was the base tune as it was running as rich as a diesel, which turned out to be the map hose being hooked up in front of the throttle body not after it... doh! After that was done it ran like it was supposed to :)Last edited by Zodow; 05-23-2019, 08:38 AM.Comment
-
such awesome fabrication went into this
7speedshop.comComment
-
Yo, where da updates at?Comment
-
Saftey and some paint.
Another large concern is saftey.
For the seat I really wanted a halo type and it to be fia approved. I chose this guy.

I wanted something new, and in the "affordable" category it was between this the hte. My only complaint is they put the breather mesh stuff on the head supports?? It gets in the way of your helmet when you turn your head. I threw two zip ties over the pad to pull it in some and that worked well.
The only disadvantage I can see with a halo type seat would be trying to get out of the car in a hurry as compared to a non halo seat. I think its worth having to help your head stay where it belongs during roll overs.
I bought the steel fia approved seat mounting brackets... even though I could have fabbed some up, I just wanted it to be legit.
I went with the schroth clubman harnesses. FIA rated for 5 years, although pikes peak has a two year rule for any belt for some reason... and they are not too expensive. They are 3 inch all around... I was originally worried about the hans needing the 3 to 2 shoulder straps but some research later decided that it was okay to go this route. The fear being that the harness would somehow slip off the hans groves.
Google brings up some good articles on the matter.

I went with 4x4 1/8 inch backing plates for the harness mounts and the appropriate angles dictated in the schroth harness set up guide.
You can kinda see the one mounted on the tunnel in this pic, I used also the large washers that came with the eye hook mounts on the inside as an added bonus.

Pikes Peak requires some kind of fire suppresion, the minimum being two fire extinguishers with a metal mount within drivers reach which is what I went for. Next year I plan to have a good suppression system as well. Ace Hardware has a decent metal fire extinguisher mount if you ever need one on the cheap.
My buddy with the neon found a decent deal on sfi roll bar padding and we went with that. Its the thickest besides the fia rally padding I believe.
Paint time
Here's the color! I went the cheap route and ordered single stage urethane online from tcpglobal.
My colors were jet black gloss, Gold Mist Metallic(the silver color), and Camero Gold Metallic

Driveway paint job.


This was about a week or two before the fire started that delayed the race. I really was cutting it close.

I still had a ton of stuff to do at this point, wire the megasuirt, shut of switches, ignition switch/start button, vacum lines and more.

Here's a shot of the straight pipe. It goes back to my side of the car.
Ill be changing up the downpipe/exhaust for next year to make room for some undertrays.

Getting ready for the stripes!


At this point the fire close to the springs had become pretty crazy basically overnight. The race hadnt been postponed yet and this was one of the last things to do so we decided to go for it. We had been lucky as the wind was blowing the smoke the other way, up until about halfway through the paint job ehh!! There was ash flying around in the air and everything! Fortunately we had it in the garage and closed the close one down most of the way and opened up the further one and avoided most of the ash. Its probably still a good 5 foot paint job lol.


Up on the way to Deckers, trees scorched by the hayman fire several years back.


Trmotorsport c1's - not super light but they are cheap and look decent. about 14lbs I believe for the 15x8's. Below are the super skinny 195 star specs that I bought for the stock 14" wheels as practice/ rain tires.

Hoosier 225/45/15's
 Last edited by Zodow; 05-23-2019, 08:47 AM.
Comment
-
Excellent work all around. Keep it up.Comment
-
Loving these updates, beautiful work!
Comment
-
I love this thread. Keep it up.1991 318i SOLD
2003 325i SOLD
Racecars and stuff.Comment
-
-
Have some stuff on your wing fabrication? Just curious and I'm sure others are as well...Comment
-
Aero
Well the race had been postponed for a month because of the fire so it gave me some extra time to do what aero work I could.
Strapped for cash, as always, I opted to try and make my own wing, splitter and diffuser.
Here is the fantastic thread that I used to help create the rear wing.
https://forums.bimmerforums.com/foru....php?t=1306900
First was to create the shape and cut down the foam block to that shape using a homemade hot wire cutter. The profile was sorta made up using a best guess/eyeballing others (Hopefully with Robs help at GOODaero we can figure out a legit one for next year) I also made the profile a bit skinny because of the thickness of the layers I added.

I saved some money using an old 10 amp car charger for the hot wire cutter and a 5 dollar dimmer wired into a 120v outlet to control the power that the battery charger would get. Worked really well for the foam I had at around 4 or 5 amps, Im guessing the better foam would need more amps but probably under 10. I used mig welding wire for the hot wire, either .025 or .030 thickness.


I dont have any pics of the layering processes, nobody was around to take pics. I did one layer fiberglass, one layer coremat, one layer kevlar and one final layer of fiberglass. Coremat seems to really help stiffen up things when your using fiberglass.

I cut cost on some stuff like the foam which I shouldn't have because it bowed with the weight of the layers and expoy and had to support the center while it set up making it not as smooth as id like.
It turned out pretty straight and strong. I was able to put my weight on it in between two chairs without much trouble. There is still tons of room for improvement on the carbon fiber one :)

The uprights are made of 1/2 square steel tubing and mount through the trunk onto the frame rails. Mounting position and material will change for next year I believe.
And now the splitter.
I went with a 15/32's plywood from the local home depot, Not as great as some materials but it's a good quick and dirty solution.

The heart thing came in handy to create an identical shape on both sides, you could easily make a template but this shape worked wonders.

I used tee nuts for all the mounts to keep the bottom as flush as possible.

I put some spar urethane on to help keep out water and such.

The rods are just pieces of allthread with two long nuts with a hole drilled though it. The nut with the hole aligns with a hole in a u channel piece of steel welded to a nut that screws into the tee nut. As long as you cut the rod close to the right length they work well and provide a bit of leveling adjustment.

Here's the air damn. I snagged a piece of my buddies sheet aluminum for this, I believe its 18 gauge. With all the screws thought it takes forever to pull the thing off. Im hoping to do a one piece bumper/airdamn/maybe splitter that can be easily taken off soon.

The diffuser was the last aero part I was able to get done.

Its made from a two sheets of aluminum that sandwich a sheet of plastic. We had tons of the stuff laying around so I tried it out.
It certainly isnt the lightest stuff around though, I think the end product was in between 10-15 lbs.

Im gonna be trying my luck with as much carbon fiber making as I can handle for the next year to shed as much weight as I can.Last edited by Zodow; 05-23-2019, 08:54 AM.Comment


Comment