-
-
Update, more work today.
Picked the block up on Thursday, they did a great job. Threw a nice coat of black block paint on that evening.

Dug the 89.6mm crank out this morning:

Cleaned it really well and installed the special crank spacer:

Installed main bearings and dropped crank in, fits like a glove.
Installed M54 rods, the "spirolox" pin retainers are seriously annoying without the special tool. Custom ross racing piston on left, stock M54B30 piston center and stock M20B25 piston on right.

Ringed and ready to drop in:


Installed pistons and rod caps, spun assembly... perfect! Top of pistons is dead even with top of block.


And that's another 6 hour Saturday.Last edited by Raxe; 12-19-2016, 11:07 PM.Comment
-
wow sorry to see all that metal carnage on your head, but looks like things are shaping up quite well! good luck man!M30 is God's motor.....but Jesus drives an M60'd car -slammin.e28Comment
-
-
wow very nice! Look at the difference in piston and rod sizing!
Where did you get the crank spacer, and is there anything special about it? Possibly a keyway or something?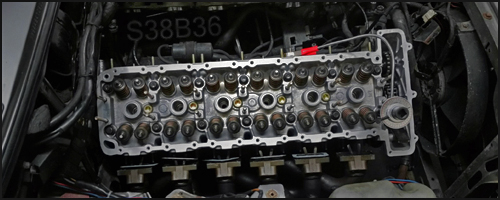 318iS Track Rat :nice: www.drive4corners.com
'86 325iX 3.1 Stroker Turbo '86 S38B36 325
No one makes this car anymore. The government won't allow them, normal people won't buy them. So it's up to us: the freaks, the weirdos, the informed. To buy them, to appreciate them, and most importantly, to drive them.Comment
-
-
Thanks guys! If everything goes well it should be finished and running by the end of the month.
My crank spacer is from IE, someone on here makes them as well but it was combo'd in with the pistons I ordered through them. Nothing complicated really, the inside edge facing the block is beveled but other than that it looks to be pretty much a solid ring. Need to heat it up well to install.
Perhaps someday haha, it's not getting tracked with this engine (maybe an autox or two) so I'd like to keep it as street-able as possible. It's also being driven 2000km through the mountains to the Picnic and other places, and in those conditions I don't want any funny business in the fuel department. Honestly my goal with the car for the last 7 years has been to build it as BMW-like as possible using OE+ parts and styling, so with these specs it's basically an M20B27... but bigger, and with a 6000rpm redline. Around town I'll run a 91 octane map. :)Comment
-
I can't wait for dyno numbers & how it sounds.Projects Hartge,Alpina & AC Schnitzer Builds.http://www.r3vlimited.com/board/showthread.php?t=280601
http://www.r3vlimited.com/board/showthread.php?t=227993
http://www.r3vlimited.com/board/showthread.php?t=289362
 DSC04926 by Raul Salinas, on Flickr
 DSC03413 by Raul Salinas, on Flickr
Comment
-
Small update this time. Finished assembling head v2 and adjusting the valves. Installed stock cam gear to test clearance.

Clayed the valve reliefs in the pistons, installed the timing gear, bolted down the head and turned the crank... about 3.5mm of valve clearance with the stock cam gear. Swapped out the stocker with the blue adjustable IE unit and advanced half a tooth and tried again - about 2mm. I think I'm just going to run it with the stock gear. I know there is some tuning potential with the adjustable one but after the last head failure I don't feel like it's worth the uncertainty.
 Last edited by Raxe; 12-19-2016, 07:39 PM.
Comment
-
Since you putting all this work into building this engine, have you considered timing the cam where it was designed be? That kind of is the point of an adjustable cam gear, you get to set the cam timing and compensate for milling the head/block and variation in how the cam was ground.Lorin

Originally posted by slammin.e28Comment
-
Another weekend, another update!
Assembled engine on stand to make sure we had all of the hardware/gaskets and everything needed for install day.

Pulled the remainder of the old engine out:


New engine went in piece by piece, much easier to hook everything up in stages and I didn't want to remove the exhaust and deal with that. Converted from the dual mass flywheel to a stock solid one, replaced the clutch slave and hose, release and pilot bearings. Clutch disc is still like new :D. Installed new engine mounts and lowered the block in:


And finished:

Filled it with cheap oil and ran it for a while. Loud as hell, after about 10 minutes the shop started filling with smoke haha. Coolant cook-off anyone?

The car has no fan at the moment, going to install an electric pusher fan in the near future as it overheats when idling for a few minutes.

Drained oil and filled with GTX 20W50. The valvetrain chatter is completely gone, not even any ticking. Unfortunately the flywheel rattles with the different cam, but I can live with that. Took it for a test drive at the end of the day - fantastic!!
 Last edited by Raxe; 12-19-2016, 07:42 PM.
Comment
-
that thing is red hot!!
One of the best threads you will ever read
http://www.r3vlimited.com/board/showthread.php?t=221813
Nice trailer of my e30
http://www.youtube.com/watch?v=TTjtG...e_gdata_player
If i sold you something please leave feedback here
http://www.r3vlimited.com/board/showthread.php?t=217142Comment
-
:)
1991 325iS turbo

Comment


Comment