

Presently when I press AC it turn the fan on high speed, this was the only testing I was doing with the BK which wouldn't do it but the GN/BK does. Looking at the ETM diagram it appears that the AC control uses only normal speed which in my case is high speed because there is no resistance. I don't know why my BK isn't BK/BU but hopefully it is the same thing.
EDIT: BK indeed is what I have instead of BK/BU as my high speed, GN/BK being low speed. I connected BK and fan RED to the top end of the stock resister and GN/BK to the other end. The fan's BK is connected to the car's Brown for grounding. The resistor is mounted on one of the spal's motor screws. Low speed comes on at 10 o'clock but is able to keep it around 11 o'clock so I haven't been able to confirm high speed after a month. I'd rather be at the 1/2 mark when fully warmed but perhaps on a really hot day of hard driving I'll get there and be glad I'm only there. Thanks again for the help!
-
BK/GN is connected to the low speed relay, which is turned on by the lower temp part of the rad switch. It's just a normal 12V feed so when you connect it to the fan directly, the fan blows at full speed. The resistor is used in this circuit to slow down the fan.
BK/BU is similar but it doesn't have any resistor, so the fan blows at full speed. It's connected to the high speed relay and turned on by the higher temp part of the fan switch. Your water has to get very hot in order for the high speed to turn on. That's probably the reason you didn't get power when you tested.
You could also check whether the black wire is actually the high speed feed by using a digital meter and checking for continuity between the end of that wire and one of the pins at the high speed relay socket in the fuse box.Leave a comment:
-
I don't have BK/BU from the original harness, I only have BK, GN/BK and Brown. Without the resistor involved when I connect GN/BK to spal RED and Brown to spal Black, the fan works on high. If I switch the spal RED to the BK it doesn't come on.
Does this mean that GN/BK is really still low but without a resistor it runs on high and my BK really is high but has a blown relay? I'm mostly confused because I don't have a Black/Blue.
When splicing the spal RED to high speed (whichever mine is), does that mean actually splicing it into the high speed line before it connects to the resistor or just double connecting it AT the resistor?Leave a comment:
-
I'm sure this has been answered in this thread, but I'll ask it anyways as a quick search did not turn up an answer to it. What is the average available space between a stock late model m20 radiator and the waterpump pulley on an S52? My oem aux fan appears to be dead and I'm considering replacing it with either a single 16" pusher fan or switching to a single 16" puller and removing the aux fan entirely. Will this be enough? Ambient temperatures in my area rarely ever exceed 30-35 degrees celsius and I do have AC in my car.
Lastly, I cannot quite figure out exactly what the best temperature would be for my fan switch, I'm definitely going to try and find a dual temperature setup. I know the m20 runs with an 80 degree thermostat from the factory, the s52 runs an 88 degree thermo. Will this make the stock e30 gauge read high when mounted in the head? An 82/88 switch seems too low for this setup, I'm thinking Something more like an 88/92 if available would be better?
EDIT: Found 91/99 degree was the factory aux fan switch for an S52, I may go ahead and just use one of those as I'm pretty sure the car will run cool enough that the low speed setting should keep temps down. If not I'll setup the switch to run on high at 91 degrees with an 88 degree thermostatLast edited by Varinn; 05-20-2013, 08:30 PM.Leave a comment:
-
So I have my Spal fan wired and working per the instructions in the first post as a single-high speed only triggered via the radiator mounted single pole switch.
My engine stumbles and the rpm's drop for a second when the fan turns on even with my idle set at 1000rpm---is that normal?
No AC in the car.Leave a comment:
-
-
fronton,
If you don't have stock aux fan at all then you need to wire up the fan loom yourself.
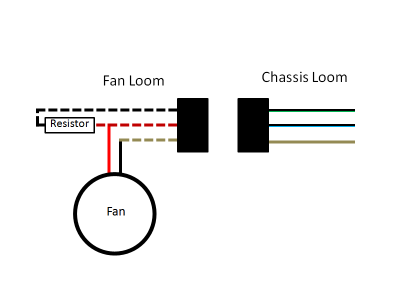
Prepare 3 wires. They need to be as thick as the ones on the SPAL. The functions of these wires are:
1. Low speed. This wire connects to BK/GN on chassis loom.
2. High speed. This wire connects to BK/BU on chassis loom.
3. Ground. This wire connects to BR on chassis loom.
Connect wire 1 to one of the resistor's pins. It doesn't matter which side. Both are the same.
Connect wire 2 to the other side of resistor.
Connect wire 3 to the SPAL's black.
And lastly, splice the red wire from the SPAL into wire 2.
In the following diagram, the dashed lines are the three wires mentioned above. See if this makes sense.
 Last edited by RoadHazard; 05-16-2013, 11:16 PM.
Leave a comment:
-
This ? see post 57 i wired mine this way works fine
Leave a comment:
-
My present working high only auto setup:
16" spal puller with the fan's red connected to driver side's GN/BK and fan's black to car's brown while the car's third wire (Black) is left disconnected. I also have a new stock dual temp switch connected with original wiring. Presently the fan kicks on high speed automatically about at around 11oclock on the temp gauge. This is not ideal as high is too intense and quickly cools it down to further never letting it get to half mark and needlessly drawing full amps. So, I want to incorporate low speed with the oem resistor but am having trouble getting clear instructions for splicing it into play.
1. Is there a way to identify which side of the resistor is high and low or is one ground and the other power?
2. What exactly connects to each end of the resistor? Do I merge the GN/BK which seems to be high speed (works that way now) with the currently unused car's BK on one end and have just brown on the other end?
3. Once the resistor is wired correctly with the car, how do I then connect the Black and the Red fan wires to it?
I don't have the stock fan to see how it originally was wired or I would have less questions. ThanksLeave a comment:
-
I would rather be able to control it myself, it's a gutted track car with no ac if that matters at allLeave a comment:
-
Leave a comment:
-
So I can wire the black and brown to the green/black and itll fire high speed (which is what i want) I want the fan to be manual though with the snowflake button, not it to turn on automatically with the switch. Does that wiring seem right still?
cliff notes
red--> positive on fan
green/black spliced to black and brown wires --> negative on fanLeave a comment:
-
-
You need a 3-prong switch for the E36 M3 radiator. (A 2-prong switch will only allow you to run 1 fan speed.) Use a 80/88 deg switch from a 4-pot E36 and yes this is a BMW part. I know because I'm using it in my car but I don't have the exact part number in my hand right now.
First, replace the new fan switch on the radiator and connect it to the stock fan switch plug located near the RH headlight. That's all you have to do for the fan switch part.
Now on to the fan part. I'll reword the OP's instructions here. You want to reuse the wires that are/were attached to the stock aux fan. Remove them off the fan as a complete loom. Wires in this loom are colored red, black, brown and have a plug and a resistor connected to some of them. It is recommended to use the loom as is with the resistor still attached unless it's broken. First, hook the blue wire on the SPAL to the red wire on the loom (where you cut off the aux fan) . And hook the black on the SPAL to the brown wire on the loom. That's it. Connect the plug on the loom to the plug under the LH headlight and you're done.
Hope this makes sense.Leave a comment:
-
guys can i get a bit of a hand here please. im not very wiring minded so am trying to work the wiring for spal fan out. (probably simple for quite a few of you, not me lol) im hoping doing it the following way will give me a Low and High speed on the fan?
ok i will use the resistor off the E30 M3 so is this the correct way to wire it in. just solder it to the black wire from the Spal fan?

i have worked out this is the aux fan plug (under the headlight) but not sure how to wire the Spal fan to this... my Spal fan has 2 wires, a BLUE and BLACK one.

I also have the two prong aux switch 328ijunkie mentioned in first post. How do i wire up the original 3 prong plug (what colour goes where?) to the new switch?
once again thanks heaps for any advice!Leave a comment:


Leave a comment: