If this is your first visit, be sure to
check out the FAQ by clicking the
link above. You may have to register
before you can post: click the register link above to proceed. To start viewing messages,
select the forum that you want to visit from the selection below.
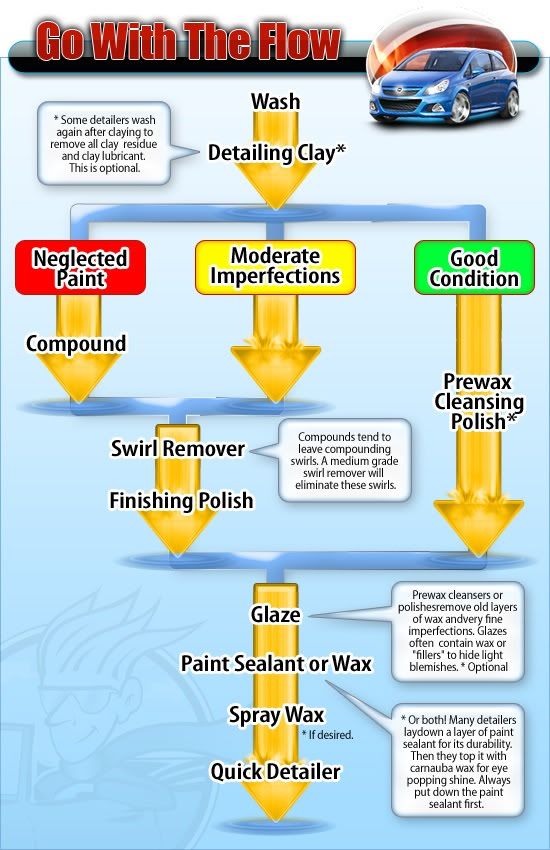
I have been detailing my cars since I was 16 and owned my first car (2003 EP3). I have been doing a lot of research on detailing. Here is a good diagram (very vague, I know).
complementary of Autogeek.net
Check out that forum and you will learn worlds amount of detailing skills.
Edit: Oh and I just got a 1987 eta that I will be detailing this week end. I will take before and after of the paint. Stay tuned
thanks for all the info here gonna be doing a much needed thorough detail of my car. I will post pics before and after as i have 24 year old factory paint in pretty good shape but there are swirls and a few scratches. Do you guys pre treat carpet with hot water ammonia mix? A friend of mine in the carpet cleaning biz swears its really good. I have pretreated with 25% ammonia and 75% h20 works pretty good if you let it sit for 15 minutes scrub then put down carpet cleaner of choice. I use his machine to pull up all moisture and looks good. Any better way? Thanks
It sounds like this can easily take an entire weekend just for the exterior. How in the hell do detailers make money if they are doing this much work? Can you guys chime in on a procedure for the interior?
I will give a quick rundown of what I do for most details that come into my shop with a few pictures.
~ Hose off entire car well. I prefer to use a pre-soap to loosen dirt and grime. Adams makes a great pre-wash. Using two buckets, I use ClearKote car wash in a 1oz:1 gallon configuration. I prefer to use a clean lambs wool mitt. I have had so-so results using boars hair. Starting from the top of rinsed and wet car, I work my way down. You want the last part you wash to be the dirtiest (front bumper, behind wheels, rocker panels). Hose after each panel to keep soap from drying into the paint. I prefer to use a an airgun when possible followed by a microfiber drying towel, but the two towel rule works well.
~ ONLY claybar a well-cleaned car. Very dirty cars may require multiple cleanings before suitable to claybar, otherwise you will ruin your clay quickly. Again, I start on the top of the car working my way down, doing the dirtiest parts last. Once I am done claybaring, I rewash the car and do an entire coat of ClearKote Quik Shine. This helps me to analyze any serious problem areas as well as give me a nice surface to work on. Always remove excess lube with a clean microfiber towel.
~ Starting with a dual action and a cutting pad (I prefer Lake Country, but I have used Meguiars and 3M, all work well), I work my cutting polish at speed 5 or 6 depending on the product. If starting with Poorboys SSR, I use speed 5. If using ClearKote Compound Creme or Blue Moose Cutting Creme, I use speed 6. I start on the top doing about 2'X2' sections. The biggest key here is to take your time. Almost every DIY detailer I have helped goes way to fast and the results are marginal. Products have to be broken down and without a rotary buffer, you need to work the product a lot. Polish each section until there is literally just a haze of polish left. If there is visible polish on the panel, you have not worked the product through. Remove left over residue with a clean microfiber towel. Wipe down car with Quik Shine to verify there is no left over cutting that needs to be done.
~ Next I move to my polishing stage. Depending on color and application I prefer to use Red Moose Machine Polish, Poorboys Professional Polish, or Meguiars Machine Polish. If cutting was not required, Poorboys SSR2.5 or 2 can be used. Using a polishing pad, I work all my products at speed 5 using the same method as above. Again polish should work to haze with no left over build up. Remove with clean microfiber towel.
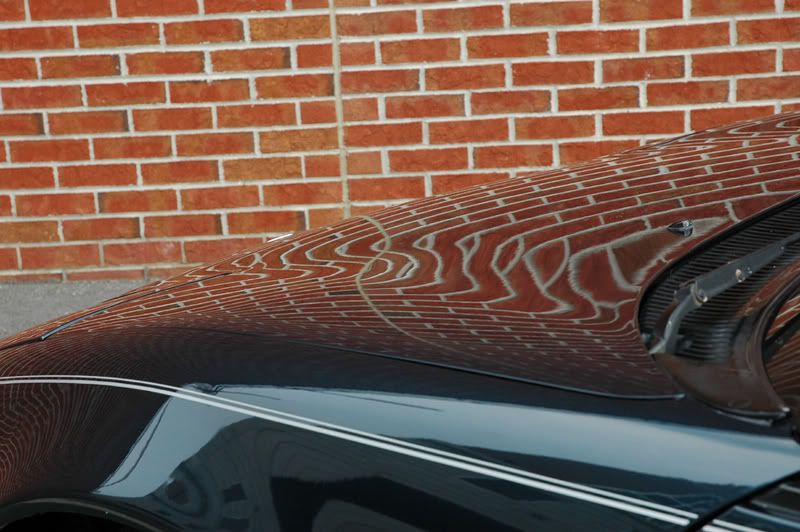
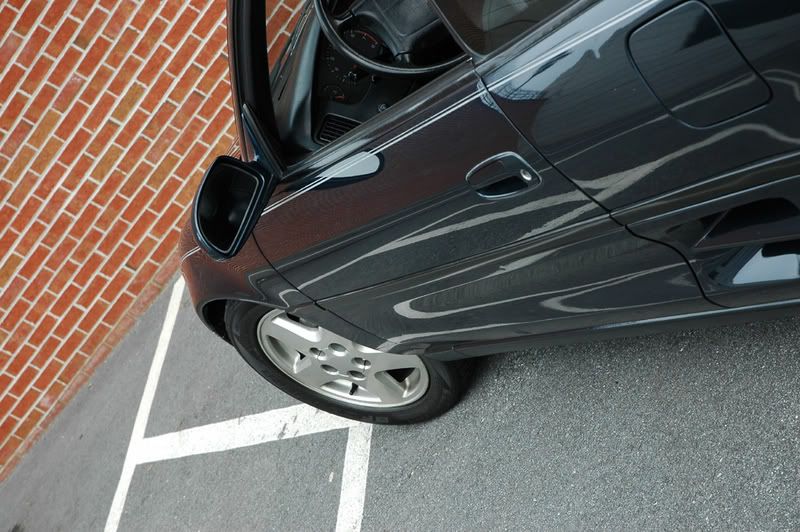
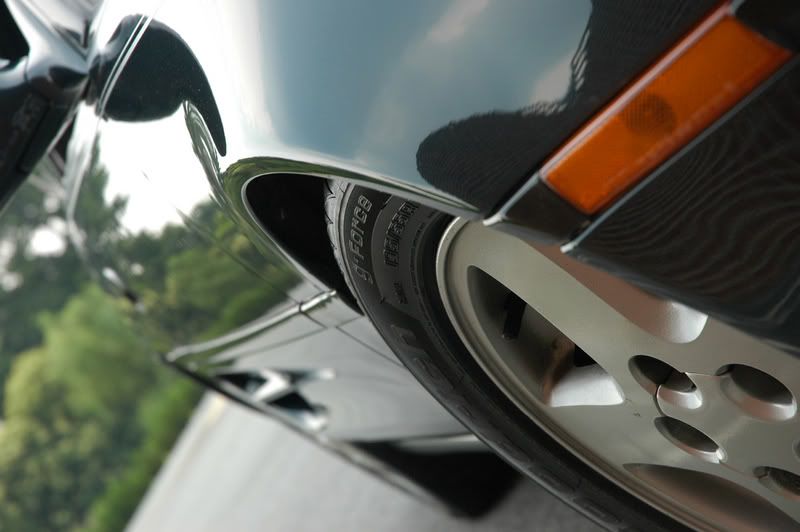
~ This is the point where you shift from ailment removal to paint depth and shine. Determining what is left in the paint plays a roll in what can be used here. If the paint is very clean, I really enjoy doing a coat of ClearKote Vanilla Moose with a finishing pad. If another polish is needed, I may work SSR1 or another coat of Red Moose Machine Glaze. I prefer to use Vanilla Moose Wax because it acts as a cleaner and filler, as well as a moulding and glass treatment. I essentially apply it with a finishing pad on speed 4 to the entire car. It goes on wet and comes off wet, leaving a super-deep shine. It brings life back to mouldings and rubber surrounds as well as cleaning glass very well. Remove with clean microfiber towel after application.
~ At this point I either apply a sealant or a wax depending on customer preferences and the paint of the car. On single stage paints, I typically skip the sealant and move straight to a wax. If I am applying just a sealant, I prefer to use Optimum Opti-Seal. If I am applying a sealant and coating it with wax, I prefer to use Poorboys EX-P. Either way, I apply the sealant by hand using a quality foam pad. I let the sealant sit a minimum of 20 minutes before removal. I remove with a clean microfiber towel being very gentle. It does not take a lot of sealant for it to be effective, so be very conservative with your application.
~ There are so many waxes on the market that I am always trying something new. My products of choice are ClearKote Carnauba Moose Wax, Pinnacle Souveren, or occasionally Poorboys Natty's paste wax. Pinnacle is the most expensive but the results are always outstanding. ClearKotes and Poorboys have very similar results, difference is one is a liquid and one is a paste. ClearKote I can apply faster, Poorboys I can apply more generously without negative results. Regardless I always use a quality foam pad and apply by hand. I let the results set up until the wax is dried and dusty. Using a clean microfiber towel (usually several) I buff the car to liquid glass smoothness.
~ While the wax or sealant is setting up, I clean the wheels. I prefer to use non-acidic wheel cleaners, although on occasions there is so much brake dust build up that I have to be more aggressive. Keep in mind that wheel paint takes some serious abuse, and the last thing you want to do is aid in its corrosion. I use a sheeps wool mitt or brush to clean the wheel. At the same time I also wash the wheel wells. If cleaning for a car show, it is very important that you remove the wheels and clean the backsides as well as all suspension and brake components. For wheel cleaner I usually use Adams Wheel Cleaner or a home made secret creation :) .
Also keep in mind that not all 'terry' cloth is terry cloth. Genuine terry cloth is expensive and the softest to use. The bag of terry cloths you can purchase from Wal-Mart and auto parts stores will do more to damage your paint then help it. Genuine terry cloth you could use for bed sheets and pillow covers...that generic stuff I wouldn't even want to dry off from the shower with.
First I would like to thanks you guys for writing this. I have google detailing many time only to be disapointed buy the lack of detail.
whakiewes in your detailing method you do not mask the car up like the OP did why is this?
Is this because you use Vanilla Moose Wax? Do you literally apply this wax over the whole car?
thanks again guys fantastic write up can't wait to do my car. So many things I was doing wrong! LOL
^^
yeah you wash the car as mentioned, clay the car, polish the car, and then seal the paint with a layer of wax/sealant. Wax and sealant do the same thing, they are both sealers.
I realize this thread is in the body/paint section, but, seeing as many of you are detailers, I was wondering if you could make some suggestions on steam cleaners.
In the next month or two I'm planning on purchasing and wanted to hear if you had any suggestions or opinions. Are they worth it?
Budget is probably 800, but I'd still like to hear your recommendations if it's over that.
I'm getting my car painted next week, what should I do to it when i get it back from the shop. I assume it wouldn't be as intensive as the waxing job described here.
I though of waxing it and using some sealant as well, but to be honest, I'm pretty much clueless.
Agree that this detailing business is a lot more serious than I thought.
I got all excited about shining up my white convertible & bought a bunch of detailing supplies from Griot's Garage. As soon as I opened the box, my kids grabbed the wash mitts and started beating each other senseless with them. I haven't seen them since - they're probably in the boy's room, and it's too scary to go in there.
I will give a quick rundown of what I do for most details that come into my shop with a few pictures.
~ Hose off entire car well. I prefer to use a pre-soap to loosen dirt and grime. Adams makes a great pre-wash. Using two buckets, I use ClearKote car wash in a 1oz:1 gallon configuration. I prefer to use a clean lambs wool mitt. I have had so-so results using boars hair. Starting from the top of rinsed and wet car, I work my way down. You want the last part you wash to be the dirtiest (front bumper, behind wheels, rocker panels). Hose after each panel to keep soap from drying into the paint. I prefer to use a an airgun when possible followed by a microfiber drying towel, but the two towel rule works well.
~ ONLY claybar a well-cleaned car. Very dirty cars may require multiple cleanings before suitable to claybar, otherwise you will ruin your clay quickly. Again, I start on the top of the car working my way down, doing the dirtiest parts last. Once I am done claybaring, I rewash the car and do an entire coat of ClearKote Quik Shine. This helps me to analyze any serious problem areas as well as give me a nice surface to work on. Always remove excess lube with a clean microfiber towel.
~ Starting with a dual action and a cutting pad (I prefer Lake Country, but I have used Meguiars and 3M, all work well), I work my cutting polish at speed 5 or 6 depending on the product. If starting with Poorboys SSR, I use speed 5. If using ClearKote Compound Creme or Blue Moose Cutting Creme, I use speed 6. I start on the top doing about 2'X2' sections. The biggest key here is to take your time. Almost every DIY detailer I have helped goes way to fast and the results are marginal. Products have to be broken down and without a rotary buffer, you need to work the product a lot. Polish each section until there is literally just a haze of polish left. If there is visible polish on the panel, you have not worked the product through. Remove left over residue with a clean microfiber towel. Wipe down car with Quik Shine to verify there is no left over cutting that needs to be done.
~ Next I move to my polishing stage. Depending on color and application I prefer to use Red Moose Machine Polish, Poorboys Professional Polish, or Meguiars Machine Polish. If cutting was not required, Poorboys SSR2.5 or 2 can be used. Using a polishing pad, I work all my products at speed 5 using the same method as above. Again polish should work to haze with no left over build up. Remove with clean microfiber towel.
~ This is the point where you shift from ailment removal to paint depth and shine. Determining what is left in the paint plays a roll in what can be used here. If the paint is very clean, I really enjoy doing a coat of ClearKote Vanilla Moose with a finishing pad. If another polish is needed, I may work SSR1 or another coat of Red Moose Machine Glaze. I prefer to use Vanilla Moose Wax because it acts as a cleaner and filler, as well as a moulding and glass treatment. I essentially apply it with a finishing pad on speed 4 to the entire car. It goes on wet and comes off wet, leaving a super-deep shine. It brings life back to mouldings and rubber surrounds as well as cleaning glass very well. Remove with clean microfiber towel after application.
~ At this point I either apply a sealant or a wax depending on customer preferences and the paint of the car. On single stage paints, I typically skip the sealant and move straight to a wax. If I am applying just a sealant, I prefer to use Optimum Opti-Seal. If I am applying a sealant and coating it with wax, I prefer to use Poorboys EX-P. Either way, I apply the sealant by hand using a quality foam pad. I let the sealant sit a minimum of 20 minutes before removal. I remove with a clean microfiber towel being very gentle. It does not take a lot of sealant for it to be effective, so be very conservative with your application.
~ There are so many waxes on the market that I am always trying something new. My products of choice are ClearKote Carnauba Moose Wax, Pinnacle Souveren, or occasionally Poorboys Natty's paste wax. Pinnacle is the most expensive but the results are always outstanding. ClearKotes and Poorboys have very similar results, difference is one is a liquid and one is a paste. ClearKote I can apply faster, Poorboys I can apply more generously without negative results. Regardless I always use a quality foam pad and apply by hand. I let the results set up until the wax is dried and dusty. Using a clean microfiber towel (usually several) I buff the car to liquid glass smoothness.
~ While the wax or sealant is setting up, I clean the wheels. I prefer to use non-acidic wheel cleaners, although on occasions there is so much brake dust build up that I have to be more aggressive. Keep in mind that wheel paint takes some serious abuse, and the last thing you want to do is aid in its corrosion. I use a sheeps wool mitt or brush to clean the wheel. At the same time I also wash the wheel wells. If cleaning for a car show, it is very important that you remove the wheels and clean the backsides as well as all suspension and brake components. For wheel cleaner I usually use Adams Wheel Cleaner or a home made secret creation :) .
Also keep in mind that not all 'terry' cloth is terry cloth. Genuine terry cloth is expensive and the softest to use. The bag of terry cloths you can purchase from Wal-Mart and auto parts stores will do more to damage your paint then help it. Genuine terry cloth you could use for bed sheets and pillow covers...that generic stuff I wouldn't even want to dry off from the shower with.
Sealants! Sealants are not synthetic waxes, and are not intended for the same use. Sealants are specially formulated polymers that bond with your paint, preferably clear, and form a more 'hard' clear. Until recently, sealants were not UV protectant, so you would still recieve oxidation on single stage paints. There are many classes of sealants, and because they use polymers they can be included with AIO (all-in-ones). All waxes have a synthetic base with a pure wax additive, typically carnauba. Pure carnauba waxes are incredibly hard to apply but have the most beautiful results. They are VERY expensive and are made for concours vehicles. Most 'carnauba' waxes contain no more then 10% carnauba. For sealants I prefer Opimum Opti-Seal or Poorboys EX/EX-P. With traditional sealants, there is a time exchange for proper results. Each coat should sit a minimum of 24hrs before applying another coat. Done correctly with several coats and you can expect protection from most all hazards for months. There are many current products on the market that say instant protection from sealants...my results have been marginal at best with such products.
All over the counter claybars are not the same, and should not be used the same. I have in front of me right now three different kinds, Meguiars Smooth Surface Clay Kit, Clay Magic, and ClearKote 200g claybar kit. Just feeling each bar there is a difference. Bars come in different levels of abrasivness and in turn how much they remove. Over the counter clay bar kits are very soft and remove only the most basic of ailments. Professional level bars (I love Clay Magic Pro Series) come in harder compounds that are harder to work with, but prep the paint much better for polishing. When improperly used, these harder compounds can actually scar your paint up pretty bad. With that said, address your situation before purchasing. The Meguiars is the softest I have ever used. If your working newer paint, or your paint has been well maintained, then this very well may be a good kit for you. Clay Magic is a little more aggressive. It is in line with the Mothers Clay Bar kit. This kit is also a good all around setup but will be harder to work (more lube required). If you wash your car, run your fingers down your paint and its very rough, you may want to consult a professional level clay bar. If you start polishing on an imperfect surface, you will ruin your pads and more then likely pick up contaminates in the pad.
Next thing I would like to address is the difference between a swirl remover and a polish, the purposes, and why you should use them or not use them. Poorboys SSR1-3 are swirl removers, not polishes. Poorboys SSR3 (the most abrasive) is barely as abrasive as Meguiars Machine Polish. What it does have though are oils and fillers that give incredible depth to the paint and make swirls 'disapear'. They are also super easy to use which makes it a plus for any DIY'er. I like the Poorboys SSR products, but I can tell you that they don't have near the cut to remove anything but light swirls. The proper way to remove swirls is to smooth or level the paint down to the lowest point. The only way of going about this is through the use of polishes. Polishes range from compounds to glazes. Compounds and cutting polishes are the most abrasive and should always be used with care. Improper use can make your paint worse. Proper use though will remove a very thin layer of paint or clear which should clean up most imperfections. The general rule of thumb is that if you can catch a finger nail in the paint imperfection, it is too deep for buffing. Next are machine polishes which have the main purpose of removing the marks left from compounding. Often after proper compounding you will get hazing. Machine polishes worth this hazing out to a perfectly smooth shine. Glazes are the finest polishes and often have an oil or filler additive to help with depth and any left over marks. Swirl removers would go in this catagory.


Leave a comment: