
From S14
Ok, I can successfully report that all the air vents in both Archie's car and in my car have been fixed and are as tight as new. I'm really stoked because such a simple thing as a sloppy vent can be a major nuisance.
We tried the method that was suggested where you rotate the vent all the way down and then apply additional downward force until it "clicks," but it was obvious that it was not going to budge or click without damaging the vent. So here's what we did instead.
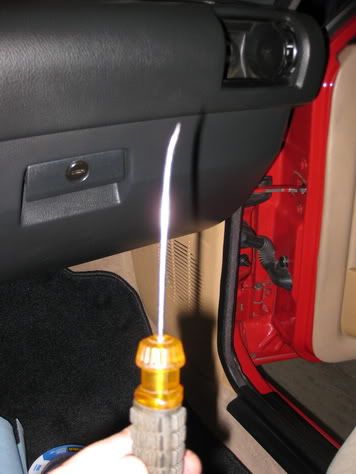
Find a thin, slotted screwdriver. It needs to be thin because you will be inserting it between the vent and its plastic housing. Shant had one that was bent, and the bend came in handy in helping to reach the pivot points for the vent. Here's a picture of what was used.
If you look inside the vent, you can see the pivot points on either side. Familiarize yourself with their locations, then rotate the vent so that it is all the way down.
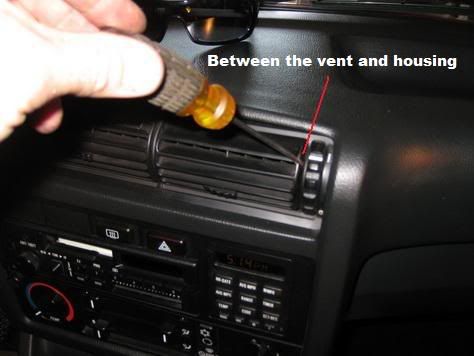
With the vent pointed down, insert the thin screwdriver between the vent and its housing, as shown in the picture below. Gently pry the vent away from its pivot point on one side and then do the same on the other side. You will hear a "click" when the vent unseats from the pivot point and the vent will move slightly forward. Many times when you go to unclip the other side, the unclipped side will reseat itself on the pivot point, so hold it in place to prevent this from happening.
When both sides of the vent are unclipped from the pivot points, pull the vent out towards you. You might need to pull slightly down as well.
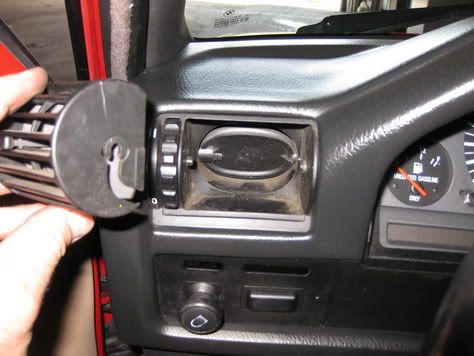
The following picture shows the vent. Note the "ghost-shaped" channel in the side of the vent. Remember when re-installing the vents that the head of the ghost is upwards, so that you don't install the vents upside-down.
Next, get some o-rings that will fit snugly over the pivot point. You only want to put an o-ring on one pivot point--not both, as that would make the vents too tight. We didn't have any o-rings, so we cut up some 5/32" vacuum hose into thin sections, as shown in the picture that follows:
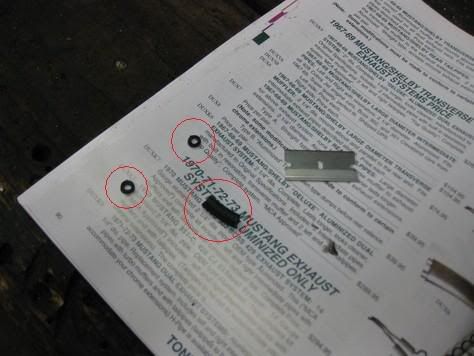
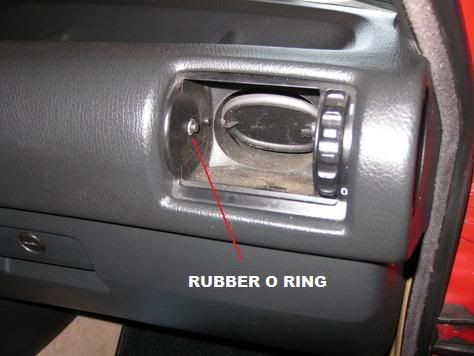
Install an o-ring over a pivot point on one side of the vent housing, as shown in the following picture:
Reinstall the vent, taking note of the position of the channel so that it can engage the pivot point. You will need to rotate the vent slightly as you insert the vent. It will click into place when in the proper position.
Hope that helps.
Ok, I can successfully report that all the air vents in both Archie's car and in my car have been fixed and are as tight as new. I'm really stoked because such a simple thing as a sloppy vent can be a major nuisance.
We tried the method that was suggested where you rotate the vent all the way down and then apply additional downward force until it "clicks," but it was obvious that it was not going to budge or click without damaging the vent. So here's what we did instead.
Find a thin, slotted screwdriver. It needs to be thin because you will be inserting it between the vent and its plastic housing. Shant had one that was bent, and the bend came in handy in helping to reach the pivot points for the vent. Here's a picture of what was used.
If you look inside the vent, you can see the pivot points on either side. Familiarize yourself with their locations, then rotate the vent so that it is all the way down.
With the vent pointed down, insert the thin screwdriver between the vent and its housing, as shown in the picture below. Gently pry the vent away from its pivot point on one side and then do the same on the other side. You will hear a "click" when the vent unseats from the pivot point and the vent will move slightly forward. Many times when you go to unclip the other side, the unclipped side will reseat itself on the pivot point, so hold it in place to prevent this from happening.
When both sides of the vent are unclipped from the pivot points, pull the vent out towards you. You might need to pull slightly down as well.
The following picture shows the vent. Note the "ghost-shaped" channel in the side of the vent. Remember when re-installing the vents that the head of the ghost is upwards, so that you don't install the vents upside-down.
Next, get some o-rings that will fit snugly over the pivot point. You only want to put an o-ring on one pivot point--not both, as that would make the vents too tight. We didn't have any o-rings, so we cut up some 5/32" vacuum hose into thin sections, as shown in the picture that follows:
Install an o-ring over a pivot point on one side of the vent housing, as shown in the following picture:
Reinstall the vent, taking note of the position of the channel so that it can engage the pivot point. You will need to rotate the vent slightly as you insert the vent. It will click into place when in the proper position.
Hope that helps.

Comment