
I see. Sucks...I thought it was the same since I looked up a sealed beam us spec e30 and then a euro spec e30
-
-
Not gonna bother with trying to rebuild these things...I sent an email off to Steve @ Blunttech to get me pricing on all new hardware....Do it right the first time right?Comment
-
Can you buy new lenses? My happy headlight has a hole in it :(Comment
-
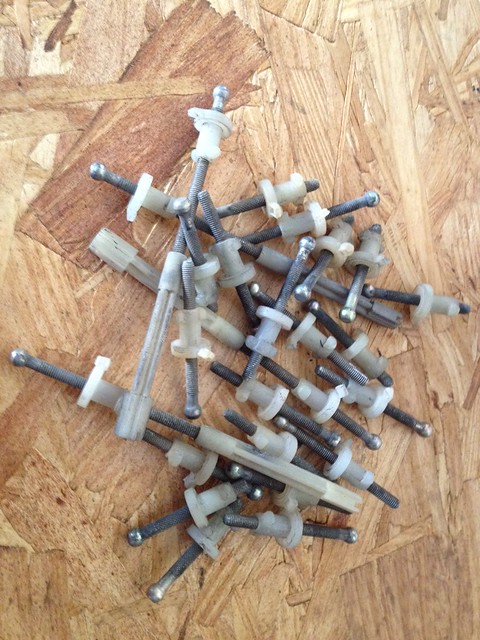
Look what i got at the junk yard today... =) And it only cost me $2.95! Now i just have to order the little rubber black things that the ballheaded screws go in!Comment
-
what car did you take those off of?1991 318is --- currently not road worthy
1991 318i ---- 308K - retired
Originally posted by RickSloan
so if you didnt get it like that did you glue fuzzy oil to the entire thing?Comment
-
e34 i think? 5 series with projection headlights.Last edited by GOT8SPD; 04-08-2012, 05:53 PM.Comment
-
they fit the smileys? I desperately need new adjusters, but the price is ridiculous1991 318is --- currently not road worthy
1991 318i ---- 308K - retired
Originally posted by RickSloan
so if you didnt get it like that did you glue fuzzy oil to the entire thing?Comment
-

^^^not sure...Here's what a few of my old ones look like...the ones i got today are a billion times better.... The white plastic pieces for sure will work. If the screws don't work, i'll use my wire wheel and my drill to clean up the rusted adjustment screws...but...so far it looks like these are going to work just fine by first glance.
Black Rubber Bushings (BMW Part #: 63121378369) seems to be about $3.00 each. Gonna need 12 of them. I tried saving the ones at the yard, but since all these parts are so old, the plastic is really brittle and they brake almost instantly. So I'll end up hopefully spending $36.00 for plastic parts, and $2.95 for a ton of adjusters.
I got 24 total adjusters. Each car will use 12 of these white plastic things and screw adjustments etc. I got 24 of them because my friend also recently bought Euro Smileys but his might be in good condition...We will have to see.
If his are in good condition and doesn't need them...do you want to buy what I have left?Comment
-
the adjusters should be the same throughout all the different types of ellipsoids. you done good getting those for 3 bucks.I saved 15% on my Bimmer parts by switching to ...
...


Comment
-
those black plastic bushings are A LOT cheaper than 3 bux a pop:
http://www.rmeuropean.com/Part-Numbe..._CB4144DE.aspx
I'm sure blunt has even better prices as well as BMA, bavauto, pelican....1991 318is --- currently not road worthy
1991 318i ---- 308K - retired
Originally posted by RickSloan
so if you didnt get it like that did you glue fuzzy oil to the entire thing?Comment
-
Whoa...sick! I only looked it up on BMW South Atlanta just to get an idea on pricing.
Just ordered them! I should have it by the weekend. Thanks for the tip!Last edited by GOT8SPD; 04-09-2012, 06:13 AM.Comment
-
Some of the E34 adjusters are slightly different lengths but they will do the job.
Good call on ordering new OEM BMW clips though.Comment
-
Some of the E34 adjusters are slightly different lengths but they will do the job.
Good call on ordering new OEM BMW clips though.Comment
-
This is true. The e34 adjusters are shorter. you can use them in certain areas, such as the adjusters at the top, but the bottom adjusters you need longer ones or else it's kinda hard to access.
Cleaned vs junk yard adjuster. Used a wire wheel attached to an 18v drill...ugh it took forever!

About an hour and a half later....

Install the white collars for the adjustment screw, then attach the black bushing to it...gonna have to use some force to get those suckers on...same thing when you push the headlight on to it...i was so afraid he glass was gonna break and cut my hand so i put some work gloves on.

I didn't have the OEM adjuster, so i went out and got two M5 x 0.8 nuts, and tightened them towards each other to lock to two nuts together, now i can adjust the headlights using an 8mm wrench.

Just painted the headlight rings flat black...I should have some time this weekend to install the headlights and run all the wiring to get the city lights to work and such. More later...Comment
-
Forcing the light onto the black bushes with the adjuster normally breaks them, as if too much force is used, you'll end up pushing it through the otherside.
What you need to do is, place the black bushing onto the adjuster, and using a long nose pliers, open it up, place it either side of the black bush, and while spreading the load over the bush, push it evenly into the light hole.
Then fix the light the the light bucket.
I've done loads of these, and this is the way I found easiest without damaging the black bushing.
Don't forget to grease the fittings, or else they'll be rusting again.Your signature picture has been removed since it contained the Photobucket "upgrade your account" image.
If you have bought items from me, please leave feedback below.
If you are a BUYER, Check My Feedback.:up:
http://www.r3vlimited.com/board/showthread.php?t=183860
Check out my Euro Build Thread
http://www.r3vlimited.com/board/showthread.php?t=215557Comment


Comment