Announcement

Collapse
No announcement yet.

E46 window switches with one touch function

Collapse
X
 
  • Filter
  • Time
  • Show
Clear All
new posts

    E46 window switches with one touch function

    I'm going to retrofit my E30 using E46 window switches, and add motors to the popouts so that using them is more convenient. So far I have matted which pins on the switch activate in what order and for each function. They are the two window switches that have only six pins designed for use with a GM5 system. Considering how much of a complete nightmare instllig a GM5 into a pre-OBD vehicle would be, I'm opting to instead figure out how to get the switches to function in an E30 using alternatives to a GM5, up to and including pulling out some PCB and building a micro module to control just the windows.

    Here's what I've got on the switch so far:

    Pin 1 is common switch negative terminal
    Pin 6 is the polarized illumination positive terminal (LED)

    Functions:
    -Front Push: half activates pin 3; full then activates pin 2 as well, providing the momentary signal to trip auto open after the GM5 has seen pin 3 activated first, which on its own signals open window.

    -Front Pull: half activates pin 2; full then activates pin 3 as well, providing momentary signal to trip auto close after the GM5 has seen pin 2 activated first, which on its own signals close window.

    Rear Push: same principle as front push using pin 5 to signal down, and then 4 follows with full push to activate auto open.

    Rear Pull: same principle as front pull using pin 4 to signal up, and then 5 follows with full pull to activate auto open.

    Next I will need to further study a relay setup to actuate auto open/close feature and any module diagrams to build and incorporate a simplified CAN-BUS style module to the GM5 that is strictly for window control that can interpret the signals sent and what each activation order means rather than being required to swap over an entire E46 CAN-BUS system.

    #2
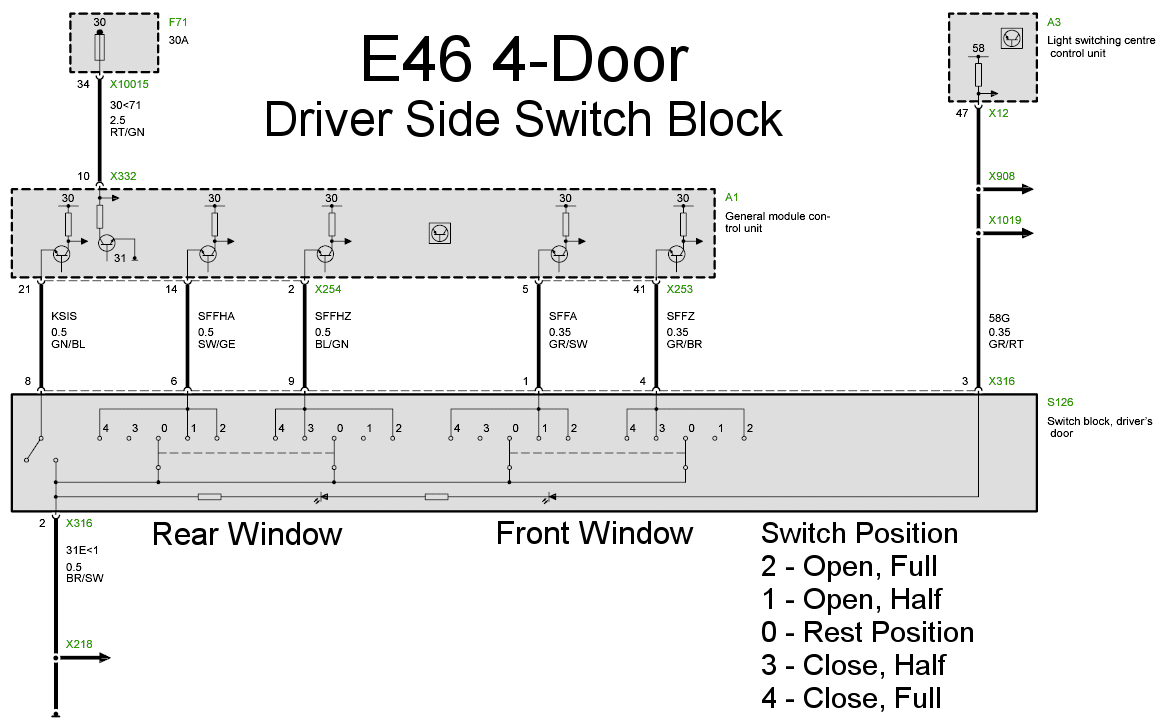
    Here is the diagram for the GM5 and the window switch. Position 0 corresponds to no signal on any of the activation pins (2 & 3; 4 & 5)

    Comment


      #3
      Okay time for the breakdown of photographs and what I've done so far with the switch.

      Switches unmolested.


      Half open but still unmolested


      Fully disassembled (but still unmolested)


      Pin out on bottom of switch, female end for harness on the actual switch itself.


      Bottom side of unmolested PCB showing tracer routing


      Top side of PCB showing top tracer routing


      Another view of topside showing easier view of pins


      Top side of PCB with rear up activation switch desoldered showing tracer routing hidden underneath the switch.


      Bottom side of PCB desoldered


      I'm in the process of drawing a full physical diagram of the circuit board that isn't displaying CAN-BUS style signalling, but rather actual current flow. As soon as I'm finished drawing it up I will be posing it as well as a secondary diagram with what gets nodded where and how to give traditional output signal.

      Comment


        #4
        Nice work so far...and just so you know, every 'vert owner needs that feature where the windows drop an inch when the door opens then closes back up after it shuts...

        Closing SOON!
        "LAST CHANCE FOR G.A.S." DEAL IS ON NOW

        Luke AT germanaudiospecialties DOT com or text 425-761-6450, or for quickest answers, call me at the shop 360-669-0398

        Thanks for 10 years of fun!

        Comment


          #5
          Thankfully mine is a coupe, I'm curious how to build a circuit that creates that function though.
          For my project I want to design my own circuit to create the one touch feature using PCB and resistors and most likely an over current protection circuit on the board to stop the windows when the motor begins to draw more than typical current resetting the relays in the circuit due to reaching top, bottom, or encountering an obstacle that puts more than normal operating resistance on the motors and causing them to draw more voltage like a hand.

          Comment


            #6
            But I need some assistance and guidance on designing such a circuit

            Comment


              #7
              Physical switches completely desoldered from the PCB to facilitate true view of tracer routes.


              Comment


                #8
                Electrical diagram of PCB with switches, resistors, and LEDs


                Internal images of the physical switches on the board


                Comment


                  #9
                  New Diagram showing only relevant connections that are on top and any that will be changed.


                  Changed marked onto both sides of PCB


                  If someone could review this and let me know if I need to change anything differently from what I have shown above please let me know.

                  Pinouts are as follows:
                  1 common ground
                  2 front up
                  3 front down
                  4 rear up
                  5 rear down
                  6 illumination + signal
                  7 front one touch down
                  8 front one touch up
                  9 rear one touch up
                  10 rear one touch down

                  Comment


                    #10
                    Little tid-bit... I'm considering building a 555 timer circuit to run a set of relays for the auto up/down feature. More on that later. Right now I've cut the tracers I needed to and am in the process of soldering in the necessary jumpers as well as reassembling the board and adding the new wires.

                    Comment


                      #11
                      This is cool. Respect for your skills.
                      ACS S3 Build / Dinan 5 E34

                      Comment


                        #12
                        Originally posted by TimeMachinE30 View Post
                        This is cool. Respect for your skills.
                        Thanks :D

                        Comment


                          #13
                          For the 555 timer circuit I have an idea to use it for verts with a switch signal wired to the door switches for opening and closing in the lock. It would have to be tied into the actual latch and ground when opened and open when latched. This would trip I bi-state or mono-state signal to trip a 1/2 second or 1second signal in the timer to activate an auto open relay and auto close relay for the window. More on that later and when I solidify it I will make a new thread.
                          Last edited by ajune; 08-18-2014, 09:44 PM.

                          Comment


                            #14
                            I am currently researching MOSFET transistors and miniatrure SPST (single pole single throw) relays for window operation.

                            Comment


                              #15
                              Although I dont understand any of this, its still a pretty cool project, cant wait to see it finished.
                              My Garage
                              2001 Z3 2.5i Steel Gray/Black (Lexi)
                              1988 325ix Diamond Schwartz/Black (Izzy)
                              1989 325i Cirrus Blue/Houndstooth (Stitch)
                              Feedback

                              Instagram: Stone.Hopkins

                              Comment

                              Working...
                              X