

There is no need to drain the coolant or remove the radiator to check timing. It is best done by removing the belts, removing the fan and water pump pulley, removing the harmonic balancer, distributor, and then the timing covers. Using a 22mm wrench on the crank bolt from the left side, rotate the engine until the cam timing marks are close to being lined up. The continue to rotate the crank until the mark on the crank hub lines up with the notch in the inner timing cover. When those marks are lined up see if the cam and head marks are lined up.
-
The car makes it possible, but the driver makes it happen.
Jim Levie, Huntsville, AL -
Comment
-
If it were mine I'd adjust the valves first before I started removing anything since you probably have to do that anyway.Seat Shocks....I have passed the baton to John Christy from Ninestitch. Email John or Garrett at ninestitch1@gmail.com
https://www.r3vlimited.com/board/sho...86#post4944786
Alice the Time Capsule
http://www.r3vlimited.com/board/showthread.php?t=360504
87 Zinno Cabrio barn find 98k and still smells like a barn. Build thread http://www.r3vlimited.com/board/show...20#post3455220Comment
-
Comment
-
All your doing is turning the crank bolt to adjust the valves, Jlevie was correct in that you need to use a 22 mm wrench on the bolt to turn it.
BUT if you dont want to turn it by hand you may be able to turn it by hand you can bump the starter on through your diagnostic port. But some M20's might not have it but here the link anyways.
If you have the diag. port with the flat side it may be different.
OTHERWISE, pull the plugs and turn the crank, easy!Comment
-
I just didn't think there's enough clearance to get a socket down there to crank it without removing the rad.
I do have a Diag port. What's the one with the flat side?Comment
-
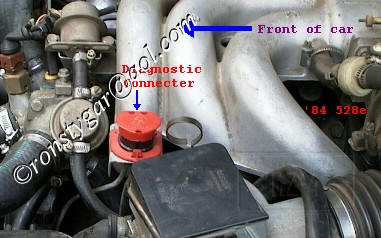
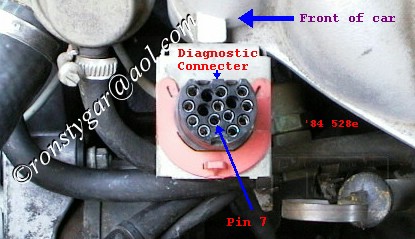
this is the flat sided one (aka-Diagnostic connector):
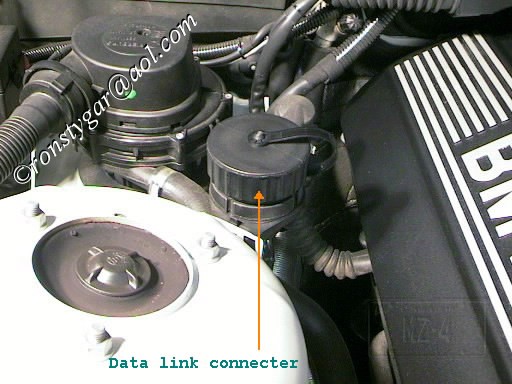
this is the round one(aka-Data Link connector):
The Ports varied by engine and MY.
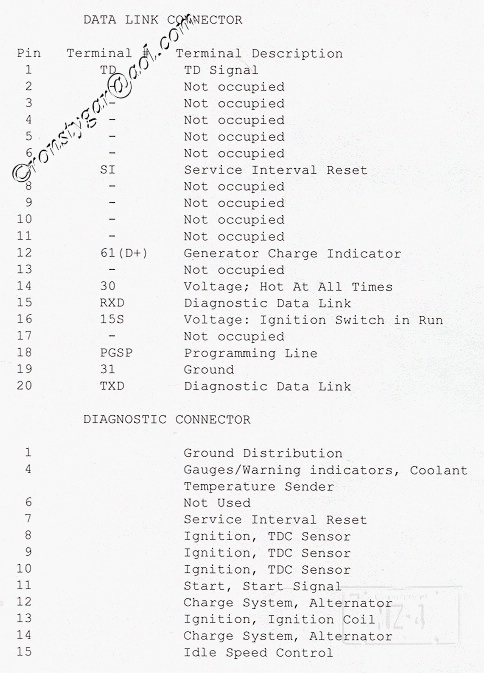
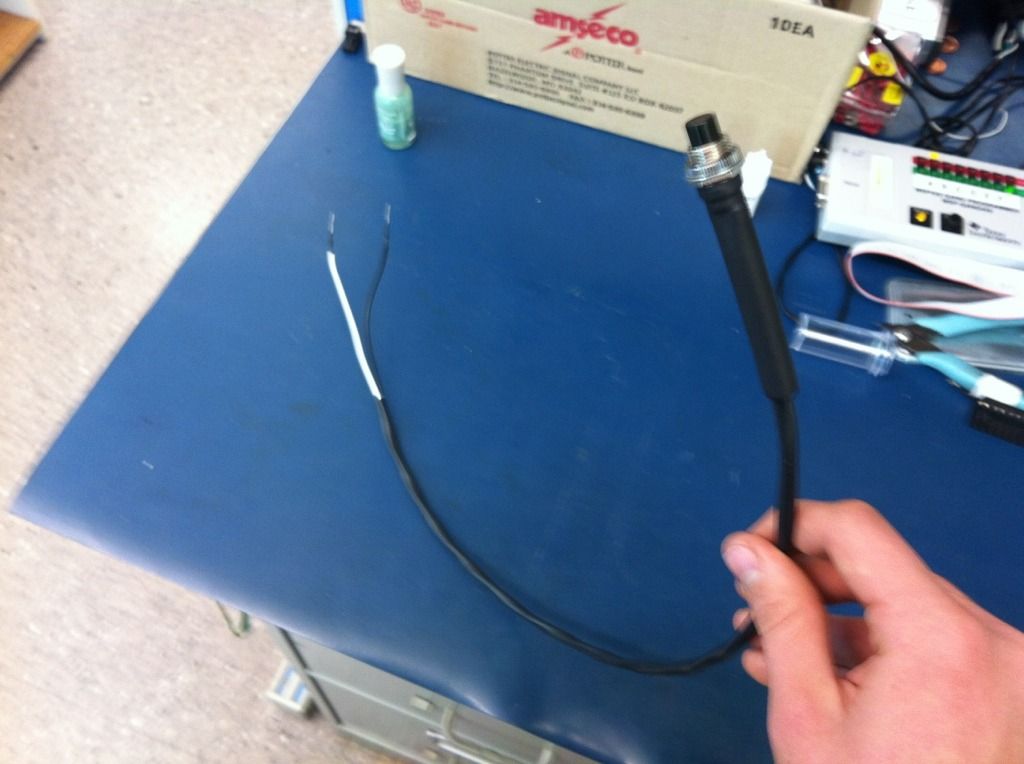
If you have the round port then you can FOR SURE jumper pins 11 & 14 to run/bump over the starter to crank the engine so you don't have to turn it by hand. Big help when adjusting the valves especially if you make your own pushbutton for the pins.
IF you have the flat sided connector then there may or may not be pins for bumping the starter, im not too sure. You can try the bump start method but it may not work. I would incorporate a fuse in the jumper wire in case anything goes wrong.
According to this it should work for the flat sided connector as well:
If you have the round one or the flat sided one then go ahead and try it with a fuse.Comment
-
lol
"to each his own..."Comment
-
Comment
-
From your diagram the Data Link Pin 11 is not occupied :S is it still correct to use that one?Comment
-
I use a 1/2 ratchet with a 22mm socket with the radiator in place. There is not enoiugh room to put the wrnch and socket on the bolt as a unit, so I take the socket alone and put it on the crank bolt. Then I put the socket wrench on the socket. There is enough room to then turn everything as desired. To remove the socket, I separate the wrench from the socket with a flat blade screwdriver, then take the socket out.
I dont even bother to remove the plugs - either I have crappy compression or the wrench gives me enough leverage.Comment
-
Comment
-
use a fuse!Comment


Comment