Announcement

Collapse
No announcement yet.

M20 2.9L Stroker Recap

Collapse
X
 
  • Filter
  • Time
  • Show
Clear All
new posts

    M20 2.9L Stroker Recap

    Hey R3v, I just wanted to take the time to recap how my stroker m20 build went. I had a lot of help from forum members and a few shops so I want to put down how my process went incase anyone in the future is searching for information. I will say this is the particular way I went about it with zero engine building knowledge/experience beforehand, so I'm sure there are other paths available that could have even made more sense.

    The build changed directions multiple times and the budget got tossed out after awhile. The engine is not complete to the point I want it as of now but it is leak free and drivable so I consider it to be at a good point. Most of this is scattered in my "members ride" thread incase you've already checked that out.
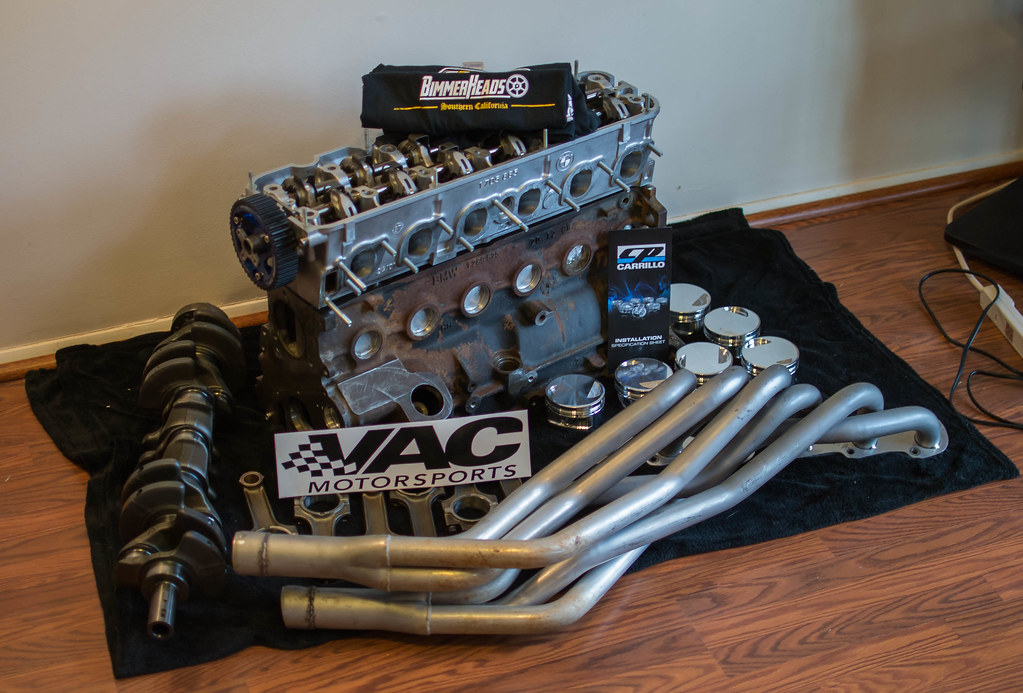
    The specs are
    Bottom End (VAC Motorsports)
    M20B25 bored +1mm
    M52 84mm stroke crank
    M20B25 stock 135mm rods
    Custom Carrillo Pistons 85mm 11:1 compression ratio

    Top End (Bimmerheads)
    885 Head Port and Polish
    284 Cam
    Stock Valve
    OEM Dual Springs
    HD Rockers

    Others
    Pink Top Injectors 21#
    Megasquirt 2 (Whodwho)
    Cold Air Intake (Kamotors)
    Nuke Adjustable Cam gear
    BavAuto Headers
    Vibrant Bottle Style Resonator and Muffler using 2.5" piping
    RHD 7lb Flywheel

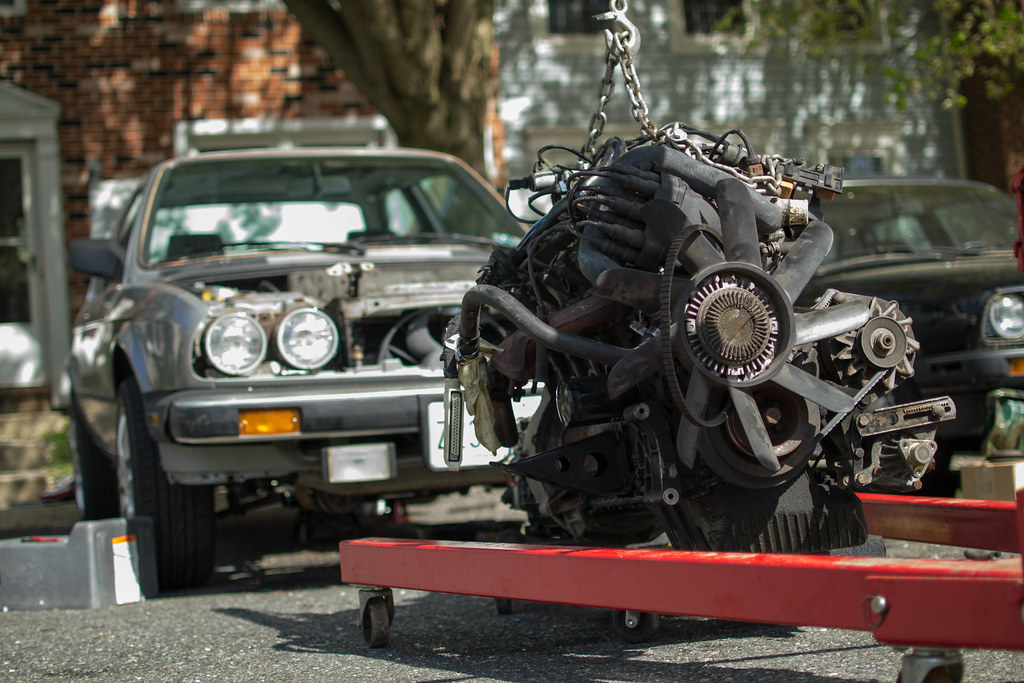
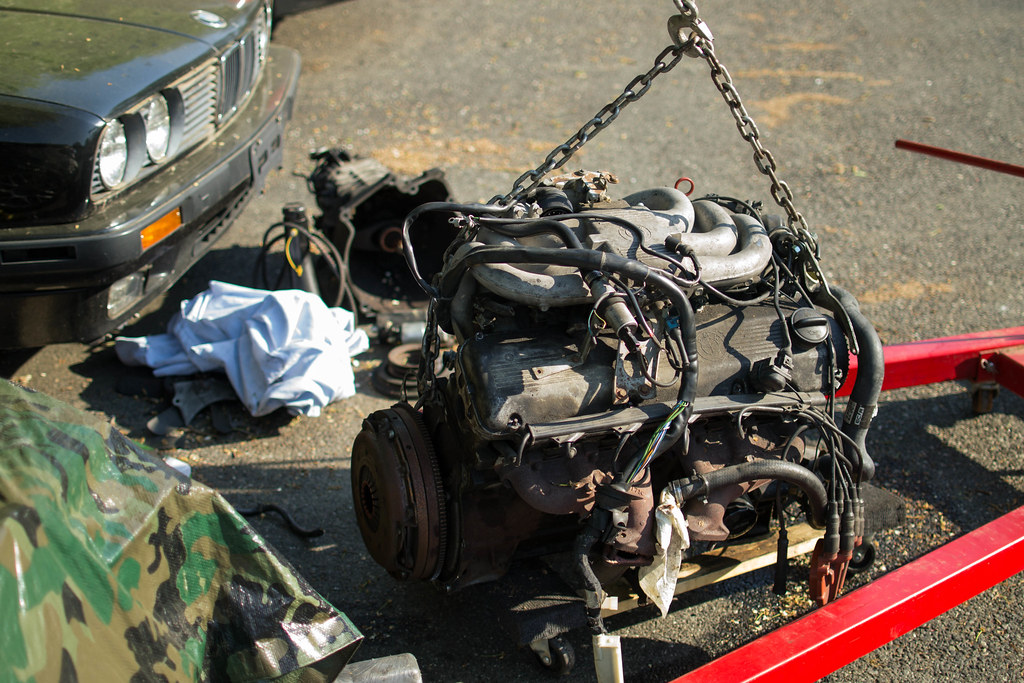
    Back in the end of September? 2014 I picked up the engine from BimmerBuddies in PA and with the help of my dad got it home and started disassembling it at a friends shop. No plan here, just take it apart and get it ready to go to VAC. In retrospect I wish I would have been more particular and precise about bagging bolts and organizing everything that came off. Reassembly was made difficult due to trying to rush this process.


    The crank bolt was a pain to get off. Pry bar and block of wood wedged in to stop the crank from spinning and a long breaker bar being jumped on was the final trick to loosen it up.

    I was able to take the bottom end to VAC on black Friday and lucked into a discount deal they were running. Originally I was only going for 10:1 CR but they convinced me to go 11:1 since I was using a standalone ECU to tune fuel and spark with it. Nothing wrong with a little extra compression. Now it was getting to be winter and I was slowly gathering parts needed for the swap.

    Fast forward to February I was getting ready to pick up the bottom end stuff from VAC. They were a little slower than I initially thought but I wasn't saving money as fast as I thought for other parts so it didn't really put me behind. They had a problem with a secondary bearing oil drive something (I don't remember what it was) and that was partially the lag on their end. I was able to find a used set of BavAuto headers which was number 1 on the potential exhaust list for me. I decided to go with Bimmerheads for the head instead of VAC because of the price and I wasn't blown away by VAC although I got to tour their shop which was cool. Knowing Bimmerheads is a big part of the community I was glad with my decision.


    Once the head came in I figured I had the majority of the large parts and it was just gasket and maintenance type items left to get.


    Engine assembly coming in post 2.
    Last edited by Reichart12; 06-26-2015, 04:52 PM.

    Instagram: Reichart12

    #2
    Ok so ended the last post with a pile of parts. I think from parking my car and draining the oil (first step) to getting a decent tune and driving to work the first time was 4 weeks. Definitely much longer of a time frame than I thought. I had the bottom end assembled for me and picked that up when I started the swap. I thought I could start taking the car apart during the day and build the engine in my house at night.

    Realoem was a life saver. I couldn't remember where a few parts went and using the diagrams I was able to figure it out. I missed the guide U shaped part that holds the intermediate shaft in the right position the first time. I had the lower timing cover on but had to take it off to fit the crank stroker spacer. Then I couldn't get the cover back on, so oil pan off then I realized I missed the U part.

    Speaking about the crank stroker spacer, this thing was a pain to fit on. Tried boiling it to slide it on, nope. Tried smacking it on with a rubber mallet, nope. Tried using a mapp torch to get it glowing hot to fit on, nope. I was about to give up and buy a new one but I went to a local engine shop and they thought the spacer wasnt even on the inside. They tossed it on a lathe and when I got home it was still a extra tight fit but went on with a lot of whacks from the mallet. No oil leaks from this area so far.

    Also spent time rubbing the engine down with some sand paper and taped it up to paint. Used high heat primer and was going to use a black coat too but I stopped at primer. I will say more prep work was needed but it was ok for me. Could have spent an entire day just sanding it down. I thought more areas needed to be taped off that what was really needed, so I have some bare spots after.


    Doing this at home was great, my parents were very understanding with me building the engine in the dining room. Even used the torch in here trying to get the spacer off when it got stuck on there. Had to use a three prong puller to finally get it back off, was stuck about 1.5 inches on the crank snout.


    Showing some more progress with engine removal. Removing the hood was first. Then radiator. Started doing accessory type items like the washer bottle and coolant reservoir to make more room. Starting at the top and working my way down. Harness was freed from the car and had to spend time under the car getting the driveshaft and exhaust off the trans and engine. Heres a few pictures showing the process and how bad rust had hit parts on my car.


    So work continued and after a few days of unbolting and unhooking (most things) I was ready to yank the engine. The chain on the hoist didn't really fit the hook on the arm too well so the chain moved around a little when picking up the engine. Made it kinda sketchy. We used the hook above the timing cover and the hole near the starter to get the engine. Bumped the radiator support with the oil pan and had to take the alternator off to make more room. Originally we thought it would clear with it still on. Doing a little yank yank, the engine wouldn't come out. Slave cylinder wasn't undone, oops. Got that off and the engine came on out.


    At this point I was pressed for time so not cleaning of the engine bay although from the last picture it was pretty clear I needed to do some. I left the engine and trans together until the new engine was complete just incase I had to put the old one back in for some reason. Also had to order external torx sockets to get the trans off because I didn't have any to begin with.

    To finish the engine I had to "borrow" a few bolts from the old engine. Like I said earlier my bad labeling on disassembly really got me at this point. I think I had to grab a couple timing cover bolts, a water pump bolt, and an oil pan bolt because my washer was trashed on one. But after some work it was done so it was time to take it outside and get the transmission switched. But like a rookie I didn't know the problem with switching from dual mass to single. My bolts were about 52mm when the singles used 28mm. A trip to the local dealer and I was good to go.


    I left the transmission alone, no rebuilding or cleaning. I left the two sensors as it just to act as plugs. Also because I was going to single mass with e trans I needed to use the longer throw out bearing. It is crucial to make up for the slimmer flywheel clutch combo. It was the euro 323i bearing. I can get the part number up in a couple.

    With my dads help we dropped the new engine in relatively easily. He was just a couple weeks off a neck disc fusion so he probably shouldn't have been helping but how can you keep a car guy away. I stood on the strut towers and pushed the transmission down into the tunnel. More pushing and some luck the engine arms fell into place on the mounts. And it was in.


    Engine assembly was the reverse of the removal. Just grab a part towards the bottom and bolt it on tight and move to the next item. A couple hangups came from the e brake booster. Not difficult but took some bending of the hose to match up. A big mistake that put me back a day or so was that I kept the e cooling system but used an I water pump. The pump lacked the attachment for a hose coming from the reservoir. Rigged something up with a plumber cast T and a lot of jb weld and sealant and no coolant leaks. Ill try to get a picture tomorrow. Tested all the hoses with just water in the system at first so I wasn't leaking coolant at first, which I lost water from this originally.

    First start time! Cranked right away but no start. Sounded healthy on cranking. Going through testing procedures showed fuel and spark to the coil. The problem was a loose distributor cap. Tightened that up and the car came to life! At this point it was open headers and it was looouuuddd. I had to rev it a few times and I was very excited about it. Sounded like a racecar.

    I towed my car to the exhaust shop and had the rest put on. Very good job done and hopefully one day Ill be able to get a picture of it. Car sounded great with this setup. With a lot of help from Whodwho at this point, we got to the point of a running tune and now it was just fine tuning. More problems in post 3 and some dyno numbers!

    Last edited by Reichart12; 06-26-2015, 04:51 PM.

    Instagram: Reichart12

    Comment


      #3
      Ok time to finish up what I have done so far. At this point the car was running and I could drive it. My tach still wasn't working correctly because there are two types that I encountered. My cluster uses the small back tach with coding plug in the front but the 7k tach I got was a big back and plug in the back. Not a real big problem, I just had to find another tach to use. The splicing of the tach wire for the e to I swap wasn't difficult either.


      Another few problems I had were an oil leak, a coolant leak, and sync loss problem in megasquirt. The oil leak worried me the most. The front of the engine had oil in multiple places and the main drip was off the front right corner of the oil pan. I thought it was the crank spacer at first but after some reading I found out it was the oil pressure switch on the passenger side of the block. It was bad and caused oil to get into the wire and drip out of cracks in the wire casing, hence why oil was over the front of the engine.

      My coolant leak was pretty easy to chase down. Although this too leaked out and spread out drips over the front and driver side of the block, it came from a single location. My tstat housing sensors were loose and caused coolant to drip out after driving around heating up the coolant. I still need to go back and clean up the dried coolant but no more leaks now.

      Sync loss caused my car to break up in higher rpms. Luckily megasquirt shows the error code for this that translated to missing a tooth at the wrong time. The CPS was in spec distance wise to the gear but it did have a pretty good dent in it. I grabbed a nicer one from my other e30 and swapped it on. Fixed the problem right away. At this point I also switched to a different vTPS from an e36 and that also helped out with megasquirt readings, the readings were never really stable before.


      The only thing left to do was get it on a dyno now. I went to Ma-Motorsports which is the shop Chris Forsberg is part of with his 370z drift car. He was there working on it when I went so that was pretty cool. I left my car there for a little bit while they touched up my fuel maps. I came back to see what they were able to do. Unfortunately my car only was able to get 182 hp with about 180 ft/lbs too. They told me this was as much as they could get with my injectors that were maxed out at this point. But the positive was that the car was maxed out so hopefully it will still be able to put out more power with correctly matched injectors.


      Overall I'm happy with what I was able to accomplish. The outcome for the price doesn't make much sense but it was a lot about the experience for me and I enjoyed the process (even with the stressful parts). Its not a finished project but who wants an e30 that is finished. The car pulls great above 3500 rpms and the sound of the engine with exhaust is music to my ears. My plan now is to keep making changes to make this even better and Ill be sure to update here and my normal thread. Hopefully this will help people out in the future when deciding on potential engine swaps. Any questions or tips on making this better are always appreciated.
      Last edited by Reichart12; 06-27-2015, 10:57 AM.

      Instagram: Reichart12

      Comment


        #4
        Nice build. Just remember power is in the top end of the engine so cylinder head, cam and intake if that's what you're after
        Last edited by digger; 07-01-2015, 04:44 PM.
        89 E30 325is Lachs Silber - currently M20B31, M20B33 in the works, stroked to the hilt...

        new build thread http://www.r3vlimited.com/board/showthread.php?t=317505

        Comment


          #5
          Thanks, Im already itching to keep upgrading. Someday I would like to get ITBs but I would want to be able to run a box intake for them instead of socks or open.

          Instagram: Reichart12

          Comment


            #6
            Sweet build. I also believe you have a little more steam left in the motor that could be extracted from bigger injectors and tuning.

            1991 325iS turbo

            Comment


              #7
              Do you have a print out of your AFR curve from the dyno?

              You could be leaving a fair bit of power on the table by running too lean.
              Lorin


              Originally posted by slammin.e28
              The M30 is God's engine.

              Comment


                #8
                Nope no AFR curve with it. That one printout was all that I got. It probably does go lean towards the top and obviously over 5500 rpms where it cuts out. I'm hoping by August I'll get around to grabbing larger injectors to use and then I'll really know how much the engine can put out.

                Instagram: Reichart12

                Comment


                  #9
                  Awesome build.. thanks for sharing, getting ready to do something similar here soon
                  1988 BMW 325iS

                  Comment


                    #10
                    Great engine build!!! I'm drooling on pistons.
                    Projects Hartge,Alpina & AC Schnitzer Builds.http://www.r3vlimited.com/board/showthread.php?t=280601
                    http://www.r3vlimited.com/board/showthread.php?t=227993
                    http://www.r3vlimited.com/board/showthread.php?t=289362

                    DSC04926 by Raul Salinas, on FlickrDSC03413 by Raul Salinas, on Flickr

                    Comment


                      #11
                      Judging by the roughness of the dyno curve above 5k, i'm going to say your AFRs are pretty far out and larger injectors plus a new tune should make a huge difference.

                      Ask for the AFR curve next time.
                      Lorin


                      Originally posted by slammin.e28
                      The M30 is God's engine.

                      Comment


                        #12
                        U shouldn't be running out of fuel with 21lbers
                        89 E30 325is Lachs Silber - currently M20B31, M20B33 in the works, stroked to the hilt...

                        new build thread http://www.r3vlimited.com/board/showthread.php?t=317505

                        Comment


                          #13
                          Originally posted by Beau B View Post
                          Awesome build.. thanks for sharing, getting ready to do something similar here soon
                          Be sure to make a thread when you do, itd be interesting to read how other people go about it.

                          Originally posted by e30m3s54turbo View Post
                          Great engine build!!! I'm drooling on pistons.
                          Thanks! I stared at them for awhile before installing lol.

                          Originally posted by digger View Post
                          U shouldn't be running out of fuel with 21lbers
                          They had told me a flow rate of 21# would support about 210 in crank horsepower so the tuner felt as if my injectors were maxed in the higher rpms evident in the graph limiting with a 80% duty cycle. He said he couldn't get any more fuel to continue the higher range tuning. I would think to say that my fuel delivery system is original and stock so maybe that part of my car is tired and not providing enough fuel to the injectors.

                          Instagram: Reichart12

                          Comment


                            #14
                            Still shouldn't be anywhere near maxing out the fuel system. Also the sky won't fall down if you exceed 80% duty. Alpina used stock injectors for about 200-205bhp
                            89 E30 325is Lachs Silber - currently M20B31, M20B33 in the works, stroked to the hilt...

                            new build thread http://www.r3vlimited.com/board/showthread.php?t=317505

                            Comment


                              #15
                              Wow that number on stock injectors makes my car look weak lol. I was just going off what I was told from the shop. I was hopeful about the injectors being the problem of less than expected hp numbers because that's an easy change and I don't want it to be something major wrong that's holding the car back.

                              Instagram: Reichart12

                              Comment

                              Working...
                              X