

How to adjust the valves on your M20. Super easy, just takes a little patience.
-
-
Why do you feel the need to post the same video in four different threads? This topic has been covered many times here. Slow day? -
i dont mind it, if there is anymore resources on valve adjusment plz link me.Comment
-
i dont unsterstand what you mean by having it top dead center and where are the camshaft lobes?Comment
-
on the camshaft....
tnow, sometimes I just mess with people. It's more entertaining that way. george gravesComment
-
-
89 E30 325is Lachs Silber - currently M20B31, M20B33 in the works, stroked to the hilt...
new build thread http://www.r3vlimited.com/board/showthread.php?t=317505

Comment
-
When I started doing mine not long after I got the car, research online suggested the easiest way was to have the lobes for the cylinder you're working be positioned in an upside down V over the valves - this is relative to the head and valves. This way, there is no tension on either the exhaust or intake side and you can check both on the same cylinder at the same time. You can test it by giving the rocker arm a shake. You should feel just a hint of movement and should hear a faint click when you do it. I start with cylinder one, then proceed by firing order. I use the "transmission in 5th and turn a jacked up rear wheel" method to rotate the engine. About a 1/4 to 1/3 turn of the wheel will get you to the next cylinder in firing order.
This method has never steered me wrong.Estoguy
1986 BMW 325, Alpenweiss ~ "Elsa"
Need a photographer, come visit my site: http://estoguy.wix.com/unique-perspectivesComment
-
-
Sorry... a little unclear... both cam lobes combined should create an upside down V over the valves. This takes the load off both rockers at the same time, making it possible to check both clearances at the same time.
From a BF thread I bookmarked way back:
"You want to hit the spot where play will be greatest, and adjust it at that point. I typically adjust at the point where both lobes are pointing down, since that saves me the trouble of rotating the engine for each valve. So I rotate six times instead of twelve. When both lobes are pointed down, you are TDC for that cylinder, since both valves are as closed as they will be and the piston is at the top of travel.
Edit: I see how you got confused now lol. When I said upside down V, I'm talking about both lobes, not just one. If you were to draw a line straight through and out the point of each lobe, the two together would describe an upside down V at tdc."
Page 75 on Google of the 101 Performance Projects for your BMW 3-series, shows a pic of the camshaft and what that "V" is supposed to look like.Estoguy
1986 BMW 325, Alpenweiss ~ "Elsa"
Need a photographer, come visit my site: http://estoguy.wix.com/unique-perspectivesComment
-
it is possibly to adjust both in/exh at the same time but the window of opportunity is smaller so a novice may get it wrong89 E30 325is Lachs Silber - currently M20B31, M20B33 in the works, stroked to the hilt...
new build thread http://www.r3vlimited.com/board/showthread.php?t=317505
Comment
-
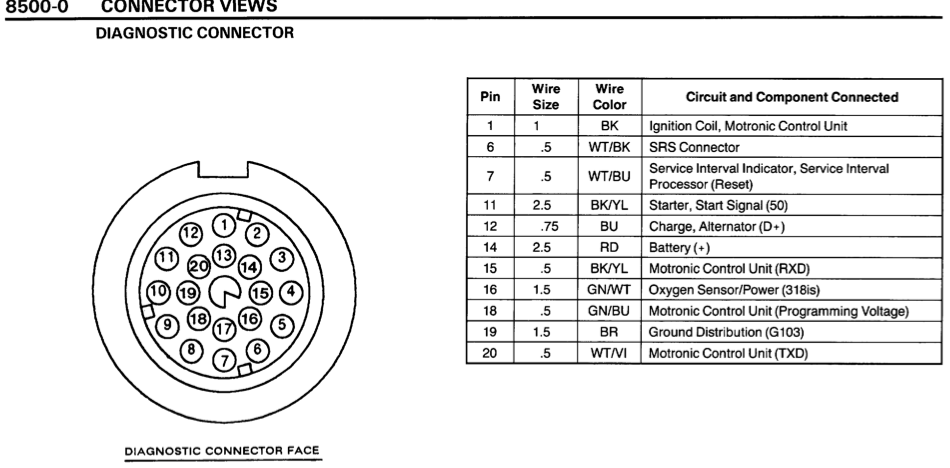
The easiest way is use the diagnostic connector with jumper wires (or convert/make a remote starter with pins) and bump the starter as needed.
Instead of trying to see the lobes under the cam look at the opposite cylinder of the firing order and they are on the top and easier to to view.
Firing order - 1-5-3-6-2-4
Just split to match up pairs
1-5-3
6-2-4
Easier way to remember
1-2-3
6-5-4
So
1-6 XOOOOX
2-5 OXOOXO
3-4 OOXXOO
Use diagnostic connector pins - 11 & 14
Comment
-
OP, you should replace your head bolts, the old hex ones were know to break and wipeout the head.Comment
-
Estoguy
1986 BMW 325, Alpenweiss ~ "Elsa"
Need a photographer, come visit my site: http://estoguy.wix.com/unique-perspectivesComment
-
I didn't say they would just that they are known to, I have replaced a couple heads from it in the past. For $20 in bolts I wouldn't gamble on it.Comment


Comment