
-
Thanks, i'll try to have some patience with it... Looks like this was the problem... so, I'm calling around now to find the paper gasket and it looks like i can only buy the whole kit??? well, need the seals anyway, right?
Last edited by G-Man the Visionary; 05-08-2013, 10:32 AM. -
Not sure about why the input shaft isn't coming loose, but to put back together, get all the clutches and steels lined up as best you can, then put together. To get it all lined up, rotate the shaft as you are assembling. Don't push too hard or you could break one of the clutch discs; just keep turning. It'll go together eventually.Leave a comment:
-
One voice in my head is telling me to take the transmission to the pros, the other is saying I can put it back together... The shaft is stuck in the bell housing now somehow so I guess the Teflon seals will not be going in... Having a hard time getting it to line up and go back together... Plus I need a new paper gasket now... Haha... Well, other than that, there is a round plug on the intake that doesn't look like it matches up to anything on my harness...
Did you get your tranny back in? Ready to run?Leave a comment:
-
yeah: http://transmissiontechnologies.com/...ent-seals.aspx
No, I didn't drill the hole. I've seen it in a few places on the 'net where folks mention not bothering with it, perhaps figuring that the rest of the AT is more likely to go kaput before these seals blow out. I *believe* that you only need to replace one of the metal seals (forwardmost, or TC, side) with the teflon, hence the kit above for (3) repairs, but the pics I've seen show both being replaced. Oh and you'll only need to compress the teflon seals for a short while. IIRC, I left the clamps on while I ate lunch; that's all.
update on my work - got the AT down, TC and flexplate off, new flexplate back on and AT back up. Need to button up the rest of the work now that had to be undone to get to the AT.Leave a comment:
-
Did you get the shift kit k002 with the drill bit? Did you drill the hole?Leave a comment:
-
OK thanks, that calms my worries... I appreciate all the pics! Where did you get your hands on those seals? I have found whole kits, but do I need to get all those gaskets? Any luck on your work?
ThanksLeave a comment:
-
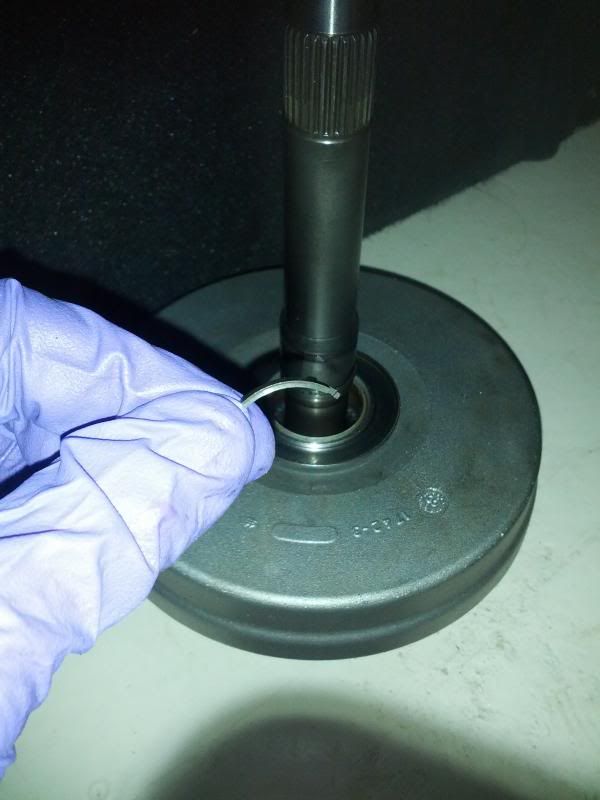
G that's kinda how the AT comes apart. I think you can use a quality sealant at the AT front pump to case joint. If the gasket didn't get torn you can re-use it dry. Now is the time to replace the existing metal input shaft seals with the upgraded teflon. This is the new seals in place, then compressed with a hose clamp, protected by metal strapping, then the final compressed state before reinstalling. The shaft won't go back without damaging them unless you compress them:
Attached FilesLast edited by n3nyongmini; 05-04-2013, 06:53 AM.Leave a comment:
-
-
Thanks guys! Looks like I'll have some work to do on the rad mounts...
Rookie mistake, I pulled off more than just the bell housing... hopefully everything is fine... And I suppose that will call for a new gasket... More fun to come...
Other than that, the new b35 is on the stand and while I await gaskets, cleaning and paint is necessary, along with installing the new e36 r&p...Leave a comment:
-
-
E28 radiator is taller than the e30. Bottom mounts will have to be removed. The upper mounts, where the radiator screws to the core support matches up exactly.
Basically it fits width wise, but not height, unless you nix the lower mounts.Leave a comment:
-
OK, engine is out, sitting at the yard right now... I got the radiator in the mail last night and its not fitting like everyone says... It hits the bottom mounts... I have the automatic tranny radiator if that makes a difference, and also noticed that those lines are on the opposite side as well... Did I get the wrong one? While I'm at the yard I decided to grab an e36 rack & pinion, and a trunk mount for the battery... I could not find an older 535 here for that bracket, but I can experiment when the time comes... Can I use the Old Tq converter? They don't want to give me that... Thanks!Leave a comment:
-
Replacing the flex plate requires the engine and AT to be separated. During install, It appeared that there would be enough room to access the bell housing bolts for underneath. So I raised the motor with an engine support, pulled put the motor mounts, dropped it and the tranny down and there is plenty of room to get in there with some long wobble extensions. I left the TC on the flex plate, as it easier to separate that way, so that would also lead me to believe that a manual transmission with it's input shaft could be dropped the same way:
Leave a comment:
-
Leave a comment: