-
Hey TJ, Do you need the exauhst bracket from a manual, or can you just re-use the automatic one? -
Hey BS87...Originally posted by BS87
I actually end up using the pedal assembly from the 5speed, I also notice that the auto pedal assembly doesn't have the little ledge that your talking about. you can see the pic, that i cut the top part of the pedal assembly to make it fit...


Sorry for not updating my progress...I've been so busy at work and also been raining here lately...Leave a comment:
-
Marvin, I'd be very careful about using that much grease on the input shaft and release bearing, it should be a very thin layer in order not to get on the clutch surface and ruin your new clutch!!!
Also, you didn't mention the squishy thing inside the shift coupler! Many times they do not come with the coupler when you order it, which could be misleading to others using this thread as a reference. That is, if you have one yourself. Also note that it should be soaked in oil before being put inLeave a comment:
-
Hmm, figured i'd post this in here- The manual pedal set i ahve is for the older non-airbag E30s. It uses a fat spring below the clutch pedal. Looking at an airbagged 5 speed parts car, it uses a spring from above, like the brake Pedal. I'm going to have to pull the pedal box out of that, aren't I? Or is it just like this because it's a 318is?
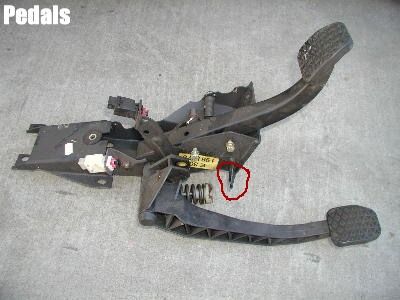
*edit* ok, this is really confusing me. According to the ETK, the part #s for the pedal box is the same for Manual vs Automatic trasmissioned cars. However, looking at Marvin's pictures, and looking at my pedal box, i see that i do not have the flange the clutch spring sits on. I've circled it in red, in marvins picture. Looks like the pedal boxes aren't the same?
Leave a comment:
-
Removing the the (2) transmission lines
Shows how the lines are attached to the front transmission cooler, which is located in front of the engine radiator (shows the upper line)

(shows the lower line)


Loosen using the correct wrench. You should be able to pull the lines out of the connector.


The line can then be snaked out and around the suspension for removal. Pic of the transmission line after removing.

Shift coupler

Mount the coupler on the transmission and tap in the pin that secures it to the selector shaft. Make sure that you place the small retaining clip on the selector shaft prior to tapping in the pin.

When the pin is tapped in, move the retaining clip to cover.

Now the Transmission...

Lightly lubricate the clutch disc splines and the transmission input shaft splines

Also grease up this rubber piece

Install the throw-out fork. The fork is attached at one end with a small metal clip.

Use grease to pact the release bearing lubricating groove and to coat the guides.

Install the release bearing

Pics after everything assembled

TO BE CONTINUED.......Leave a comment:
-
both lines can be unbolted from the radiator with no ill effects. They have to be snaked out from underneath the car unless you remove things in the engine compartmentLeave a comment:
-
It's easier to use a used one since it needs to be bent. The parts car didn't have one?Originally posted by e30 gangstaLeave a comment:
-
With the flywheel mounted, take your clutch alignment tool and place it in the center of the pilot bearing. Install the clutch disc

Then install the pressure plate onto the flywheel, compressing the clutch disc

Use new pressure plate mounting bolts

Tighten the pressure plate mounting bolts evenly until the clutch disc is firmly held in place.

Tightened pressure plate bolts down to its proper torque, then remove the alignment tool.

Pic after the clutch assembly installed

Now on the pedal assembly
Installing clutch master cylinder


Pic after installing clutch master cylinder

Test fitting


TO BE CONTINUED.....Leave a comment:
-
Sorry for the slow progress. Just came back from my long vacation.
Well, here it is again,
Installing the flywheel and Clutch.
I purchased new flywheel bolts and coated the threads with Loctite

Now its time to reinstall the flywheel. After the long vacation, the flywheel started to rust, so i slightly sanded it down to remove the rust.

You must use a torque wrench and a flywheel lock to tighten the flywheel. Also tighten the bolts in sequence alternating between opposite sides fo the flywheel

Shows the flywheel installed with all the bolts properly tightened to the proper torque.

Clutch alignment tool

I started installing the clutch disc and the pressure plate onto the flywheel and realize that i forgot to get new pressure plate bolts. so i guess....
TO BE CONTINUE......Leave a comment:
-
just came back from my 2weeks vacation....
heres some more parts for the conversion.


Removing the flywheel. When removing the mounting bolts, hold the ring gear stationary using a holding fixture. I actually used an electric impact wrench to remove the bolts.


After removing the flywheel

Heres a pic of the transmission

Also installed a new clutch slave cylinder.

To be continued.....Leave a comment:
-
some parts that i ordered for the conversion is in back order.
probably not until after the holiday.
Sorry for the slow progress......Leave a comment:
-
Regarding the problem im having with the pedal assembly. After 6 beers (Corona) I started thinking to how can i solve the problem. Then it hits me. Why not just swap the bracket thats holding the pedals. As you can see on the pics. The pedal assembly from 92 M-technic w/ airbag mounting bracket is much longer than the auto's pedal assembly. THIS WILL NOT WORK!!!!....The pedal bracket from the auto doesnt have the lip (spring guide) which the compression spring (clutch pedal over-center helper spring) sits....
all that needs to change is to remove the pedal shaft bolt & transfer just the manual pedals over to the automatic bracket

Here's a pic after swaping the manual pedals to the automatic bracket.

TO BE CONTINUED......Leave a comment:
-
Originally posted by PanamaE30
Yes, i'll be using Getrag 260
Hers a pic of the transmission mounts....

Leave a comment:
-
Removing Pedal
Remove the lower trim panels above the brake pedal

Panel removed

Disconnect brake light switch connector

Disconnect the pushrod from the brake pedal by disconnecting the brake pedal return spring, prying off the retaining clip, and sliding out the clevis pin.

Retaining clip and clevis pin removed

Remove vacuum booster mounting nuts (4) and remove (2) bolts by the top of the pedal

Now carefully pull out the pedal..

Pedals from a manual transmission w/ airbag needs to be modified. The top part of the pedal needs to be shorten.

TO BE CONTINUED........Leave a comment:


Leave a comment: