

Cant wait to see this thing painted and watch you meticulously put it back together, just as you took it apart. :)
-
Current:
1989 325i
1988 M3
1987 325ic
Past:
2001 330ci
2001 M3 -
Thanks guys. Catching up some
I first removed the cover from the bell housing that pulls away to reveal the flywheel and the sensors that are housed near it – one is called the flywheel crankshaft position sensor (12141708619) and one is called the position transmitter (12521287784)
Cover
Bolts – I belive the big ones go in front, small ones in rear, but don’t remember
Bolts out
I pried the cover off gently with a plastic pry tool so I didn’t scratch any metal
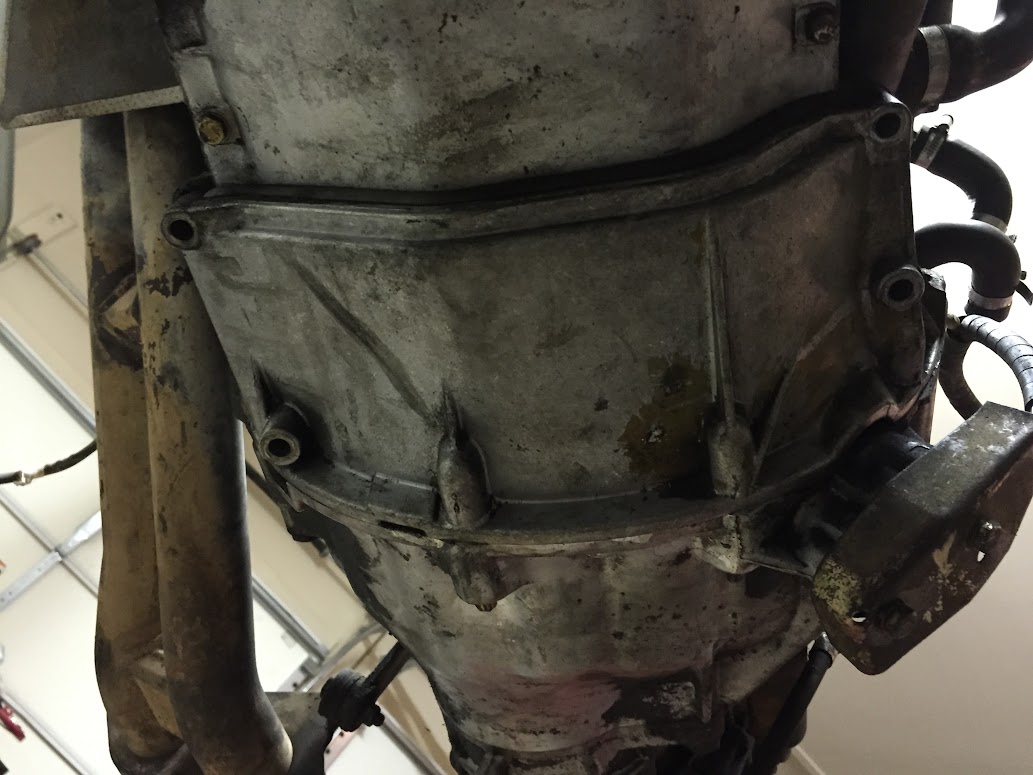
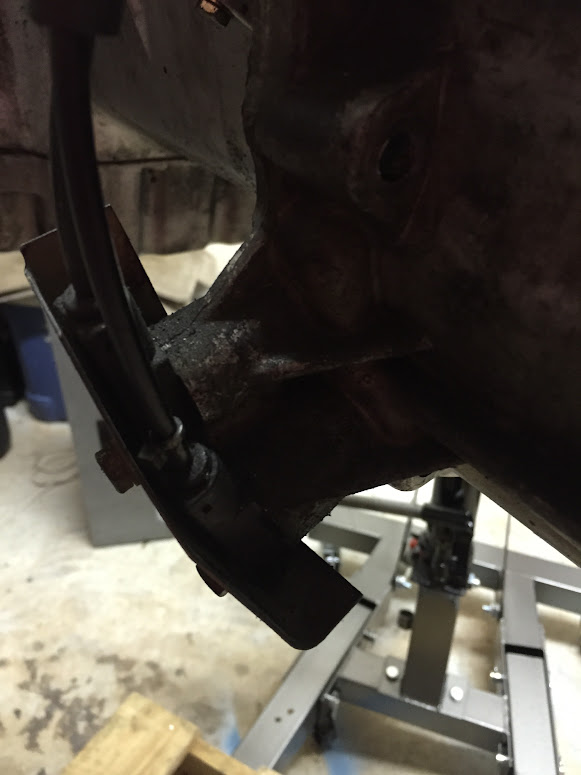
I also disconnected the support that holds the exhaust manifold downpipes to the transmission housing. Bushings obviously need to be replaced
note how the lower part attaches
Coming off
Clutch slave cylinder removed
Sensors here
Here is the top end of the Crank position sensors
Top sensor (don’t know which is which yet, Ill figure it out later)
Bottom sensors
Bolts that hold on the heatshield also hold on the sensors
Then they pull out
Oh time for these gems of transmission mounts
This one was… not doing its job
Other one was at least whole
Up next, separating engine and trans.Last edited by CurrusDei; 08-22-2015, 07:10 PM.Comment
-
To separate the transmission from the engine, these seven bolts must be removed
Passenger side
Top bolt here holds in the starter
Three bolts on the top here – Big one just left of center is the other starter bolt. Top two come off as well
You can see the bolt positions here (looking ahead a bit – 4 are used for the engine stand, the other 3 are empty)
When you remove the two starter bolts the starter will stay in place if you haven’t removed the screws in back.
Mine had a snail under it. He was thoroughly roasted – nothing left but the shell. Cue the slow car jokes, right? We’ll count it as good luck.
I jerked the transmission back a bit by hand, then it didn’t want to move
Bring back out the cheapo Harbor Freight pry tool and the mallet
Worked by way around the housing, prying gently. Tore up the plastic pry tool a bit, but who cares – its like $5 for a set.
And off she comes
I was surprised at how light the transmission is. I can pick it up by myself pretty easily. Its not light, but I expected a lot more weight.
Clutch pack coming off
See how all the bolts came out easily….
…except one. Dremmel scars from cutting off the bolt that stripped. Going to replace the pressure plate and clutch, so no worries.
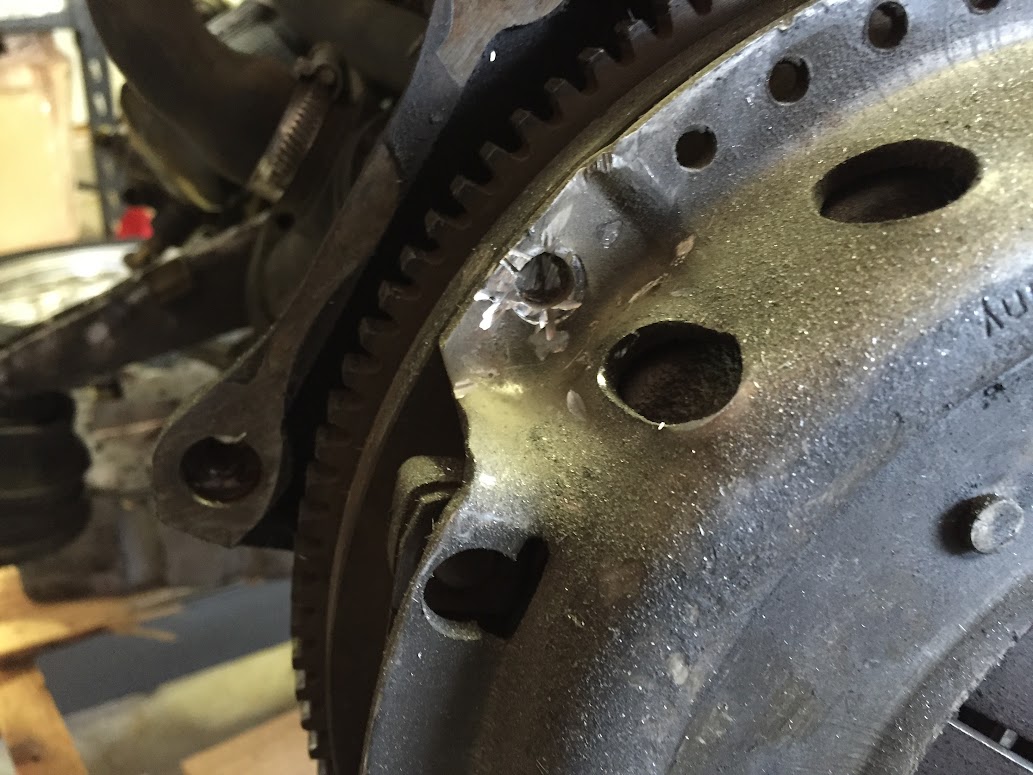
With the pressure plate off, the clutch comes off easily and there are 8 bolts holding on the flywheel
Impacted those off, and a few whacks with a soft mallet..
I wasn’t sure if the starter would interfere with the engine stand mounting point, so I took it off before mounting the engine. The two main bolts were removed when I took off the transmission. The teeth of the starter normally hook into the fly wheel but that has already been removed, so the only thing I had left was where the back of the starter attaches near the arm that supports the air plenum from underneath.
You can remove the two bolts on the bracket, but I just removed the bolt that holds both the bracket and the air plenum support arm.
Then it will pull straight out
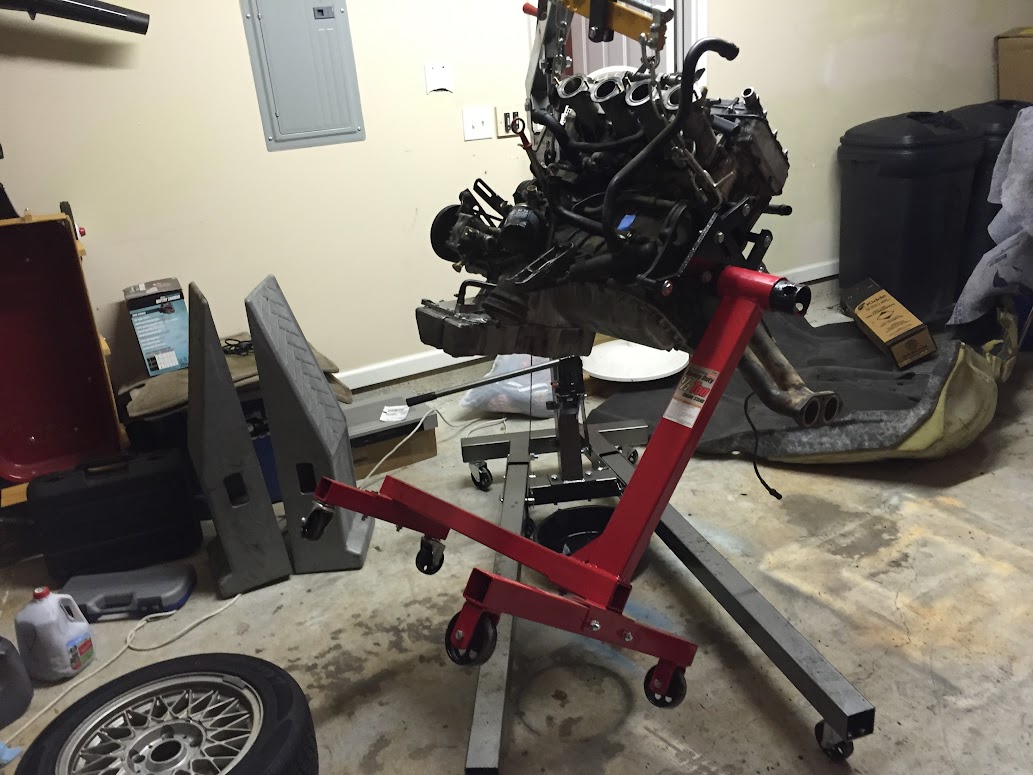
Now for this engine stand. I wanted to mount the engine so that the valve cover was facing straight up to make it easier to work on. The issue is, the engine sits in the car tilted over to the right a bit. I spent an hour or so trying to match the engine to the stand using various positions of the hoist – it was a pain. Things went MUCH smoother when I took the stand apart and assembled it on the engine in the air.
I put down the stand but the engine wouldn’t rotate, took it back off and greased it with some thick all purpose grease.
The first time I put the engine down I matched the insert to the stand. This time I just lifted up the stand and put it on the insert.
It shifted a bit, but was still upright.
WARNING: If you follow this strategy, be VERY Careful when putting the engine down and keep the hoist attached and the chains tight until the stand is on all four wheels. Do not try to lower it too fast. I put mine down carefully and it still tried to fall over to the right. I leveled out the stand with my body weight and it never got away from me, but if someone was hurrying this could go badly. It’s a lot of weight and can be dangerous. So, be careful.
I used hardware from Fastenal to mount the engine. Some guys have used the OEM hardware, but I don’t think the top bolts work. As best I can remember, these are the sizes I used. (got from S14 .net thread here: [IMG]http://s14net.vbulletin.net/forum/s14/general-e30-m3-discussion/46136-putting-an-s14-on-an-engine-stand)
(2) M8x1.25 70mm length
(2) M10x1.5 70mm length
A few pics
Comment
-
makes me wish i didn't sell mine. Life forced me too. One day I will get another E30 M3Comment
-
Quite the work you have done so far but inspiring none the less. Never had an E30 M3 but due to your work Ill be looking forward to getting one in the future, cheers!Comment
-
Great thread! Keep up the good work!
Comment
-
Thanks for the kind words guys. As of now, there is nothing left for me to take off the outside of the car and the next step is the chassis dolly. Time to catch up on the thread
Removed a bunch of stuff off the trunk, don’t remember if I posted this yet
This will need to be replaced, don’t want water in the trunk
Next up was the wiring harness. I went back and forth on if I could leave part of it in the car so that the engine bay could be painted, or if I should just take the whole thing out. Ultimately I elected the latter option – why go this far and pull up short on this item. I do wish that BMW had put in a quick disconnect through the firewall or below the fuse box. This is one BIG harness.
MESS
I decided to start at the back and work my way forward. So – to the trunk.
Here’s the amp bypass from my stereo thread
Lotsa more wires, the two bare wires go to the trunk open/close sensor – not sure why they were cut, but they’ll be being repaired when I overhaul the wiring harness.
The black wire without tape on it goes up into the roof of the trunk and to the light. Sorry for the blurry pics.
One wire runs around the driver side of the trunk and makes a 90 degree turn to run under the rear trunk lip over the tail lights.
This contains the connections for the tail lights, trunk lock, license plate lights, and rear reflectors.
Running under the trunk lip
Driver side wire dropdown. The black connector is for the tail lights. The white connector is for the rear reflectors.
Here is the driver side rear reflector
Same on the passenger side. You can see one of the license plate lights here.
Driver side license plate light
Cable tie on driver side that holds cables going to the rear light check relay.
Close-up of the metal tab that holds the wiring harness in
Wiring hanging
The trunk illumination light pops out easily
License plate lights have screws
Looks like there has been some corrosion – probably will try to replace the connections
Disconnected the rear trunk actuator
Here it is
and the lock mechanism that it moves
See where it connects to the push button trunk release in the white clip by my finger (with overspray on it – grumble)
And off comes the spoiler
Bolts off
When the bolts are off the spoiler just lifts out. Feels very heavy compared to the CF spoiler.
Negative wire terminal off
Positive terminal runs through the conduit shown here and through the rear seat wall
Conduit/cover off
Comes out under the red bar shown here, under the brown padding
Now, to get the harness fully out, you have to disconnect the speed sensor at the differential, electrical connections to the fuel tank, and other things underneath the car. Coming in next update.Last edited by CurrusDei; 12-25-2015, 11:48 AM.Comment
-
Alright, Thanksgiving. Time to bring this thread current :up:
Before I could free the back part of the wiring harness I had to get under the car to free a few sensors that tie into the main harness
Looking up from the bottom into the back seat
Speedo sensor comes off the diff
Brake wear sensor
I took a handful of videos tracking the path of various lines under the car.
This seemed more efficient than test and photos.
Some wires run to the fuel lever sensors and pumps
The two you see in the picture above run off the back of the fuel tank. Not easy to get out but unbolting the tank gives you some more clearance.
Some lines run over to the fuel sender pump
Pulling wires from the underside to the topside
On the topside
Part of the wiring harness runs over to the passenger side
On the passenger side, some of the wires split off from the main harness by the rear seat brace bar
These wires continue down toward the door sill (the white translucent clip (not the one in my hands) around the wires here plugs into the sheet metal on the inside of the door sill.
This connector looks a bit singed. The connection goes to the overhead lights.
Moving toward the front, here is the door sensor and speaker
You’ll notice on the passenger side that there are two main “sets” of wires that run down the side, one crosses over from the main harness that runs down the driver side, the other runs from the positive terminal on the battery down the passenger side and up into the engine bay. Here you’ll see where I have started to coil up this positive terminal wire.
Positive terminal wire goes up a series of tie downs and into the engine bay
Nice and wrapped
Cleaned, taped, and tied
There was one wire left when I had cleared out the others
It runs back to the gas tank flap lock, easy to disconnect. The actuator comes off as well
On the driver’s side, separating the wire that runs up to the ceiling reading light
Complex junction around where the left side of the driver seat would be
Floor spaghetti
Passenger door wiring connection coming out
Passenger speaker
Harness running under the passenger seat area
Passenger side rolled up
Unattaching sensor on hand brake
Going over the transmission tunnel
and back down the other side
This guy was just coiled up under my seat. Quick research says its the seatbelt buzzer sensor.
Front driver side speaker
steering column
four screws hold on the stalks
I read that this is the seatbelt buzzer relay
Plastic cover over a set of relays behind/below the front driver speaker.
Ugh, such a mess
There was one more electrical attachment in the engine bay – I think this is the Fuel Tank Breather Valve, but all the new ones are plastic
Now, find someone to help with this part. The entire harness has to be fed through a small hole under the fuse box. My buddy from my neighborhood (who works on VWs a lot) helped with this part. It is not an easy pass through – just go slowly, don’t break anything, and take a break if you get frustrated. After a while, your reward is a huge mess of wire on the floor, and some very skinned knuckles.
…and a very empty car
Handy use for my engine hoist box...
Last edited by CurrusDei; 12-22-2015, 02:04 PM.Comment
-
Actually there was one line left after the harness came out
It goes back to the fuel filler flap lock
And the drains from the sunroof empty through the side of the car through these vents.
The actuator comes out easily - screws here
NOW, for removing the rest of the engine accessories.
Starting inside, hood release cable
And the mechanism that releases the hood. Careful with this guy. I vaguely remember almost injuring myself taking this off, but dont remember how, so...good luck with that.
The grommet that goes through the firewall
Accelerator Cable Removal
Firewall insulation was peeling badly everywhere. Looking forward to replacing
Heat sheild coming off
could stand to be replaced
As could its hardware - unless the titanic museum wants them back
*Edit: ordered a new heat shield and hardware as part of my to me-from me christmas gift :-)*
potato photo of the insulation retaining bits and the downspouts from the ac box
Another potato photo, passenger side insulation
Clips that hold the O2 sensor wire
...and with insulation removed
Grommets that the wires for the front brake sensors pass through
And removing shift linkage. This boy was pretty tired. Explains why the shifter would swing back and forth like an inverted grandfather clock pendulum.
Potato again
Last edited by CurrusDei; 12-25-2015, 07:02 PM.Comment
-
Tried to pressure bleed the brakes to flush out all the old fluid - but the brakes were sitting on my shelf, so i couldnt depress the pedal.
The Pressure wasnt getting past the ABS unit, so, time to take off the ABS unit, after we take off the evap stuff
More on where that Fuel Tank Breather Valve goes
And fuel feed and return lines
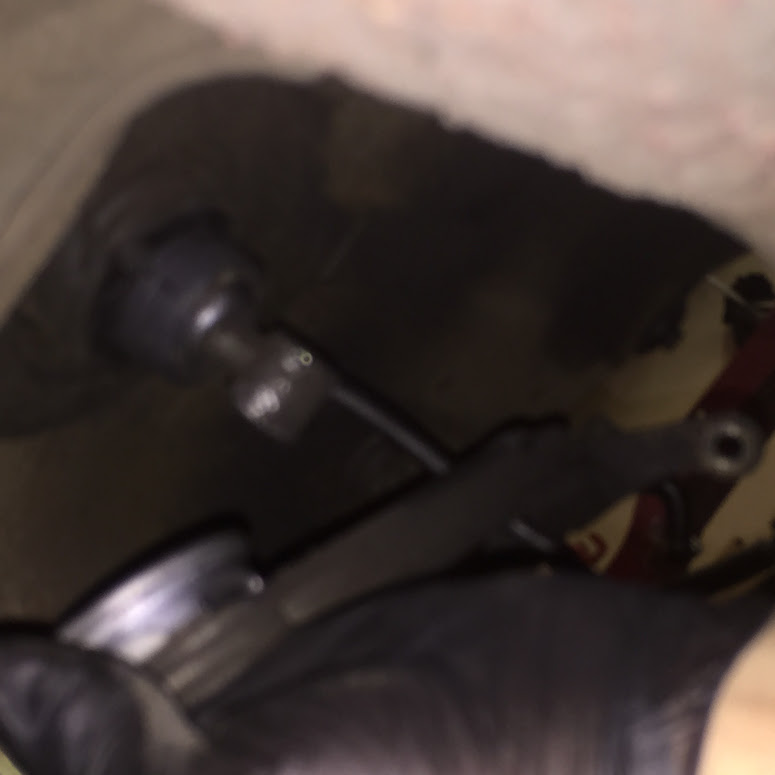
Now, ABS unit. I did way more labeling here than is necessary, but painters tape never killed anyone...that I know of.
The lines run through the round rubber grommets you see on the right of this pic, and the cylinder in the middle is the brake pressure regulator.
More tagging
Disconnecting from the chassis
fast forward, and...
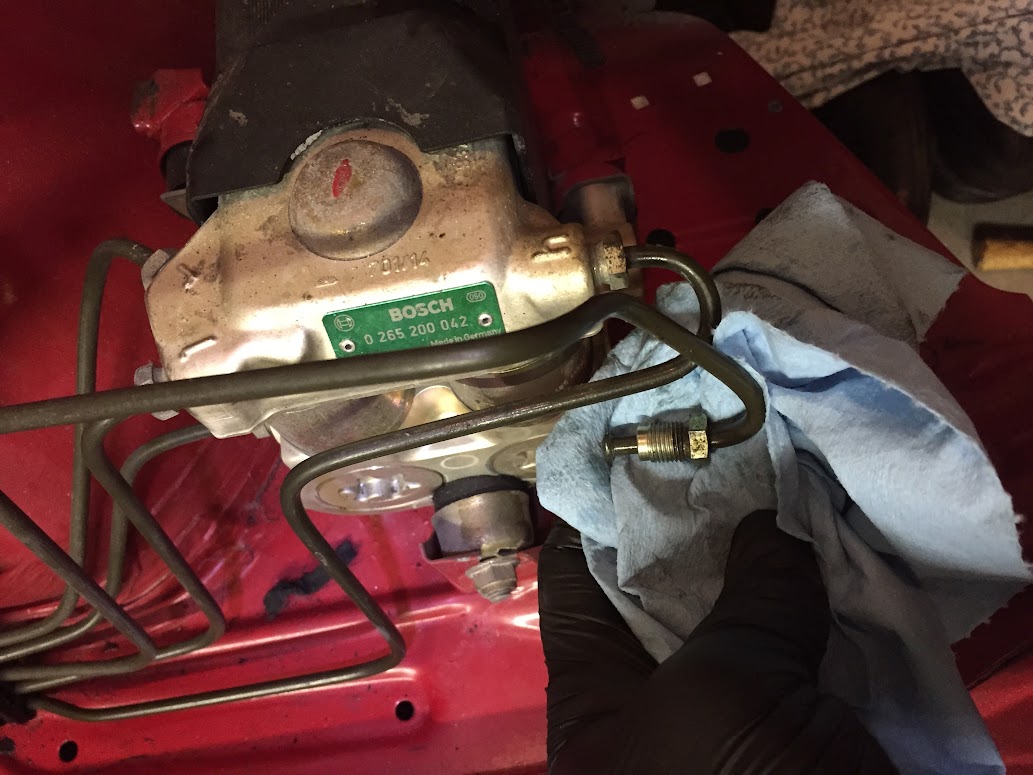
The anti-vibration feet are two piece metal and rubber
Then I manually drained the fluid and caught the excess in a rag. Air compressor helped here
And unattached the brake lines from the junction point with the rubber brake lines in the wheel wells
Solid lines out. These were in really good shape. With some cleaning up/polishing i think Ill reuse these.
Brake line free engine bay
How she sat then.
Last edited by CurrusDei; 12-23-2015, 09:07 PM.Comment
-
Sideskirts coming off
Four clips with these screws hold the bottom of the side-skirt to the frame
The front and rear of the side skirts are held on by pins and a bolt
And several clips along the top. I just gently popped them lose
Removed the rear undercover plates – easy to figure out
Here are some pics - there were sedementary layers of dirt in here - probably from the first Bush administration.
This guy was chipped. Will replace
Rear exhaust hanger
The rear bumper removes just like the front – two square plastic covers hide the two bolts that hold the bumper on. I removed these and it slid off easily
Found my rear reflector
Removed the wiring and the plastic battery tray
The brown is dirt and gunk, not rust
Rear bumper and skirts off
Last edited by CurrusDei; 12-25-2015, 07:10 PM.Comment
-
Are most of the pictures on this page not showing up for anyone else?Comment
-
I just logged in from another browser not logged into my account. Looks like the hosting linking changed recently. Is this the last photo you can see?
.if so, i have a looooot of pics to rehostComment
-
Yeah, that's the last one I see. I like pictures; looking forward to you rehosting them. :)Comment


Comment