Announcement

Collapse
No announcement yet.

'93 325i brilliantrot convertible

Collapse
X
 
  • Filter
  • Time
  • Show
Clear All
new posts

    '93 325i brilliantrot convertible

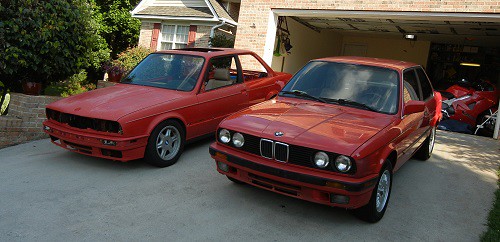
    A few of my friends have had E30s and I've personally always wanted one too, especially considering all the high praise it gets from auto enthusiasts. I finally bought one of my own a few months back for a great deal considering the sky high prices lately!

    The car does look great from far, but the closer you get the worse it really is. The interior (worn and mismatched seats, broken trim pieces, non-functioning speakers) and exterior (top is missing back window, bumper is missing splitter and lights, dents, etc) need a major refresh, and the engine/transmission/suspension are in dire need of maintenance too.

    I've been preparing it for a mini restoration, slowly ordering parts and finding time to work on it. I can't wait until it's complete and she is back on the road. I'll document the journey along the way, and it would be a great help if you tune into the channel as well.

    Part 1: E30 introduction video https://www.youtube.com/watch?v=K3uz...l=ViksVehicles

    Post 2 - part 2: pulling the engine
    Post 12 - part 3: cleaning up the oil and grime soaked engine
    Post 15 - part 4: engine maintenance including timing belt, head gasket, and spark plugs
    Post 17 - part 5: more engine maintenance including fuel injectors, valve clearances, and more
    Post 19 - part 6: transmission work and reinstalling the engine
    Post 20 - part 7: Ireland Engineering shift knob
    Last edited by e30_jatt; 08-06-2023, 07:09 PM.

    #2
    In Part 2 of this series I pull the M20 motor from the E30 in preparation for some much needed maintenance. It was my first time pulling a motor, and was cer...


    With the engine out, I can tackle some much needed maintenance. I plan on changing the timing belt, drive belts, gaskets, hoses, water pump, tensioner, mounts, and address any leaks. And since it is out, I've run into the "while you're in there" situation so I'll be changing the clutch and rebuilding the shifter since the transmission will be out too.

    The car did drive great when I bought it. The engine pulls strong and the transmission shifts good, but depending on how long I keep this car I want to know I'll be able to put on a lot of trouble free miles in the future. Given the lack of service history available and some parts that needed obvious repair, I thought it was best to pull the motor and give it a good once over.
    Last edited by e30_jatt; 06-23-2023, 08:20 AM.

    Comment


      #3
      nice going. doesn't look bad at all. nice project start.

      Comment


        #4
        Congrats. I think brilliantrot e30s look best! Also cool super later production model. What are the last 7 of your VIN, Im curious about the production month and year.
        sigpic

        Comment


          #5
          Congrats, definitely strong starting point. The problems mentioned can mostly be dealt with relatively easily. This should be a fun project without needing to get too deep into it
          Simon
          Current Cars:
          -1999 996.1 911 4/98 3.8L 6-Speed, 21st Century Beetle

          Make R3V Great Again -2020

          Comment


            #6
            Originally posted by Mike36 View Post
            Congrats. I think brilliantrot e30s look best! Also cool super later production model. What are the last 7 of your VIN, Im curious about the production month and year.
            EC07033
            Where do you look up this info to find the prod date?

            edit: my door jamb says 12/92

            Comment


              #7
              Originally posted by e30_jatt View Post

              EC07033
              Where do you look up this info to find the prod date?
              Realoem.com

              Enter BMW Catalog, close first pop up, "cerrar" button, enter top left where it ask for Serial Number then click search.

              The easiest way is to just look at the vin sticker on drivers side door. Your is "12/92" Dec 1992 Thats a super late production car!

              sigpic

              Comment


                #8
                I have a 93. on the good side, zip in rear window. already has R134a and doesn't need a retrofit. I did end up changing out the worn rubber parts and it handles great. Is your power top still operational. i found that the elastic on the tension straps were weak and worn and would put too much stress on the motor. since i didn't replace my top, i couldn't do the tension straps. ended up sewing some flat elastic to the tension straps to provide the assistance to the motor. good luck with the project and I will be following

                Comment


                  #9
                  Looks like a decent car! A little bit of interior work and it'll look great. You rarely see plastic bumper convertibles.
                  '90 325i - 5 speed coupe
                  '05 330ci 6MT ZHP

                  Comment


                    #10
                    !! Just saw in the first video that you have an extremely rare part. At 4:48, the ignition wire cover at the front of the engine that fits around the coolant hose. It's just a simple plastic covering piece but for some reason BMW hardly made any so they're an absolute unicorn m20 part.
                    My Feedback

                    Comment


                      #11
                      Originally posted by E30 Wagen View Post
                      !! Just saw in the first video that you have an extremely rare part. At 4:48, the ignition wire cover at the front of the engine that fits around the coolant hose. It's just a simple plastic covering piece but for some reason BMW hardly made any so they're an absolute unicorn m20 part.
                      Wow never seen one before haha. The search is on!
                      sigpic

                      Comment


                        #12
                        Soooo I've had the engine out for almost a year but it's finally back in. Had a lot going on and hardly had time to work on the car but the engine is done, and man does she drive good!

                        I finally found some time to put together some content. In this first video since the engine came out, I gave the engine a good cleaning. It was absolutely filthy. Oil was dripping from everywhere including the oil pan, rear main seal, oil pressure sensor, valve cover, oil return b**** tube, oil filter housing, basically everywhere that oil circulates. I'll show all of the rebuild process as I go through all the video footage. Besides cleaning the engine, in this video I also disassembled a few of the bolt on parts, resealed the oil pan, and replaced the rear main seal.

                        In Part 3 of this series I wash the engine and replace the oil pan gasket and rear main seal. There is so much maintenance still to do, including replacing t...


                        Enjoy the pictures of an oil and grime soaked engine. A pressure washer easily took care of blasting away all the grime, didn't really need to use any cleaners.


                        Click image for larger version  Name:	IMG_2894.jpg Views:	7 Size:	230.0 KB ID:	10092220 Click image for larger version  Name:	IMG_2892.jpg Views:	0 Size:	262.3 KB ID:	10092234 Click image for larger version  Name:	IMG_2898.jpg Views:	5 Size:	267.3 KB ID:	10092221 Click image for larger version  Name:	IMG_2900.jpg Views:	5 Size:	230.0 KB ID:	10092222 Click image for larger version  Name:	IMG_2896.jpg Views:	6 Size:	231.7 KB ID:	10092223
                        Last edited by e30_jatt; 06-23-2023, 08:20 AM.

                        Comment


                          #13
                          Here a few more shots of the engine before and after cleaning.

                          Click image for larger version  Name:	IMG_2902.jpg Views:	4 Size:	203.8 KB ID:	10092226 Click image for larger version  Name:	IMG_2905.jpg Views:	3 Size:	236.9 KB ID:	10092227 Click image for larger version  Name:	IMG_2909.jpg Views:	3 Size:	273.9 KB ID:	10092228 Click image for larger version  Name:	IMG_2910.jpg Views:	3 Size:	267.4 KB ID:	10092229

                          Comment


                            #14
                            Awesome progress - worth waiting for!
                            E30 320i vert
                            But daily drive is Volvo V60 Polestar

                            Comment


                              #15
                              In Part 4 of my video series I start to tackle some more engine maintenance. I replaced the timing belt, water pump and tensioner, head gasket, cam seal, and spark plugs. I also painted my intake manifold, some various engine parts like the pulleys, and also the exhaust manifold. This is just the beginning, the final result of the engine looks so much better, I can't believe how much the previous owners neglected this beautiful classic.

                              In Part 4 of this series I replace the timing belt, head gasket, and more.The engine progress is finally starting to come together as I begin to replace some...


                              Here are a few notes and photos of the engine rebuild progress, more details are in the video above.


                              The fan clutch was a real pain to remove. I found that the easiest way was not to use two people but instead use the crankshaft bolt to hold the pulley wrench while you use the other wrench to loosen the clutch nut. I was able to take the nut off so much easier this way.

                              Click image for larger version  Name:	IMG_2928.jpg Views:	0 Size:	264.9 KB ID:	10097391


                              With the water pump removed you have easy access to work. My water pump gasket looked to be leaking. I'm surprised how basically every single seal on this car has failed.

                              Click image for larger version  Name:	IMG_2935.jpg Views:	0 Size:	297.1 KB ID:	10097392


                              The head gasket and pistons have seen better days. Holy carbon buildup!

                              Click image for larger version  Name:	IMG_2938.jpg Views:	0 Size:	245.4 KB ID:	10097393

                              Click image for larger version  Name:	IMG_2939.jpg Views:	0 Size:	285.3 KB ID:	10097394


                              Ahhh much better. I did not resurface the block prior to installing the new head gasket. I know I'll get a lot of feedback for not doing so but my new head gasket has been holding up just fine with the copper spray. I simply used carb cleaner, a soft bristle brush, and shop towels to clean the carbon off the pistons and the block surface of the old gasket.

                              Click image for larger version  Name:	IMG_2951.jpg Views:	0 Size:	269.7 KB ID:	10097395
                              Last edited by e30_jatt; 06-23-2023, 08:18 AM.

                              Comment

                              Working...
                              X