New owner, BMW 325iX Touring

Collapse
X
 
  • Time
  • Show
Clear All
new posts

  • D.Martijn
    replied
    Little update on the Touring, not a whole lot has happened but I decided to go ahead and get a MOMO hub as the cheap hub I got didn't fit that great anyway.
    However, I did like that it was quite tall, so the steering wheel position changed more and got a little higher so I have more room for my knees..

    After receiving the new MOMO hub, I didn't like the original look with it's rubber sleeve.
    So I modeled a cover that fit's tightly around the aluminium base of the hub. Fired up the 3D printer - turned out pretty nice if I say so myself.


    There isn't a whole lot of clearance when the center pad is fitted, it made the top of the cover quite thin but still plenty strong


    And fitted inside the car. I did want to make the diameter towards the steering column a little bigger (I since then measured the Mtech 2 wheel I previously had)
    I do like the finish as it's printed quite fine anyways, I might however still wrap it in leather/vinyl


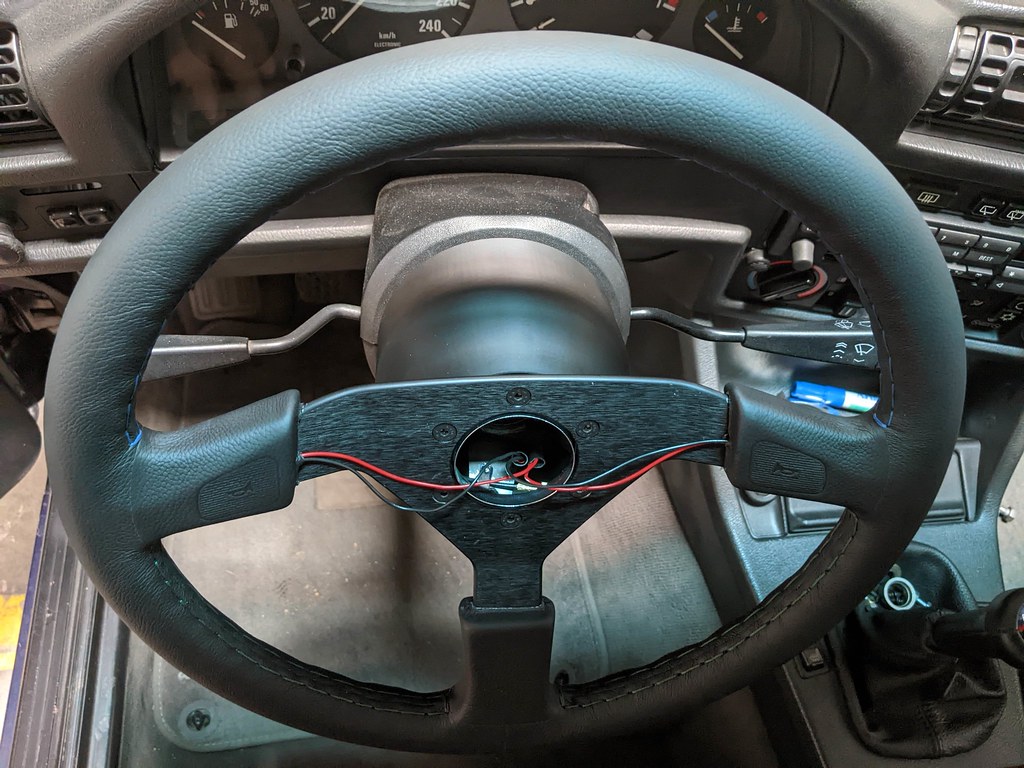
    After test fitting a couple of times and checking clearance with me knees etc, I still found the steering wheel sitting too much forward (so also down)
    I decided to have a look on the internet and stumbled across a longer version of the MOMO hub.
    The small version (K2006) is 8cm long - the (L2007) is just shy of 12cm (measured from the base where the steering wheel bolts on to, to the bottom where the hub sit's against the steering column spacer on the shaft.)

    Test fit with the small hub


    Test fit with the longer hub


    Difference between the two


    So I went ahead and measured the hub, changed the length and a few things and voila a new 3D printed cover!
    Last edited by D.Martijn; 09-05-2022, 07:43 AM.

    Leave a comment:


  • D.Martijn
    replied
    Last week I bought a little upgrade for the Touring!
    I'm a pretty tall dude (2m04) so every bit of extra room I can get in the E30 is a nice little extra.
    I decided to get a new smaller steering wheel, an Alpina three spoke steering wheel (360mm) to be exact.


    I got a cheap hub from Aliexpress in aluminium (more like chinesium) since the hub that other resellers list with the wheel are the typical MOMO hubs with the ribbed plastic cover.
    The hub I bought is more smooth and suits the car better in my opinion. The spline of the hub it a little off though, I now kinda forced the hub on.
    I'm not sure if I'll stick with this hub. I might even go with the MOMO hub and 3D print myself a new cover and maybe wrap it in leather just like the original Alpina hub was.


    We also had our classic car event/drive last weekend, 50 cars, 100 people. Everything went smooth and everyone was very happy!

    Leave a comment:


  • D.Martijn
    replied
    Having finished the wring under the dashboard for the headlight aim adjust, I was able to test the motors. Turns out the left motor didn't run at all.
    I had already found a replacement motor on Ebay so I decided to just buy it as was pretty cheap anyway.

    To fit the motor you need to cut off the plastic shaft and reuse the steel one that's original to the aim adjust system. Upon receiving the new replacement motor I found out one of the mounting point on the front housing got damaged.
    So I decided to just swap the front housings of both motors. Opening up the housings revealed quite a bit of rust, turns out the rubber seal was broken and water ended up inside the housing and rusted the little electric motor.


    I still need to do some fine adjustment on the SWRA wipers as the right side seems to go a little too far and gets stuck behind the glass of the headlights


    No one will ever notice the refurbished headlights tho

    Leave a comment:


  • D.Martijn
    replied
    Last weekend I took a couple of pictures of a friends BMW E36, started out as a regular 235i 4 door sedan. Since then he has fully built the thing.
    And the latest addition was a S54 engine swap, the thing sounds awesome!


    On Friday I took the mk1 Golf (1.1L engine) to the yearly technical inspection, it was actually the third time (I know..) First time it got rejected because of the lights, second time I went the odometer suddenly stopped working.
    I had to remove the dash and replace the little plastic gear. Turns out it's a lot harder to find the correct one for the Golf than for an E30. It took me a few days of tracking down the correct gear type.


    And just received the NOS ZKW front turn signal lenses for the E30 as well. These will freshen up the front a little bit more since fitting the restored headlights

    Leave a comment:


  • D.Martijn
    replied
    Today I fitted the headlights onto the car, still need to adjust the aim tho (done by a family friend who has worked his whole life in a workshopgarage but now retired)


    New connector housings as well, I also replaced all the bulbs.


    Pulled the wiring loom for the electric motors thourgh the firewall, just need to finish the wiring at the connector for the switch (forgot to bring it with me to the workshop)
    I plan on taking power from the Home connector of the accessory connector under the dash, there is 12V supplied when the ignition is on.

    Leave a comment:


  • D.Martijn
    replied
    Originally posted by e30m3s54turbo
    The lights look great.
    I like the electric headlight adjuster. Now I need to dig them out of storage.
    Thanks! Still need to fit them and figure out the wiring tho.
    Probably will clean the area where they fit as well.

    Leave a comment:


  • e30m3s54turbo
    replied
    The lights look great.
    I like the electric headlight adjuster. Now I need to dig them out of storage.

    Leave a comment:


  • D.Martijn
    replied
    Update on the headlights.
    I managed to clean the interior of the reflector housings by using glass cleaner, some rice grains and lots of rinsing with water + final rinsing with demineralized water.
    Since the weather was pretty good, I let them sit two days straight in the sun to get them fully dry. Hopefully they don't fog up, but I guess we'll find out once they are back in the car.

    I had to order two new (used) plastic end caps where the lamps connect to the harness. the original caps were stuck and I had to break them to get them off..
    However, the new caps I got, the foam gasket was pretty worn I removed the seals of my old caps and used those. I 3D printed a small ring (0,6mm thick) to get some more pressure on the seals to get them so seal a little bit better
    You can't seem to buy these seals separately for BMW

    Top caps got replaced, bottom ones are original


    Difference between both seals. I'm using the right one.


    And fully assembled. There is still some pitting on the faces of the lenses. I didn't bother to get them sanded down as that would have made this whole process a lot longer.


    Leave a comment:


  • D.Martijn
    replied
    Originally posted by e30m3s54turbo
    I like your touring. One day I like to own one.
    I was able to get new vacuum lines years ago. I put them in my Alpina project.
    I have electric ones that were modified for e30 in Germany. I think the motors are e36.
    Thank you! I do love the look of the Touring as well.
    Yes, there are a couple of retrofits. E36, the Ford Fiesta system and also E34 if I'm not mistaken.

    Leave a comment:


  • e30m3s54turbo
    replied
    I like your touring. One day I like to own one.
    I was able to get new vacuum lines years ago. I put them in my Alpina project.
    I have electric ones that were modified for e30 in Germany. I think the motors are e36.

    Leave a comment:


  • D.Martijn
    replied
    Originally posted by eternal24k
    headlight housings look great! Now i kind of wish i painted mine when I had them all apart.
    Thanks! Yeah, it might have been a little "overkill" since no one will ever see them. however can't hurt right :)

    Originally posted by e30m3s54turbo
    I like the electric headlight aim switch. I’m interested how it works out for you.
    This switch and electric system was already installed into the car. I know it still worked when I got the car, however I never used it after that.
    And since the normal adjusting mechanism was completely seized I'm not sure it if would still have worked.

    Leave a comment:


  • e30m3s54turbo
    replied
    I like the electric headlight aim switch. I’m interested how it works out for you.

    Leave a comment:


  • eternal24k
    replied
    headlight housings look great! Now i kind of wish i painted mine when I had them all apart.

    Leave a comment:


  • D.Martijn
    replied
    The 3-pin connector I ordered arrived this week. I already made the wiring loom for the front of car to connect both aim adjust motors.
    I'm still figuring out what's the best way to connect the 12V to the system. I'm sure I can take some ground from under the dash.
    DIY articles regarding this retrofit tell you to take power from the light switch but I'm not a big fan of cutting in the original loom of the car. I still haven't had any luck finding the plug for the accessory connector under the dash..


    In the meantime I painted the light housings after letting the primer cure for a couple days.
    I had the shop where I bought the paint make 0,5L as that was the minimum amount I could get anyway. Still have tons of paint left. Looks like I'll have to restore some more headlights in the future ;)


    The paint has since then dried, I removed the masking tape and applied the same quartz coating (like on the aluminium parts of my engine bay) onto the aluminium parts of the housings.


    I also found a listing in Germany of a guy selling NOS ZKW front turn signal lenses. On the Touring there is one that's a little dull. I remove both lenses to clean out the housing and the reflectors, they were a little dirty but nothing mayor.
    While I was busy with the turn signals, I also decided to sandblast and repaint the little screw that mounts the side turn markers on the front fenders.

    Leave a comment:


  • D.Martijn
    replied
    I've gone ahead and remodel the original Ford Fiesta bracket that got modified to fit the original switch mounting location/face.
    The previous owner had removed some sections from the bracket to clear the fixing point for the cover.


    I had to tweak the length a little to get the button to protrude just the right amount


    I had a hard time removing the plastic caps of the high beams. The upper part is made from aluminium which got corroded quite a bit, making the removal of those caps near impossible.
    (Luckily I never had a bulb go bad on me otherwise I wouldn't even have been able to replace it haha!)


    I decided to print a little cap that fits very snug into the opening of the lamp to keep most of the blasting media out of the housing, the glass got covered with a thick tape.


    Today after work hours, I sandblasted the housings. For the projectors, I made a small plate that fit's in the the projector housings lip. I used this for sandblasting as well so I didn't have to fiddle with the tape.
    Currently letting the anti rust primer (Corroles) dry. I might give them a second coat before painting them in color.


    I also ordered a 3pin connector for the wiring loom. This way I can disconnect the right motor if I ever need to.

    Leave a comment:

Working...