Announcement

Collapse
No announcement yet.

Repaint/Alpha-n/and more... E30 CONTENT

Collapse
X
 
  • Filter
  • Time
  • Show
Clear All
new posts

    #91
    So this process might interest some people on the board. Today I took care of putting in my oil filter relocation kit, or rather mocking it up so I can have some better hosing made for it tomorrow. This is the kit that I purchased: http://store.summitracing.com/partde...5&autoview=sku
    The way they have these hoses setup is not very sturdy, so tomorrow I am going to go have some braided hose with better fittings made to fit into the same openings as on this setup. This will not only look better, but also perform better and be sturdier than what is supplied with this kit. I think I can get the cost down to about $160 to $170 total vs. 300+ for an AN fitted setup.
    First, a pic of the kit:


    And the mess that it is going to live behind:


    First thing to do is find out whether or not you need the adaptor plate for your oil filter housing. In the case of the s14, you don't with this kit.


    Secondly, you need to figure out what size adaptor you need. The kit comes with four, I used the second to the smallest adaptor to get the motor-side of the kit to mount.
    Prepped with teflon tape:


    Mounted:


    Next, some shots of the adaptor. The adaptor has the screw that goes into it that the oil filter will eventually spin onto. Add teflon tape, and screw that in.


    A few shots of where it is going to sit after the bracket is made. I am using this position because I cannot fit it along the framerail given clearence issues with the CF snorkel.


    Next, my air oil seperator. This thing is really high quality; I'm very pleased. It will be used only to vent the crankcase vapors, but I could use the other side that is plumbed (will be plugged) for something else in the future.
    Pics:


    The bottom has a tap to drain the oil that will collect in it over time:


    And this is the approximate location of the goods once I made a bracket for it all:


    The bracket will hopefully be done over thanksgiving weekend, and once that is done, I can just connect everything up and start the car hopefully by a week from today if I get the line back from the supply company in a timely manner. The only small things that I have to accomplish are modify the air filter and put in the non-cruise control pannel in the interior. Interior wiring is done to the point of being able to run the car.

    More in a week. Hopefully if this hose setup that I am having made turns out well, I could have more made if others are interested in making this affordable kit look/perform better.
    PNW Crew
    90 m3
    06 m5

    Comment


      #92
      That is exactly the same as the Summit brand one down to the lettering.

      As for the hose though I think its junk, it has split on me twice, and now one of the lines has a tumor. So when you do get it installed check the lines periodically. I am going to be swapping over to braided steel lines shortly, my tolerance for rubber lines has run out.


      http://www.cardomain.com/ride/657387

      Comment


        #93
        ^
        read the post... I'm having braided lines and stainless fittings made tomorrow.
        PNW Crew
        90 m3
        06 m5

        Comment


          #94
          it's ALMOST ALIVE!!!

          Tomorrow I will spend a good deal of time making the final adjustments to the TPS and fire the thing up.

          I decided to ditch the bracket for now. My friend in town who also has an m3 (and is an engineering guru) is using CAD to make modifications to my proposed bracket. We are going to weld it up and powdercoat it to make it look very factory. he also purchased the same oil filter relocation that I did, and is making modifications to it that I will do on my car - so I am forgoing the relocation for now as well. Both should be completed by mid-december once he welds up the brackets and we get them and other parts out to powder coat. Here is a quick diagram that I made and sent to him of the bracket idea I had... I'll see if he'll give me the final CAD and I'll post that too for other people to maybe use as an idea in the future.

          So, with that in mind, today I just wanted to button it all up and simply get the car started. Everything under the hood is SUPER temporary. This stuff is all snugly in place and "functional"... but it looks like hell. Once the bracket is fabricated, it will look 100% factory approved (or damn near). This is how I setup the bottles on the side:

          test fitting the box:

          GREAT SUCCESS!

          the temporary product that will allow me to get the car idling and partially tuned (or at least driveable to get it painted):


          I then spent a little bit of time getting the wiring sorted out inside because the laptop would not read the max. Turned out, I put a wire in the wrong slot, fixed that, and now we are in business. The MAXX is reading the air temp sensor and the TPS, so I am pretty confident that I did that properly.

          I'm waiting to start it tomorrow as it got dark and effin cold at 5:30 tonight... so later this evening I will spend a good amount of time reading the tuning information so that tomorrow I will be able to get it up and running (hopefully).

          So fingers crossed it will start tomorrow. This has been a hell of a project for an admittedly relatively novice wrencher. If I can get it running, I will feel pretty accomplished. Much more tomorrow.
          PNW Crew
          90 m3
          06 m5

          Comment


            #95
            yay!
            sigpic

            Comment


              #96
              sexy time!! high five!!
              beware of attack squirrels

              Comment


                #97
                Originally posted by e30sd View Post
                yay!
                thank you for the exuberance.
                PNW Crew
                90 m3
                06 m5

                Comment


                  #98
                  Congrats on your progress! I've been following this for a long time.

                  Comment


                    #99
                    Nice work and nice car. Love the M3's. Keep the updates comming.
                    sigpic
                    1990 E30 325ic (sold for more than I paid for it after 5 Years)
                    1995 E30 325e (in progress)
                    1987 E30 325is (totaled)
                    1990 E30 325i
                    1991 E30 318is M50 PWR
                    1996 E36 328ic
                    1997 Z3
                    2006 F150 Super Crew 5.4L 6.5' bed The work horse (need something to drag all these old BMW's home for resurrection.)

                    Comment


                      IT RUNS!

                      I can't remember the last time it ran, but it idles (albeit a bit rich) in the garage.

                      pre-startup pic:


                      I think I have the worst garage working conditions on the board but it works!

                      Long story short, it is finally alive and I am awaiting a few things to come back from powdercoat before I do the **final** assembly. I'm also expecting a WB02 for xmas so then tuning can commence next week!! I am beyond stoked that the thing finally runs. Many more pics to follow once the parts come back from the powdercoaters and I'll post a video of it comming to life here in a bit once I get it off the movie camera.
                      PNW Crew
                      90 m3
                      06 m5

                      Comment


                        Hey at least you have a garage

                        But congrats on getting that beast running.


                        http://www.cardomain.com/ride/657387

                        Comment


                          video evidence (hopefully this works)

                          PNW Crew
                          90 m3
                          06 m5

                          Comment


                            sweet! i bet your stoked... cant wait for it to be done!
                            -Brandon
                            sigpic

                            Comment


                              Congrats on getting it running man, i cant wait to see it when its all said and done!

                              Comment


                                So... it's been a while since an update and since some things are nearing completion... i figured I'd post up here and dig up the old thread.

                                Finally, I got around to instaling my Innovate LC-1 WBo2. This gave me problems at first because I was trying to get it to connect to my 1st gen. MAXX system (doesn't have a direct out for WBo2 application). Finally, I said F that and just wired it in on its own, and run the MAXX A/N with lambda off. I'm told this makes no difference as ultimately with a good map I shouldn't need to lambda sensor correction and I don't have a cat-converter, so there is not reason to worry about getting too rich.

                                So, I'll start with the AFR gauge. It's the XD-16 gauge from Innovate that works with LC-1 WBo2. I used input from Chris, and decided to mount it in the center dash vent.


                                And a picture of my accompanying "rice rocket" gauges


                                So, with that done, this is what she looked like from the front


                                Got torn apart to prep it for paint, but that never really happened. Now, a few pannels are sanded, and it generally looks like a POS from a paint standpoint. Once I get it running and tuned, the painting will commence.

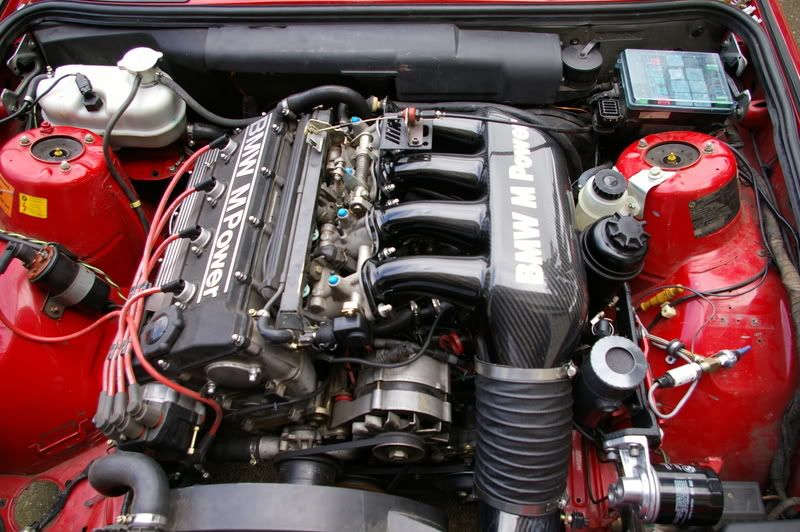
                                Engine bay buttoned up - there will be a few changes though. I have a silicon hose on order to replace the accordian hose that came with the kit (YES, I AM AWARE OF WHY THEY USE THE ACCORDIAN HOSE. YES, I HAVE DONE MY REASEARCH. NO, I DON'T WANT ANY OTHER KIND OF ACCORDIAN HOSE. I HAVE CONFIRMATION THIS WILL WORK FINE. THANK YOU.). That should be here tomorrow. I also need to make the final plastic bracket to mount the brake fluid resevior to the strut tower, and get my remote oil filter kit pieced together. The oil filter relocation will probably get solved next week, and i'll make a new thread regarding it.


                                I powdercoated the throttle bracket to look more factory and not take away so much attention from the box


                                Here you can see the custom bracket with the oil filter relocation and the Air/Oil seperator for venting the crank case vapors. The A/O seperator may get moved down to the place that the carbon canister is currently residing to get it out of the way if I decide to remove it.


                                So then I got it looking more like a car again...


                                Thought this pic was cool


                                Quick shot of the drivers side - lots of information (good thing they all have warning lights!) - and note the tach (proof it works! ;))


                                Finally it looks like a car again, but without my e3 front/rear spoilers :( and YES, the rice rocket hood will be painted body color when everything is painted.


                                engine bay


                                3/4


                                interior passenger side cleaned up


                                driver side interior cleaned up


                                Final shot of the box


                                And, a working car again :)


                                Need to bleed the brakes out tomorrow, and once that is done I can hopefully get it tuned up well enough to drive it to the meet on saturday. Probably won't make it on a long drive with the group, but it will at least limp over there :)

                                More to come as the oil filter gets sorted out, stuff on the tuning process, final brackets are made, and the silicon hose gets here.

                                Cheers,
                                Ted
                                PNW Crew
                                90 m3
                                06 m5

                                Comment

                                Working...
                                X