Announcement

Collapse
No announcement yet.

E39 EDC2 - The Daily Driver re-rebuild

Collapse
X
 
  • Filter
  • Time
  • Show
Clear All
new posts

    E39 EDC2 - The Daily Driver re-rebuild

    As noted in my E30 build, I've got a little side project going on. Basically reshelling an E39 after the wife's daily got destroyed.

    Back in 2017 we decided we needed a sedan for when family visits (I had a reg cab truck, the wife an Accord coupe) and I looked around for something cheap that needed some work but was relatively simple and inexpensive to fix. A non-running, 1998 BMW 528i with 220k and precisely zero working parts is none of those things. Except cheap. I gave the guy $950 and limped the thing 2 blocks home on a failing alternator and just about coasted it into the apartment car park before it died.

    Over 5 years, she got ALL the love. Full chassis overhaul with all new Lemforder & Sachs parts, she rode factory fresh. Every single mechanical issue was fixed. And then the headgasket threw in the towel at 245k. No cooling system failure, the gasket just perished between cylinders 3 & 4. So the engine was torn down to the rotating assembly, cylinder head refreshed, new timing guides & tensioner, evry gasket & hose has been replaced. Replaced all the window regulators, replaced the sunroof cassette, reupholstered headliner & pillars... It was like driving one fresh off the showroom and it was magnificent. And drive it we did, with the wife daily driving it all the way up to 270k without a worry.


    When something you've put so much effort into is destroyed by a red light runner not paying attention, it sucks pretty hard.


    Luckily the old Bavarian barge took it like a champ and my wife was able to walk away with only minor bruises. She saw the other driver coming, and was able to punch it when she realised they weren't stopping and mostly cleared the intersection. The other car blew a red on a 55mph road and went into the left rear of the E39 without even dabbing the brakes. Wifey did a full 270 on the spot, the trunk has been pushed out the other side of the car, but the rear window aperture and door jams are all square, all airbags deployed correctly.

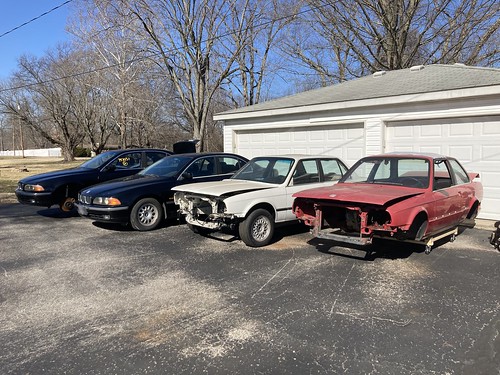
    The car was immediately and unceremoniously dumped outside my workshop to save it from loitering in a salvage yard. I popped it up on stands and assessed the damage.


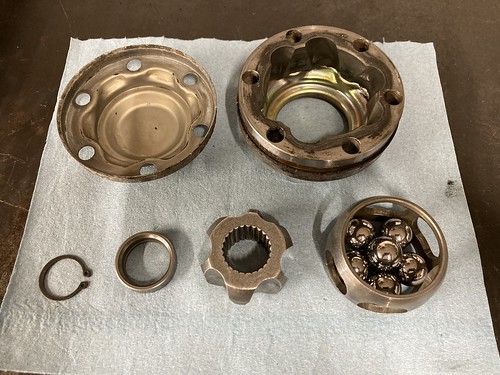
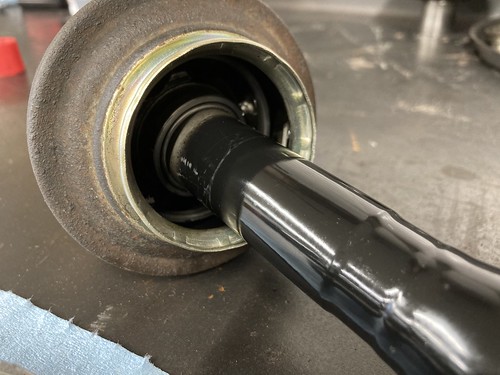
    The shell is obviously toast. The impact was pretty severe as it's Pringled the rear wheel, bent the shock and either pulled the balljoints out of the control arm or torn the tabs off the upright itself. It also burst the spherical balljoint out of the upright and the integral link. I imagine the subframe is buggered too.


    I was more shocked to find the front right corner damage. I can only surmise that the weight of the car was forced upon this corner as it spun, as there was no external impact to this corner. Similarly, the balljoint was torn from the tie rod and one of the control arms snapped, punching a big gouge in the rim


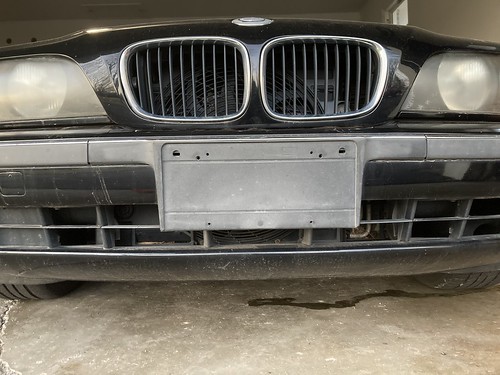
    The crash was back in Oct '22 and it took a few weeks of banging my head against a wall to get any sort of money out of the insurance company. Since then, I've looked at a number of E39s and they've all been hilariously overpriced for the condition and nothing close to being worthy of rebuilding to a similar standard. However... last week I called the guys who do all my tires & alignments (and a most excellent job they do too) as I knew they had a very mint E39 I was sure they wouldn't part with, but they did have one of their 3rd rung shop cars they said I was free to take a look at. Well, it's not pretty and everything leaks and the windows don't work and it makes some rather unnerving vibrations from the right rear. But it's a pretty tidy shell without the normal rot (that I can see...) and the price was more than acceptable. So, time to do it all over again!


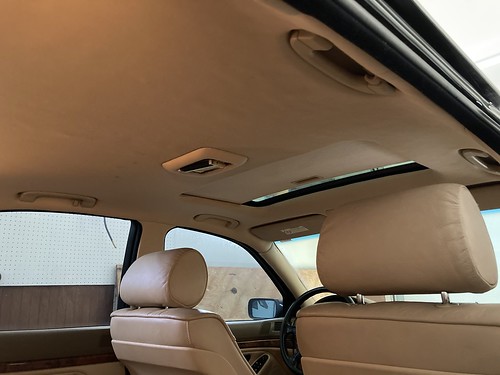
    It belonged to a customer who was tired of fixing it and so they acquired it, did the minimum to keep it moving along as a spare car and runaround for the shop. Said they put tires on it and those are dated 2012 so it's had a life as a shop car, as the interior shows...


    It does have the beautiful anthracite wood trim which is a bonus


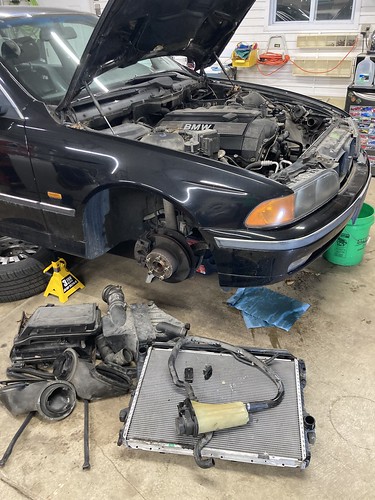
    Most importantly, it's an 03/97 build car which means it has the same single VANOS, cable operated throttle M52B28 as our old car. Just quite a bit grubbier...


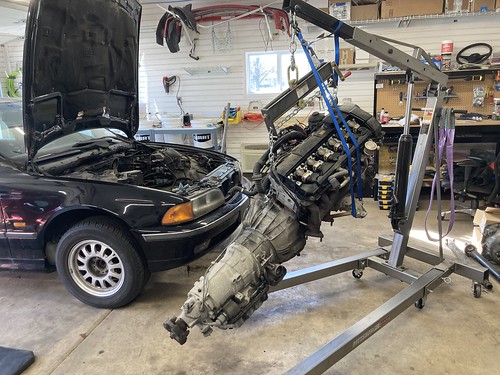
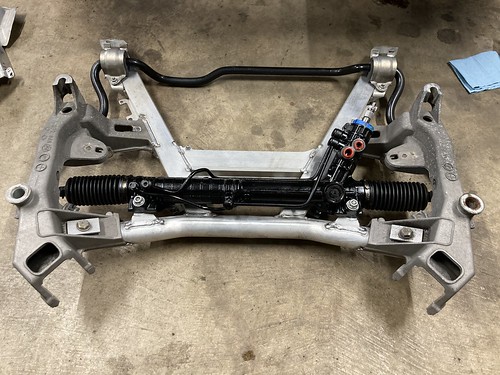
    So first job is to yank that out to make way for the rebuilt engine from the old car. This one can be rebuilt for an E30 of some sort at a later date. Then I'll set to work doing a full chassis refresh again. It's so worth the money in these E39's, they ride like nothing else on a cruise. I stuck with stock ride height, non-Sport OEM Sachs dampers and 225/60R15 Cooper tires. Puts every modern rental I get on work trips to shame.

    I've been pretty down over the whole situation since the accident, but now feel reinvigorated with a decent shell in my hands. I'll try to keep chipping away at the E30 but will be going full steam ahead on the E39 to get it back into daily rotation for about May when they stop salting the roads in Indiana. I'll reference progress in this thread, but probably log the rebuild as it's own project too, in case anyone is interested. Can't wait to drive a fresh one again!

    For now, it's just doing E39 things to my garage floor...


    #2
    Had to shuffle the current fleet around to make a space in the workshop and took the opportunity for a group photo. The replacement E39 is the only running car in the line-up and my first job is pulling the motor...


    Started by littering the shop with pieces of car


    Possible source of driveline vibration? Ya think?!


    Pulled all the fender liners for easier access to suspension & such later


    Washing these was most satisfying (finished article will appear later


    Engine bay turned to spaghetti. I have an idea for a rear lifting bracket so removing the intake and associated paraphanlia isn't necessary when I pull the motor from smashed up EDC1.


    Yoink


    Gave the engine bay a wash to make it more inviting for the new gubbins


    Scraped all the crud out of the splash shield and spruced it up


    These are the struts and knucles from the smashed up car. I'm going to use the strut assemblies as they were all new 40k miles ago, and the brakes are still healthy. But the knuckles will be retired as they saw enough force to snap the control arm & tie rod.


    Following disassembly, I continued to tear them down to separate out the vast amount of aluminum for scrap. Goes to show how well (over?) engineered the E39 was. Steering knuckles are aluminum. Sway bar droplink brakets are aluminum. Strut tubes, spring perches and top mount bodies are aluminum. Even the dang brake dust shields are aluminum! Once the rotor and caliper are off, it's a remarkably light assembly.


    Alas, I was spoilt disassembling all the new stuff I put together on EDC 1 not 5 years ago. The balljoints on the new car were an absolute bitch and fought me all night.


    But they eventually gave it up and the front end looked very bare soon after!


    This weekend I've had my ass kicked by man flu, but still dragged my sorry self out to wash the front subframe (you guessed it, all aluminum) and various other parts


    As you'll see from my E30 build, my favorite thing is to clean and refurbish everything, then lay it all out for a nice relaxing session of bolting clean parts on the car


    That's tomorrow's job, then we'll flip her round and do the same to the rear suspension.

    Pretty stoked with how it's moving along. If I can keep on top of the parts orders and not miss anything that'll slow me down, progress should be swift and we can carry the same momentum back into the E30 again!

    Comment


      #3
      That does look satisfying with the parts laid out on the ground!
      Nothing builds momentum like a new project. Last two months I've been working my tail off getting the E30 ready for spring (so I can start on the next project, a motorcycle this time).


      Sorry about EDC1, but glad your wife was okay.
      Subscribed for updates.

      Comment


        #4
        Thanks Panici, I’ve enjoyed following you E36 thread. Makes me want one to whiz around in! Similar vintage and now I have a spare M52… but limited time

        Comment


          #5
          Update o'clock...

          I mounted the steering rack and swaybar while the subframe was on the ground. Much easier than doing it on the car with a dirty great engine in the way


          Once it was all up in the engine bay...


          ...I ripped the cheapo tie rods and boots off to be replaced by something more OEM-appropriate


          Stuffed the strut assemblies and new control arms under the arches


          The rotors are letting the side down, as they came off the smashed up car that has been out on the driveway over winter. I thouhgt it worth an effort to revive them as they are basically still stock thickness and I'd be replacing them otherwise anyway.


          Gave one a vinegar bath over night. Well, 22hrs...


          The rust wiped right off!!! I was stoked!!!


          ...until I gave it a proper rinse and found a big void in the backside. Balls.


          I am as yet unsure as to whether this was purely due to the vinegar (acid) eating right through the metal by soaking too long, or more likely there was a already crack there that got eroded out further. Seems like a lot of material removal though. Either way, I dropped the second rotor in and inspected at 30min intervals and after just an housr the rust wiped off easily enough leaving a nice clean braking surface. I'm going to clean up the rear rotors in this manner and through new rotors & pads on the front. Lesson learned!

          Time to rip more chunks outta the old girl.


          Rear subframe assembly. Lots more aluminum.


          The rear ball joints are all shot but offered an opportunity to share a top tip. The nut is 16mm hex and the anti-rotation is a wheezy little 7mm hex on the end of the thread. With years of corrosion this is a recipe for disaster. A good soak of PB Blaster of course (overnight ideally) and then take a wire brush to remove what crustiness you can. I then coat the exposed threads with some copper grease to stop the nut binding as it comes off over those threads that have been exposed to the elements.


          Works very well in these situations. I find it very common on front swaybar links for most cars, where I've always fought with the nut seizing on the thread after the balljoint is loose and then it's a right wrestle to get it off or even tightened back up again. Bit of copper grease and it'll wind right off without a fight.

          Anyway, continued the teardown


          I gave the subframe, diff and swaybar a wash. Don't want to get my delicate mitts dirty while rebuilding!


          I've now ordered the rear control arm kit and all the subframe & diff bushings, plus diff input & output seals. While waiting for those, I'm going to start pulling the uprights apart and tearing down the axles for rebuild with new boots & grease. Bit of extra work but the diff has been flinging oil around and I might as well do the axles while they're out.

          Comment


            #6
            I've got to say, I'm enjoying this daily dose of E39 content.
            Originally posted by priapism
            My girl don't know shit, but she bakes a mean cupcake.
            Originally posted by shameson
            Usually it's best not to know how much money you have into your e30

            Comment


              #7
              Originally posted by Northern View Post
              I've got to say, I'm enjoying this daily dose of E39 content.
              Unfortunately, due to work commitments & travel, E39 progress has not been daily of late. BUT!!!!! I'm back with updates

              The next patient on the workbench


              Might need new parking brake shoes?


              Parking brake cable ferrels are cold-welded in. I ended up cutting the cable and yanking the rest of the sheathing out and will deal with these little bastards later


              Major disassembly complete


              Inner race of wheel bearing needed some 'persuasion' to let go of the hub


              Then it was rinse & repeat on the other side so I could get on with axles. Similar process to my E30 project, but with another couple of things learnt.

              First the teardown. I couldn't get GKN kits for bothe ends of the shaft, so went with cheaper Vaico offerings. These don't come with a new inboard end cap, so I had to remove the originals without distorting them too much. The backface of a medium prybar does the trick, where a punch or screwdriver may spoil the lip.


              Then it's just a circlip holding the inboard joint on (note orientation and spacer behind the inner track / 'star')


              Yummy. 26 year old grease goes pretty runny


              Much brake cleaner and shop towel later


              The outboard ends don't really come apart any more than removing the boot (though I might try on a spare, for educational purposes...). Getting all the old grease out is a task. I scrape out as much as possible first then fill the joint with mineral spirits to break down the remaining goop.

              First you need a suitable container. I made one... and a funnel!


              Stand the shaft on end, securely propped up against something. Once filled with mineral spirits, if it falls over you're gonna make a mess!


              I'll go back every 15mins or so and twirl the shaft around to give it a stir, then flush it out thoroughly with brake cleaner. I found mine weren't as clean as I'd like and gave it another soak with fresh spirits. I saved the spent spirits for the first soak of the next shaft.

              After a final flush of brake cleaner, they should be pretty... clean


              Clean up the splined stub shaft for easier assembly later


              All ready for new boots and reassembly


              Bag your shaft to prevent accidents


              See? Tidy


              A little wipe of silicon spray makes installing the new boot a breeze. The small clamp in the Vaico kit was fractionally too small. I think it must be like 32mm (even though it's stamped '24') as a 30mm was smaller and 35mm was a little bigger, which is what I ended up using. Had to go to a local rack & axle refurbishers. All the parts store people hadn't go the faintest idea what they were looking at


              I use a little liquid gasket on the caps for the inboard end, so decided to do a bit of masking to keep grease off the faces of the CV outer. Simplest way is to set the tape down and then rub the edges with something hard & smooth, like the shank of a screwdriver.


              Breaks right through the tape leaving neat and accurate coverage


              Repeat all over in an overlapping fashion, and I mark the 'bottom' piece; thepoint where I want to start peeling from later so it all comes up in one piece.


              Do this for both sides and reassemble the joint onto the shaft, and now you can go to town with the grease without having to worry about neatness. Pull the tape and add a thin layer of sealant to the CV outer and the adjacent cap.


              Per instructions, the sealant should be allowed a few minutes to set up before assembling the two surfaces. I then clamped the caps while the sealant set fully.


              Nice


              Diff seals next. Per the Bentley book, 'remove seals using BMW specific tool...'


              Whatever works


              New seals driven to original depth with an old bearing race that was just the right size.


              In two minds whether to tackle the input seal. I have the seal and a new nut retainer plate on the way. See how brave I'm feeling and how much time I have to afford f*** ups.

              Got a stack of parts in for the rear end rebuild, plus half price Pagid rotors and new pads all round. ShopCat did an inventory inspection and says we are good to go.


              ​ Assuming the diff bushes don't put up too much of a fight in the morning, I should be able to update with some subframe reassembly tomorrow.

              Comment


                #8
                Well, those diff bushings fought me, and fought me hard... If/when I ever do another one of these, I'm buying the full press tool kit for sure. I did them on EDC1 without too much issue, but ths time around they were a royal pain. The rear two weren't too bad, just fiddly juggling the cobbled together selection of 'tools'. The front bushing has a split outer shell and is about 5mm bigger than the hole you're trying to fit it in (story of my life...). I found that a fernco coupling clamp did a good job of squeezing the bushing down to size, but for some reason, the outer shell kept overlapping or collapsing on installation. I trashed the first one, ordered two more with 2 day delivery, trashed one of those and just about got the last one installed in an acceptable fashion. It was as if the shell was still too big for the bore when the two halves were touching, which was not an issue last time, so possibly a part quality issue, but alas, proper tools next time!

                My contraptions for the diff bushings


                I borrowed the PROPER subframe bushing tool kit from a freind and these were an absolute breeze


                Lastly, the swaybar bushings and end links were replaced. Bar and brackets were cleaned before installation.


                While the subframe was up on the bench, I noticed the bushings for the parking brake cable hangers were looking pretty tired, as do the hangers themselves. With new cables going in, I'm going to blast and plate the hangers for longevity of the cable jackets. I found some rubber grommets in my collection that were just the right size to replace the bushings.


                Then the whole lot was moved from the worbench and dropped over the diff, which was bolted into place. New exhaust hanger and bracket can just about bee seen in shot.


                I had hoped to be getting it on its wheels this weekend, however UPS lost my coil springs as they burst out of the box in transit. FCP are expediting some replacements, so I'm hoping to get it rolling next weekend instead.

                In the meantime, I pulled the old rear shock assemblies out. They are only held in with 3 nuts. It's just that the nuts are under the speakers, which are under the parcel shelf, which is behind the rear bench... Shelf is supposed to be black, as can be seen where the speaker grilles were. If my two tone interior idea works out nice, I'd like to have the shelf, headliner and pillars retrimmed in black alcantara at a later date.


                As a little filler job, I put the front brakes together. OE Pagid Pro HC (coated) rotors, Wagner ceramic pads and OE Corteco hoses. The rear will be getting the same, plus new parking brake cables and hardware. Also found out the calipers on these are aluminum too! Gives me restoration ideas for the spare set I now have...


                Speaking of parking brake cables, the old ones were thoroughly stuck in the rear uprights. I cut the cable ends off and ripped out the metal & teflon sheathing, leaving the metal end ferrels stuck in the aluminum castings. I plugged them and filled with PB Blaster for 3 days, put them in a vice and wrenched on them, tried smashing them out with a punch and 3lb sledge. Nada. So out came the drill. Can't be stuck if it doesn't exist.


                Fingers crossed, sometime this week those outstanding rear springs will show up so I can build the rear shocks. I've also ordered the PROPER press tool for the ball joints in the rear uprights, which is due any day now. This is another thing I've done before with generic tooling, but I couldn't figure out which press tools I used and didn't feel comfortable bodging it. I anticipate I'll be building more E39's at some point, so ordered the press tool from Germany.

                Then it'll be reassembling the uprights with new ball joints, wheel bearings, parking brake assemblies, rebuilt axles, and hanging them in the subframe with new control arms. Subframe onto body with new shocks, new rear brake parts, wheels on, and roll it out the door to get on with some drivetrain swappage from the old car. Easy...

                Comment


                  #9
                  Putting some solid work in!
                  Having the right tools definitely takes the stress out of a job.

                  Comment


                    #10
                    Originally posted by Panici View Post
                    Putting some solid work in!
                    Having the right tools definitely takes the stress out of a job.
                    Thanks Panici

                    Seems like a lot of work for a daily! But hope that putting the effort in upfront renders many years of hassle free motoring. EDC1 behaved itself pretty well, and any of the niggles that were corrected as we put more miles on it will carryover, or will be addressed in advance this go around.

                    Already looking forward to getting back on the E30 though!

                    Comment


                      #11
                      Subscribed! Nice to see E39's being saved. M359 Restorations on YouTube just restored a 530i wagon the you should check out if you haven't already.
                      sigpic

                      Comment


                        #12
                        Originally posted by Mike36 View Post
                        Subscribed! Nice to see E39's being saved. M359 Restorations on YouTube just restored a 530i wagon the you should check out if you haven't already.
                        Thanks Mike36. They are a fantastic machine when properly sorted.

                        I'm an avid follower of Sreten and his channel. Guy does great work!

                        Comment


                          #13
                          May thru June is pretty busy with work but I've been getting time in on this thing as & when I can. There's been numerous setbacks and parts delays to contend with. Feel like someone's trying to tell me I should have just leased a Kia instead of taking on another one of these projects!

                          New wheel bearings & ball joints in those rear uprights. I've done these ball joints before but couldn't figure out which combination of press tools I used, so said 'screw it' and ordered the proper tool from Germany, which was promptly lost in US Customs after I waited 3 weeks... So I just took them to the frame shop the car from and had them do it for me. With those back in hand, I went to assemble them and found the bolts are torque-to-yield when looking up the specs, so had to order new ones and wait a few days for them to come. Royal pain in the ass when workshop time is tight.


                          Anyway, with those finally together, I installed the axles, unwrapped all the fresh parking brake hardware and... well, you probably know the drill by now


                          When I finally got the rear coils springs in, I could squeeze them down enough with my basic spring compressors, so took them to the frame shop boys too. I need to invest in a better spring compressor, if anyone can recommend one. I had the same issue with the fronts on the original restoration. Anyway, full new OE Sachs shock assemblies with new Lesjofer springs.


                          Detailed the lower control arm guards, wheels speed sensors and clips, because.... I don't know why.


                          Anyway, with that important work done, the upright assemblies were mounted in the subframe on new Lemforder control arms, ready to be raised into the shell!


                          New brake line grommets to replace the crusty old bits


                          Then the new rotors, with cleaned up calipers & new brake hoses


                          And new parking brake cables on their refinished hangers


                          Unfortunately the new pads I bought appear to have ears that are too small, causing the inboard bad to tip when the spring is installed one the outboard end. Not something I've experienced before so I'm going to throught the old pads in and see if it all squares up again.


                          With all that done, it was time to through the wheels on and roll her outside!

                          Comment


                            #14
                            Outside, I was busy pulling the rebuilt motor from EDC1


                            Pulled the auto to do a rear main seal on the block. About the only seal or gasket that had yet to be replaced on this motor


                            Was a bear to get back together as the torque converter would never seat fully and I didn't realise until i got the two together and there was a half inch gap from bellhousing to engine block. After trying 3 or 4 times I was fed up and rolled it back in the shop. Came back to it a couple of days later and measured up, wiggled the converter and it dropped down another half inch and snugged up just fine.


                            The motor mounts were replaced about 6 yrs ago and the passenger side felt good but looks like the drivers side got ripped up in the crash. So now gotta wait for new ones before pinning the motor down for good.


                            With that, I dropped the motor in on the old mounts


                            Reconnected and plumbed in as many components as I could, and ran the engine harness into the DME tray. All went back in fine except I have one leftover blue connector on the engine harness.


                            The '98 DME tray has a corresponding socket which branches out of the main harness running through the firewall


                            The '97 does not have this socket, so it must have been some kind of addition for the '98 model year. I can't find any reference to it in the Bentley manual, nor can I find any information about it online. I've seen it in pictures, but it's never what is being talked about in the forum posts. Can anyone tell me what it is?

                            Other than that, I'm a bit stuck on fuel pressure regulator as I already sold the '97 engine which had the FPR on the rail. The regulator on the '98 is under the car as part of the 3/2 valve, but can't be swapped over as the hard fuel lines are all different. I'm going to try to track down a rail with integral FPR until it's holding me back, then I'll have to figure something out.

                            Right now, fresh engine & trans mounts are about a week out so I'll probably turn my attention to the interior this week.
                            Last edited by Matt@EDC; 06-11-2023, 07:21 PM.

                            Comment

                            Working...
                            X