91 318is Never ending project(s) journal

Collapse
X
 
  • Time
  • Show
Clear All
new posts

  • monty23psk
    replied
    PSA to all e30 owners....

    There is a build thread here on r3v, by Albie325, who was filled in by mjweimer. Thank you guys. Since he painted the car, there are some hood bump stops that are probably gone on all e30s due to rubber falling apart due to age. I got them for now and added a pair for when I paint the car. BMW PN is 51231916567. Besides protecting the paint and metal, you don't hear the metal to metal tapping when opening the hood.

    Here is a pick of the two parts:
    20210118_230847

    Before:
    20210120_215624

    After:
    20210120_221437

    Leave a comment:


  • monty23psk
    replied
    I started a project at the start of Covid to redo my sound deadening in the interior, starting with driver door. Very slow project to say the least. I have removed all the peel and seal, this took the longest but a heat gun, plastic scrapers, and mineral spirits did the job, if anyone is wondering and wants to tackle this effort. This product, which worked fine but of a lesser quality, uses asphalt (not healthy), and wanted to upgrade to something better. I have now installed the Damplifier Pro sheets from Secondskin based on different articles and recommendations online. 100% coverage is overkill but I added where it made sense and does not get in the way of the operational aspect of the inner skin. This will help with vibration, some road noise, and help keep car cooler which is nice here in Miami. I will add some to the outer skin behind door panel, to help some of the center metal that does flex. I did clean the inner area and started to order replacement parts for a few items so when I paint the car, I have them on-hand.

    Here is quick phone picture showing some of the product installed. I used a roller to make sure no air is trapped. The material is much better and really cuts back on the vibration, which is noticeable just opening and closing the door. The sticky paper does work and pulls off lots of debris.


    In regards to the replacement parts, I am going to re-grease some of the window mechanism and will provide product usage. Currently waiting on delivery of them. Hopefully this help someone and wanted all to know. The window guide/track/channel that is a flocked rubber material is currently on backorder from BMW. I know of someone waiting 1.5 years so far. I added myself on the list as well but for now, I wanted to clean 30 year parts without damaging the rubber. I have some cracks and can't let it get worst. I researched how to clean flocked (suede/velvet) rubber material and looking up jewelry organizers helped me. Not much out there as many liquids or cleaners will remove the flock portion. A good vacuum while brushing a small detailers brush helps but still more is required. I then pull a few sheets off a lint roller per my research, and using the blunt part of the brush, stuff it in, and run it along the flock material to adhere and then I can pull it at 90 degrees, to maker sure not to smear any of the dirt/lint. Here is a picture:


    Leave a comment:


  • monty23psk
    replied
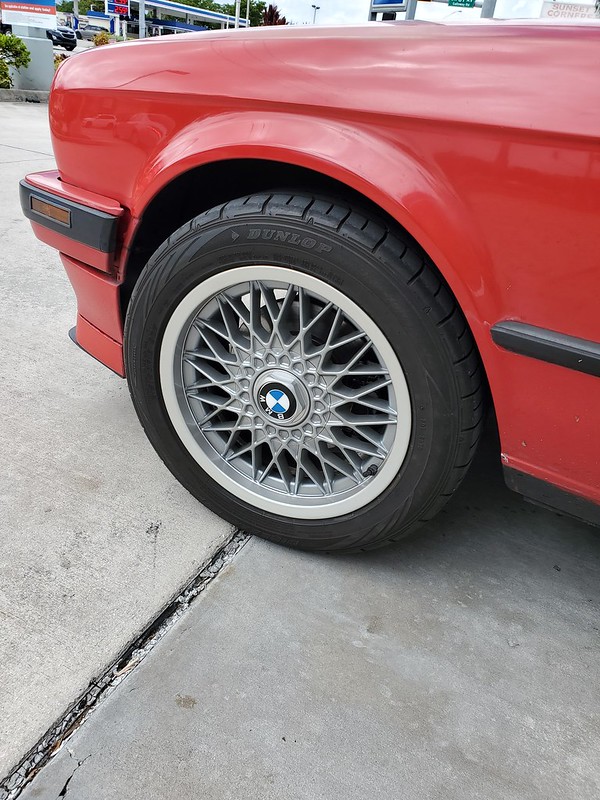
    Got them installed. Had to get gas so took impromptu pics of front wheels. Car needs a wash, very dusty from being in garage and still need to lower front a little to give it a better appearance with the H&R OE Sports. At least you can see the colors better outside and how it looks again the Brilliant Red (very faded) color.

    [url=https://flic.kr/p/2jYJbFh]
    [url=https://flic.kr/p/2jYK1Hq]

    Leave a comment:


  • monty23psk
    replied
    Got the wheels back and so nice and shiny and smooth. The two tone came out very nice and subtle. Here is the one wheel with tire mounted before going on the car. If you you compart the lip to the center you can see the slight difference between the nogaro gray and silver lip (look at 7 o'clock position on the wheel face)
    20201020_155409

    I then took advantage to wash the gloss back powdercoated calipers and paint the brake rotor surface with silver caliper paint to prevent some corrosion between the hub and wheel in the inside.

    Before (front wheel example):
    20201021_143308

    After (rear wheel example):
    20201023_155118

    Leave a comment:


  • monty23psk
    replied
    A little progress during my visit at powder coaters. 1st color done. It is the closest to nogaro silver from the powder brand, called cosmic gray from Prismatic Powders.

    Leave a comment:


  • monty23psk
    replied
    Little sneak peek of the before pics. e28 M5 wheels 5x120 et20 for the e30 heading to a certain place for new look....

    20200922_183847 by

    Leave a comment:


  • monty23psk
    replied
    Originally posted by mike.bmw
    The install looks clean. Nice work! Thick strips of velcro on the carpet and back of the sub box would help prevent it from sliding around, yet still make it easily removable. Just a thought.
    Thanks. Yes, I have some just in case. Luckily both the box and trunk carpet provide lots of friction where it never moves.

    Leave a comment:


  • mike.bmw
    replied
    The install looks clean. Nice work! Thick strips of velcro on the carpet and back of the sub box would help prevent it from sliding around, yet still make it easily removable. Just a thought.

    Leave a comment:


  • monty23psk
    replied
    Another project I was able to wrap up. After I upgraded my sub in the trunk, the JL Audio amp was not as powerful for the JL Audio sub enclosure. I upgraded to the MX series amp from JL Audio as they are used for extreme type vehicles as they are IP rated casings. I really liked the smaller foot print as they are used on boats and smaller vehicles like golf carts. I swapped the 250w for the 500w model and very happy with it. Sold the older one to pay almost half of this new one. I also upgrade my fuse distribution box and went with 4 AWG wiring. Here is a picture of the new board, wrapped in a nice thick carpet (while it stated black/charcoal, it is lighter compared to the BMW trunk carpets. The rear speakers are not connected (you can see the loose cables) as I got some BMW rear speaker pods that I will install to reduce the size of speakers in the rear. While driving, the rear speakers don't really do much for the listening experience. I also was thinking of mounting the sub box, but like the ability to move it or remove it, if needed. It is very heavy, so won't move around.


    Leave a comment:


  • monty23psk
    replied
    For those following along, I have noticed when I drive the car, a slight hesitation, once in a while. As well, the car would turn off while taking off maybe 1 in 15 drives. Not my daily anymore, so this is over a span of 3 months. Also, while driving and if I caught it, the check engine light will flicker lightly. I decide to check my Bremi coil packs and cylinder 2 was odd. It would never give me .8 ohms as the other 3, but hover between .9 and .11, sometimes 0. When I look at the pins on the coil, terminal 1 has slight corrosion and mostly at the base. Then looked at the connector, and same white residue. Other pins were just fine. I received a new Bremi coil, connector with 3 open barrel double leaf terminals from BMW, crimped them on and so far so good. Will need to take it out for a few more spirited drives to make sure.

    Thought I would share in case someone is noticing this on their vehicle. Also, with now doing this, I will be shorting all the wiring, as I had planned many years ago, so I don't have to use cable ties to keep it somewhat organized. I know recently, someone used the e90 coil packs so maybe I will go that route. I do want to modify the plate so I can get the old BMW cover back on for a more stock look. Will be my next quarantine project.

    20200814_231913 by Alexander Montoya, on Flickr

    Leave a comment:


  • monty23psk
    replied
    Over on R3V, I saw a very sleek USB charger which included fast charging for the Android devices. My radio has a USB port but it is very slow and my cigarette lighter is not installed. I ordered it, arrived Monday and today installed it. Works great and went wit the 2 port option in case I have a passenger. I will relocate it to the hazard location so its more available to passenger when it redo my AC panel. Still trying to source one as mine is missing a chunk under the AC switch. Got it from Falk MFG based in Oregon.

    20200727_220100 by monty23psk, on Flickr

    Leave a comment:


  • monty23psk
    replied
    Decided to refresh all the fuses after getting my battery tender. I ordered fuses from BMW. I had some from ECS and can confirm that BMW are the same. BMW originally used Pudenz branded fuses and this company has been bought by Littelfuse. They are branded Littefuse. I went with BMW as they were cheaper with my contact and are exactly the same.

    Fuses:
    20200718_225005 by Alexander Montoya, on Flickr

    Before:
    20200718_225603 by Alexander Montoya, on Flickr

    After:
    20200718_230322 by Alexander Montoya, on Flickr

    Leave a comment:


  • monty23psk
    replied
    I found out something yesterday. Today, BMW sells a charger, it looks to be a rebranded CTEK version.
    Click image for larger version

Name:	830262_x800.jpg
Views:	433
Size:	59.7 KB
ID:	9933538

    Leave a comment:


  • monty23psk
    replied
    A small quarantine update. I have notice that my battery is not holding a charger after 48 hours. I only have a 43mA draw with everything connected, so I know I am within specs. But batter is now 2 years old and lower Bosch model. I would love a yellow top from Optima, H6 model but $ and while I know I can get a replacement at no cost at Pepboys, I decided to try using a battery tender. I will be out of town for a few weeks so just have the battery topped off is not a bad idea. After many night doing reading reviews, I settled on the CTECK MXS 5.0. All the top brand vehicles owner use them and even Jay Leno raved about them. I got it from Amazon installed it. With trunk in the rear, and the trunk organizer, I want to leave the lead connected all the time. This model has the plug which is fused and it has a cover to prevent anything touching the contacts. Nice quality. They also sell a 25ft extension which I might use if I want to mount the tender to the wall. I ran the connecter through the small hole int he carpet trim that is used to access the fuel door lock release.

    Here is the device:
    20200613_224614 by Alexander Montoya, on Flickr

    Here is trunk organizer moved out of the way to show the connector lead connect to the tender:
    20200613_225006 by Alexander Montoya, on Flickr

    Leave a comment:


  • monty23psk
    replied
    Originally posted by Codym42
    I didn't know Bav Rest made a speedo calibration tool. That's really cool. Does it plug into the stock cluster or are there other modifications to be made?

    Hopefully I'll see you and your car at The Vintage! I've registered mine but I need to fix a few things before I trust it to make the drive there and back.
    Hey Cody,

    I don't know if it plugs in or is solder. The wiring goes into the cluster where the speedo is but I didnt take it apart at that level when I got it back to know for sure. Reach out to Greg at Bav Rest for the details. The cost for it was $20 on top of what he did, so I didn't hesitate to add it. Still need to do the calibration so then I can tidy up cover over the steering column.

    Hope to see you at the Vintage.

    Leave a comment:

Working...