If this is your first visit, be sure to
check out the FAQ by clicking the
link above. You may have to register
before you can post: click the register link above to proceed. To start viewing messages,
select the forum that you want to visit from the selection below.
You mean another coat or two of clear? I did notice them to be a little dull. I gave two coats of clear but it might not have be enough.
Sorry for the very delayed response. Yes I would wet sand and give another two coats of clear. Then once they're suffeciently dried, wet sand with 1500 then 2000 grit and hit them with an orbital and some polishing compound (I prefer 3M perfect it).
Here was mine.
Before:
After
The same products work fantastic on the paint too.
Keep up the work, your level of OCD and attention to detail is utterly insane. E30's need more people like you.
Got a new TRE fuel pump as I still hunt my rough idle. Glad I replaced it as it is much smoother but still a little rough. Looking at O2 next. The original pump was stamped BMW so it might have been the original or at least youngest age possible, 13 years as my car joined our family back in 2001 and the pump has never been replaced. The car sat without moving for 4 years locally before my dad bought it for my sister back then. Glad to get in there to replace it. I have 4 pictures but I had to recover them as my wife deleted them from the digital camera. I recovered two of them but only the thumbnail is viewable. Used my dremel to cut off the bottom lip and the rest was straight forward. Hightly recommend due to price, warranty and it is very quiet. On to the pics:
I received my special lube for the caliper piston install. From Dow Corning. It does not melt and does not mix with brake fluid. Its what the Porsche guys use. Not very cheap but made install very easy. Brake fluid was not working. Very very little tolerance on the seals and the piston. ATE has a special lube, which is not Plastilube but over $30 for a tube and not available in the states. Other brands have something that should work. Plastilube has been used but it is not designed for it and didnt want to take the chance.
Here is the newly powder caliper with guides, bushings, and piston installed. Still waiting on my other parts so I can install it all.
I got a pic of some OEM items for the calipers. I added the new bleeders, new guide bushings and caps and cleaned out the old guide pins. Next is the piston install. Will submit pic of it put together. Might have to wait until the 26th to do it, unless I can sneak it in tomorrow.
Decided on powder coat, gloss black. They came out awesome and very nice in person IMO. Picture is at night with flash so not the best but more pics to come of it installed. I got new OEM bleeder valves, guide pin bushing kit and new ATE seals ready to install. Will do it this week. Next is to order pads, rotors, pad sendor and m3 sway bar links. Then to check condition of control arms and my AKG offset bushings. I can save $$ if I can reuse them after 3 years of use and hope nothing is really worn.
Here is a picture of one of the calipers and carriers cleaned up with different wire wheels and some brake clean. I was doing this myself in the meantime while deciding to paint or powder coat the calipers. I still need to some some corners and was going to use the small wire wheel on the Dremel but I decided to powder coat them gloss black as I found a shop near me that is cheaper than most and great quality. Dropped them off today and since he sandblasts them before, I don't have to do the other side. The flash make it look dark/dirty is some corners.
Here is small teaser pic of my next project which I have had in a box for the last 3 years in storage. I need tires very soon, so instead of getting new ones, just going to install my e30 m3 5-lug suspension. First thing is to rebuild the brakes. Here are the front brakes which I started to clean but ran out of brake clean. I am looking at options to powder coat them myself as having them down will be too expensive for me. Brakes are huge and heavy when I saw them for the first time. Can't wait for the stopping power upgrade.
I received my OEM spray nozzles which were cheaper than aftermarket from my source. I would like the heated ones but here in S. FL, not needed. Also got my new arms. Now I realize that SWF arms and Bosch ones are a little different but the angle is the same.
Here is a pic of them installed and now my wiper system is complete rebuilt minus the water tank. I have the frameless wipers from before and highly recommend them even though they are double the cost of the regular ones. I believe our stock size is 20" on both arms, but I might get 19" for the passenger side not to hit the windshield edge trim. Anyone else have this issue. I aimed the nozzles per the factory repair manual and now I move one to my suspension upgrade.
SEM prep and treatment to the trim under the front windshield:
Before: (wet after simple green washed)
After:(full prep and spray down)
Here are the arms after SEM prep and paint I got at the junkyard and the extra new trim pieces. Then I find out, the the arms are actually two driver side from the car I pulled it. So out $5 for one arm. Need to go back to get passenger side.
Finished the wiper hose addition with new hoses and clips. My nozzles are fine, I just need to aim them. I ordered all the OEM parts for the install and tried to figure out how it all went together. I searched for pictures on the internet and even though I didn't find an original picture of the car in this area as it left the factory to confirm, but I believed I figured it out or at least it makes sense to me. Also, our cars did not come with the factory hood cover but I do know which holes are used for it so I used the other ones for the hose path. Pics taken at night. Now just need new wiper arms or used ones with good splines on it, to install on the linkage.
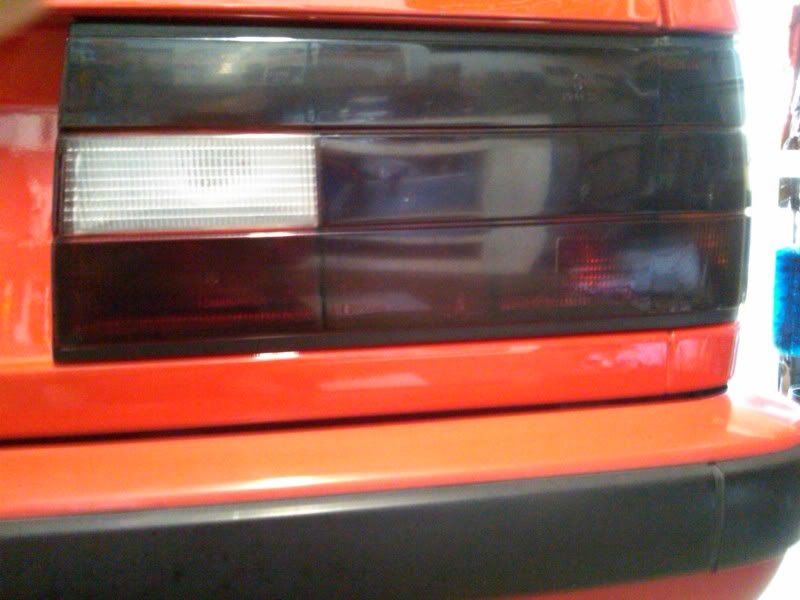
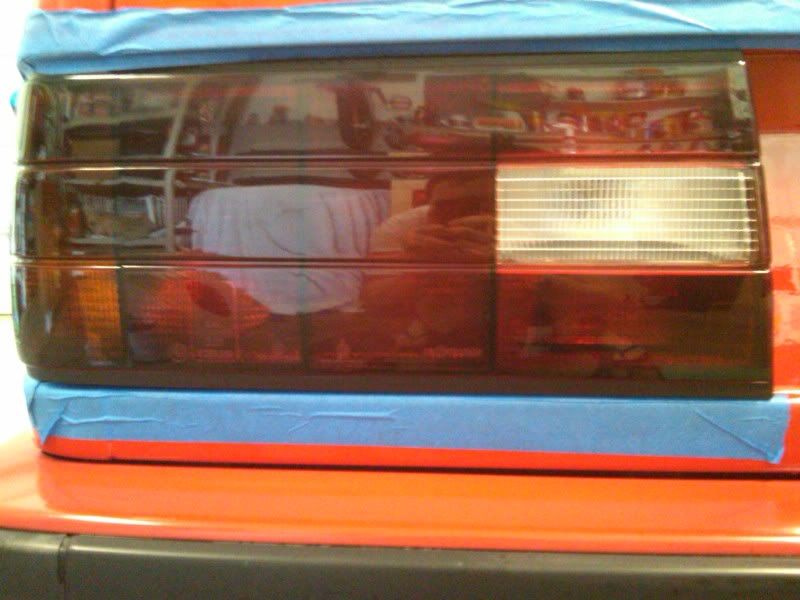
Great work! On those tails, I would recommend spray another coat or two on. Then wet sand and buff them. They will have a nice factory looking shine and not the dull look niteshades normally has. I have mine down and the smoke is subtle like yours. I'll try to find a decent picture.
You mean another coat or two of clear? I did notice them to be a little dull. I gave two coats of clear but it might not have be enough.
Great work! On those tails, I would recommend spray another coat or two on. Then wet sand and buff them. They will have a nice factory looking shine and not the dull look niteshades normally has. I have mine down and the smoke is subtle like yours. I'll try to find a decent picture.
Still on the windshield wiper system....My linkage is old and worn when it comes to the splines where the wiper arms connect to the linkage. Actually the passenger side does not turn unless I over-tighten the nut but after some time, it goes back to not working. At least my driver side works and gets through me if it is raining for the last year. I did get a new OEM linkage which I got lucky with purchase on ebay. New I can get them for ~$150. I got this one for $75 online. Used ones go for around $50.
I have had it a while but since on this project, I decided to swap it out. Not a fun job since the AC box is in the way. I eventually go it out as there is one real way to get it in and out and just takes a lot of wiggling the linkage unit to get it right.
I did replace the fresh air blower about 3 years ago with a new one but never cleaned the area. Here is 20+ years of grime in the area:
I then got the old linkage out with was rusting away in the middle. Here it is on the bottom with the motor still attached and the new one above it.
Here is the new linkage with the motor installed and the motor cover cleaned back together:
I have the new linkage installed. About to finish with AC box install. I just need a few parts for the linkage/wiper arm area. I need driver side grommet with I bought less than a year ago for the passenger side. Since it is rubber, it waste away and I would get wobbly arms since the linkage arm was not fix going through the body of the car where the arms connect. I will post more pics of the final install once I receive the parts next week. Thanks Blunt...
I finally got to install the 4-pintle Bosch 556 injectors. They came re-conditioned as I didnt want to take any chances on used ones. I also cleaned the lower intake manifold, from fly-by oil. I guess maybe I need a oil catch can as other have installed. I also replaced the upper/lower gaskets, which I got from BMW, as they were the same price for me as aftermarket ones, while I ordered some BMW dealer only items for another project. Very nice quality on the gasket but unless you get them same price, the aftermarket ones are fine. Lastly replaced two small fuel hoses under manifolds as a precaution. I did have my current stock injector cleaned at a Bosch authorized center about 6 years ago. I need to clear the ECU next to make sure it re-maps everything after the new changes. I will then run a couple of tanks and see how the my MPG is reacting and more importantly how my idle is doing. Still looking at my running rich issue. After this it could be fuel pump replacement, o2 swap or examine timing again. Besides idle, the car runs great and only on idle without AC does it seem to go into the rich loop. I did find two of the lower intake manifold nuts on, finger tight. Maybe this was causing the vacuum leak/running rich issue. More to come in the next 2 weeks. On to the pictures:
New parts all from BMW:
All intakes removed, at least the new head from almost 3 years ago is still shiny from the engine maintaining I do. Also noticed one of the newly installed valve cover bolt orings is missing. Can't believe I missed it. Will have to find the missing one or order a new one on next order.
New lower gasket installed:
How all injectors looked even though inside the cap where it shoots our the fuel it was clean:
Not best view of inside lower manifold. Cleaned with toothbrush and simple green:
New injectors installed, using old retaining clips on both sides of injector:
Lower manifold and upper manifold gasket installed:


Leave a comment: