If this is your first visit, be sure to
check out the FAQ by clicking the
link above. You may have to register
before you can post: click the register link above to proceed. To start viewing messages,
select the forum that you want to visit from the selection below.
Well in that case thanks guys, definitely wasn't expecting it lol.
Tinker Engineering - 2014
Mica - 2000 BMW 323i - The one that started it all Fiona - 1975 BMW 2002 - The Definition of Project Creep Heidi - 1988 BMW M5 - The piece of BMW history Silvia - 2013 Subaru WRX - Stock, for now
Got a little bit of progress to report from tonight. (Still working on the video update, but it should be good when it's done).
I finally took the time to reassemble the wheels (un-refurbished ATM, I figured this way I won't mess up a newly painted wheel with all the test fitting) and mount the tires on them. Originally I was going to take pictures of the process, but working alone it was all I could manage to get the damn things on the wheels. After an hour and a half of hand to hand combat I got it done. Funny enough the first wheel took and hour, once I got the hang of it the rest of them went together fairly quickly.
With the wheels and tires mounted and filled with air they could finally do the job they were born for, holding up the car. Well, the front wheels that is, the rear ones still need some kind of suspension to attach to, more on that later. So I threw the front wheels on the coilovers for the first time and set her down. And WOW, she was low. So low that I couldn't get the low-pro jack out from under the front subframe (~2.5 high). At first I was just going to put some 2x4's under the front wheels to get the jack out, but then I remembered that it had coilovers. So you can raise it. Duh. So after some tweaking of spring perches I found a somewhat happy height. It's still seems a bit lower than I was planning, but it's really hard to say until I get the front fenders cut and mount the flares up there to match the rear. I may end up making some upper strut mount spacers, it all depends on where the shock is sitting in it's range of travel with my desired ride height.
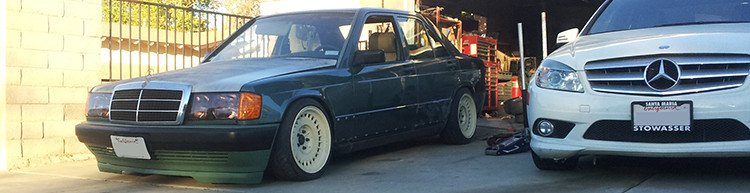
I also threw the rear wheel in the fender with the rear supported at where I think it will end up. So this should be roughly what the final ride height will look like (sorry for the crappy phone pics, left the dslr at home on accident):
Notice how tucked in the rear wheel is the the fender and body. I will probably have to do some more trimming on the inside, but I really like how that looks in this picture. With as big as the tires are, I don't want it to seem like an old school muscle car dragster with a lot of rake or anything like that.
More to come in the next few days. Thanks for looking!
Tinker Engineering - 2014
Mica - 2000 BMW 323i - The one that started it all Fiona - 1975 BMW 2002 - The Definition of Project Creep Heidi - 1988 BMW M5 - The piece of BMW history Silvia - 2013 Subaru WRX - Stock, for now
As fun as it's been fitting the rear wheels, I've come to the conclusion that the front is gonna be even more 'fun'. To start I threw the front tires on and got to work trimming the front of the wheel wells. Sadly this meant cutting into my custom front mounts, but I can always make more. Here you can see the area along the bottom that needed to be trimmed.
I still need to remove the springs from the coils and check that it will clear lock to lock under full compression, but it seems to be in the ballpark. This meant that I could turn my focus to the rear of the front wheel wells. The passenger side was simple enough, trim away sheet metal until the tire doesn't hit anymore. In the end the passenger will loose a little bit of leg room, but I don't think I'll be sitting over there that much lol. I still need to take the cuts a bit higher to account for suspension compression, but it shouldn't need to be any higher than the outer fender brace at the top of the pic.
View from passenger side. Not to intrusive.
Next up was the driver side. To be honest I've been kind of avoiding working on this section just because I hadn't really though of a way to do it properly yet. The main problem:
It's not entirely clear from the pic, but the clutch master cylinder and the tire wanted to occupy the same space. And seeing as my thesis on 4th dimensional physics has taken a back seat to this project, I had to figure out a different place for the clutch master. A few ideas had gone through my mind, from angling the clutch pedal (bad idea) to making a special linkage to raise the master cylinder up and over. I really wasn't satisfied with this idea either. It would add extra complexity that I didn't need, wouldn't save that much space, and to top it all off as soon as the tire cleared the master cylinder it would start hitting the pedal mount itself.
This was the best picture I could get of the interference. The fact I couldn't get a better one just goes to show how tight things are in there.
Then I got an idea. I took a couple measurements, said some prayers, and took a saw to my pretty pedal assembly....
Turning this:
Into this:
Which then let's the tire do this:
With the master cylinder now sitting here, snuggly in the engine compartent:
With the pictures out of the way, some more technical jargin. You may have noticed how close the clutch pedal now looks to the brake. That's a combination of a few things. First, the camera angle exaggerates it due to the fact the clutch pedal was positioned much further forward compared to the brake and gas. This can easily be adjusted in the linkage, I just didn't bother at the time. Second, the clutch pedal isn't sitting square to the firewall due to the fact that I reused existing holes in the firewall to mock the pedal in place. Once I finalize where I need it to go I'll weld in a new, reinforced section of steel to make sure the pedal is securely mounted. The thin gauge material that's there now wouldn't really cut it.
Another concern I had initially was that the floor mounted brake and gas pedals wouldn't travel along the same path as the clutch, resulting in an awkward feel from the pedals. However, after testing them, the path of travel is remarkably similar. Plus the fact that the clutch will always be operated with your left foot, and the brake + gas pedals with your right, I don't see it being an issue. I'm sure the setup will need some more fine tuning, and I'll need to add some stronger mounting points for the clutch pedal (all of the mounts for the original 3-pedal setup were left on the brake-gas assembly), but overall I think it will end up being a simple and effective solution.
And with that I'll just leave a few pics as she sits now. The more I look at the front turbo dam, the more I think it's not wide enough anymore...
Thanks for looking!
Tinker Engineering - 2014
Mica - 2000 BMW 323i - The one that started it all Fiona - 1975 BMW 2002 - The Definition of Project Creep Heidi - 1988 BMW M5 - The piece of BMW history Silvia - 2013 Subaru WRX - Stock, for now
Not to give away too much, but I came to the conclusion I'll be needing this in the near future for "things". Kudo's to those that know what it is and what it does.
Tinker Engineering - 2014
Mica - 2000 BMW 323i - The one that started it all Fiona - 1975 BMW 2002 - The Definition of Project Creep Heidi - 1988 BMW M5 - The piece of BMW history Silvia - 2013 Subaru WRX - Stock, for now


Comment