Announcement

Collapse
No announcement yet.

89 325i Cirrusblau Metallic m30 Project - Round 2

Collapse
X
 
  • Filter
  • Time
  • Show
Clear All
new posts

    #76
    Got some crap done today. I cleaned up the new cylinder head and the combustion chambers are cleaned enough for me. I power washed the crap out of it and then let it dry in the sun. Then added WD40 on the valves on the chamber side, added fresh oil in all the cam journal spots and valve stems. Rotated the thing over 10 or so times and made sure everything was smooth. Shouldn't have any issues with the way it is stored.

    Also got the "Jesus Nut" off so I can do some more cleaning on the block. 100 psi compressor on a 1/2" air gun got it off with no fuss. I am going to remove the lower front cover and the oil pan and take a look at things. I am not going to try and clean the piston tops since they look ok to me. Obviously I will clean up the mating surface but that's about it. I will have to replace the timing chain guide and tensioner guide.

    I do want to think about painting the block. I will color key the valve cover to the block too. I don't want to do black because I want to see leaks. I don't want aluminum color because it is too much of the same color as the head and intake. Given that the car is Cirrus Blau, I don't want to do another blue color like Ford Dark Blue. I have thought about burnt orange and red. Maybe purple!

    I am debating on not using paper gaskets upon reassembly of the upper and lower timing covers as well as oil pan gasket. Instead, I would use Permatex "The Right Stuff." Heard nothing but great stuff about it.

    In other news, I had to power wash the drive way after doing the initial block cleaning. It was just a mess. I don't have a massive gas powered power washer, just a cheap $100 job from Home Depot. It did the job but took an hour. No reason to mention it. Just did. Ha!

    I also marked out the tram gauge so that I can get out there and get those parts finally welded in. Need to see how well I did tomorrow.
    Si vis pacem, para bellum.

    New Hawtness: 1995 540i/6 Claptrap
    Defunct too: Cirrusblau m30 Project
    Defunct (sold): Alta Vista

    79 Bronco SHTF Build

    Comment


      #77
      Last Saturday I got some more work done on the engine block. There was a pretty significant amount of rust that built up in the coolant passages because of the retarded previous owners just filling it with tap water when it would get low. With the air compressor out, I blew out as much of that rust I could. Eventually 98% clean air was coming out of each coolant passage. I cleaned up the mating surface of the block and emptied the block of fluids better than before too. Then I oiled up the cylinder walls with WD40 for the interim. I would rather leave the piston tops covered with carbon build up than compromise any mating surfaces. I don't foresee any problems with this from the reading on the internet I have done.

      I also had to unbolt the engine stand from the motor and rest it on two saw horses and reorient the damn stand. I was an idiot and secured it with one of the four arms attached to the oil pan when I first removed the motor. When I had it off the stand, I took the opportunity to remove the automatic transmission flex plate and flywheel. It was quick work with an impact wrench. I feel better now that the motor is secured properly and I can move it around with a little bit more gusto. Plus, I can pull the oil pan and front timing cover now and take a look at what I have to work with.

      Still contemplating on using Permatex "The Right Stuff" in-lieu of regular gaskets. I also need to wirewheel the block to get it ready for paint. Not looking forward to that. Go figure.

      I plan on going out tonight and seeing how my tram gauge is going to work on frame measurements.
      Si vis pacem, para bellum.

      New Hawtness: 1995 540i/6 Claptrap
      Defunct too: Cirrusblau m30 Project
      Defunct (sold): Alta Vista

      79 Bronco SHTF Build

      Comment


        #78


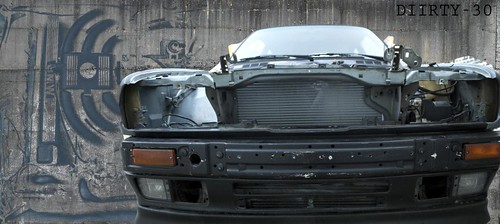
        This looks like a mad familiar sight.

        Did I buy a hood and something else off you a while back?


        BLUE NOSE - M62 SWAP

        THE E30 + 1 BUILD

        Comment


          #79
          Originally posted by DIIRTY-30 View Post


          This looks like a mad familiar sight.

          Did I buy a hood and something else off you a while back?
          Ha! You might have bought it from Josh. This picture is from his property right before I decided to buy the car.
          Si vis pacem, para bellum.

          New Hawtness: 1995 540i/6 Claptrap
          Defunct too: Cirrusblau m30 Project
          Defunct (sold): Alta Vista

          79 Bronco SHTF Build

          Comment


            #80
            I have to say, I am really not enjoying the stress of getting these body parts lined up correctly prior to welding. I guess I need to keep looking at the frame measurements. It is just flat out difficult.
            Si vis pacem, para bellum.

            New Hawtness: 1995 540i/6 Claptrap
            Defunct too: Cirrusblau m30 Project
            Defunct (sold): Alta Vista

            79 Bronco SHTF Build

            Comment


              #81
              Got fed up and started welding...

              Just kidding.

              But I did do some more trimming of the core support left on the car to get better measurements prior to tacking it up. Then I thought about the new core support I have and decided to see how far off I was. Sure enough, it took a little bit of wedging to get the core support to fit in it's normal spot. Which backs up what my tram gauge showed me (no pics of that). The tram gauge showed me that the red part was pushed in a bit too far. But I think that won't be an issue once I get a few welds in place. Then I will be able to kind of push it into position, weld some more, check, bend some more, weld, until it is solid.


              When I came home from work, the car cover had been blown off. My initial thought was, "nice ass!"
              Last edited by marshallnoise; 10-30-2015, 08:19 PM. Reason: Never use tapatalk to upload pics. They kill them after a while.
              Si vis pacem, para bellum.

              New Hawtness: 1995 540i/6 Claptrap
              Defunct too: Cirrusblau m30 Project
              Defunct (sold): Alta Vista

              79 Bronco SHTF Build

              Comment


                #82
                Good god, I can hardly believe the amount of work you're putting in to this. I would have given up long ago

                Comment


                  #83
                  Me neither! The car was cheap. I wanted a late model and there you go. Plus, it's nothing but time going into it.
                  Si vis pacem, para bellum.

                  New Hawtness: 1995 540i/6 Claptrap
                  Defunct too: Cirrusblau m30 Project
                  Defunct (sold): Alta Vista

                  79 Bronco SHTF Build

                  Comment


                    #84
                    I am a lazy bastard in many respects. Wire wheeling crap does not interest me in the least. Cleaning aluminum is a bitch. But I want it clean. So I have been all over the interwebs trying to find a chemical way (non-hot tank) to clean aluminum engine parts. One of my old hangouts is a site called advrider.com and they have a plethora of cheap and lazy bastards like me on it. One of the threads started basically found out that Pinesol was a great way to clean aluminum. So I am experimenting with that method.

                    Old m30 head that is basically scrap unless someone wants it (;D).


                    5 gal bucket with about 3 gallons of Pinesol


                    Old head in bucket, topped off with water


                    At this point, just wait a few days. Take out and high pressure wash the shit away. I have another 2 gallon bucket with half Pinesol with the upper timing cover and alternator bracket soaking too.

                    I have also heard that agitation or heat make the process work much faster and more efficiently. I believe it. So I put the oil filter housing in a ceramic coated pot on a hot plate and boiled it in Pinesol over a hotplate outside. Pretty self explanatory. Here are the before pictures.


                    It has been windy here in the afternoon and I have been arriving back home to see the car cover off the car in my drive way. Since it was pulled already yesterday, I decided to clean out the car and see what kind of stuff I was missing and already had.


                    Not too bad. Clean (98%) dash, front bumper (no cover), two right side grilles, various interior parts. Front fender trim for both sides and door trim for both sides as well. Bunch of weather stripping. A lot of the m30 swap stuff too (air boxes, AFMs, belts, etc).

                    The car was filthy. Rat shit in it (but no damage from them go figure), bolts and screws strewn about, and old trash. I went through the car and grabbed every screw/bolt/fastener I could and threw it in a bucket for future use. Then pulled out the vacuum to at least see how gnarly the car is.

                    Before cleaning


                    After cleaning


                    I knew that when the previous, previous, previous owner got in his accident that caused all the damage to the front end that there was other damage from the same incident. Well, that hump isn't supposed to be there in the floor pan.


                    After bashing with my foot first, then rubber mallet.


                    When I get closer to actually driving the car, I will do a hardcore stain removal and cleaning. It will certainly be necessary. But at least I can get in and out of the car and not feel like I am diseased.

                    Ever since I got the car, the windows were cracked about an inch and letting weather and stuff in. Since the car does not have any battery or a harness that is reasonably intact, I needed to get into the doors and get at the window motors. I successfully used my Ridgid cordless drill battery to wind the windows up. The regulators are strong (bonus)! And now the windows are closed.

                    But when I was in the driver's side (the only place missing a lock cylinder btw) I saw some crap I didn't like. Someone did some cutting with a hacksaw or sawzall for some reason. For the life of me I can't figure it out unless it is the way someone installed a key-less entry system. Either way, I am going to the yard today and getting a new door. Since my passenger door will have to be resprayed anyway, might as well start reasonably fresh.

                    Any ideas why someone would do this?


                    Also, the seat that came with the car is flogged to shit. But it was in good enough condition to see how low these seats sit. The other e30 I had didn't have the seats very long (I sold them) so I was not familiar with them. Surprisingly, this crappy one was comfortable and afforded me more headroom than the RSX seats I installed in Alta Vista. All in all, I am probably going to source a decent set of sports when all is said and done.

                    Here is the shitty seat.


                    Si vis pacem, para bellum.

                    New Hawtness: 1995 540i/6 Claptrap
                    Defunct too: Cirrusblau m30 Project
                    Defunct (sold): Alta Vista

                    79 Bronco SHTF Build

                    Comment


                      #85
                      On my sport driver seat I went to Ecology for the leather bolster cover and foam. Your seats need more work done to them.
                      Keep posting. I enjoy watching the work. It reminds me of my e30 m30 build. A lot of work, but you will see the light on end of the road!!!
                      Projects Hartge,Alpina & AC Schnitzer Builds.http://www.r3vlimited.com/board/showthread.php?t=280601
                      http://www.r3vlimited.com/board/showthread.php?t=227993
                      http://www.r3vlimited.com/board/showthread.php?t=289362

                      DSC04926 by Raul Salinas, on FlickrDSC03413 by Raul Salinas, on Flickr

                      Comment


                        #86
                        Thanks Raul. Really, it seems like a lot of work and it is in many respects. But in the end, its a car, not a house. I guess I have tackled a lot of projects in the past so I am kind of fearless in that regard. My whole family is this way though: if there is something you want to do, figure it out and go do it. The biggest key is patience. You, my friend, are a sterling example of patient.
                        Si vis pacem, para bellum.

                        New Hawtness: 1995 540i/6 Claptrap
                        Defunct too: Cirrusblau m30 Project
                        Defunct (sold): Alta Vista

                        79 Bronco SHTF Build

                        Comment


                          #87
                          Results of the PineSol experiment.


                          Here is the spare cylinder head before power washing but after PineSol soak for 5 days. Ironically enough, the left side in this pic is the side that soaked.


                          Right side soaked before power washing.


                          Right side is the part soaked before power washing.


                          Forgot the combustion chamber shot before power washing, but here it is after.


                          After power wash.


                          After power wash.


                          After power wash.

                          On the head, I would say it was semi-successful.

                          However, the other parts turned out great!


                          Upper timing cover and I think alternator bracket after PineSol soak for 5 days and a power wash.


                          Same as above, flipped over.

                          Here is the next batch of parts getting the soaking treatment. Now, I already soaked the oil filter housing in the PineSol solution but I heated it up in a crockpot type thing over a hot plate for over 24 hours. I was not impressed with what it did to the aluminum. It made it much darker and probably ate away at the alloy. At least there was more of a residue afterward.


                          Gnarly thermostat housing, AC compressor bracket (probably not using) and oil filter housing mentioned above.


                          Here are the same parts but power washed before PineSol dip. I did this mainly for the AC Compressor bracket.

                          So we'll see how the second round of PineSol soak works out. I have the parts in two buckets next to a south facing wall hoping the additional sun treatment will warm up the solution.

                          I am pretty pleased.
                          Si vis pacem, para bellum.

                          New Hawtness: 1995 540i/6 Claptrap
                          Defunct too: Cirrusblau m30 Project
                          Defunct (sold): Alta Vista

                          79 Bronco SHTF Build

                          Comment


                            #88
                            So, my thread subscribers, I have a question for all of you.

                            Judge the reasonableness and soundness of thought of this question: Does it stand to reason that if I weld this thing back together fairly well (strength and accuracy), I should be able to take it to a frame shop after and have it straightened IF I have not put it back together as accurately as it should be?
                            Si vis pacem, para bellum.

                            New Hawtness: 1995 540i/6 Claptrap
                            Defunct too: Cirrusblau m30 Project
                            Defunct (sold): Alta Vista

                            79 Bronco SHTF Build

                            Comment


                              #89
                              I don't see why you can't take to frame shop to have it straighten after you finishing welding back together.

                              I wish knew about the Pine Sol. It looks much cleaner. I would of dipped all my parts for cleaning.
                              Projects Hartge,Alpina & AC Schnitzer Builds.http://www.r3vlimited.com/board/showthread.php?t=280601
                              http://www.r3vlimited.com/board/showthread.php?t=227993
                              http://www.r3vlimited.com/board/showthread.php?t=289362

                              DSC04926 by Raul Salinas, on FlickrDSC03413 by Raul Salinas, on Flickr

                              Comment


                                #90
                                Originally posted by marshallnoise View Post
                                So, my thread subscribers, I have a question for all of you.

                                Judge the reasonableness and soundness of thought of this question: Does it stand to reason that if I weld this thing back together fairly well (strength and accuracy), I should be able to take it to a frame shop after and have it straightened IF I have not put it back together as accurately as it should be?
                                I'm not really the right person to answer this question, but I feel like if you weld it in the wrong place, and try to straighten it, something about the front end will always be off no matter what you do. I would take the extra time to be absolutely certain that it's welded in as accurately as possible. If you need to make a DIY frame jig of some sort, then so be it.

                                Comment

                                Working...
                                X