
Holy shit man, thanks for the detailed answers! Much more than I was expecting! I didn't know there were individuals who've gotten this far into modifying code in the ECU. I know there are one or two other forum members who'd probably like to pick your brain or at least grab some tips from you.
I think there really needs to be a subforum added somewhere on r3v or bimmerforums for DIY ecu code modification
Edit: doesn't the e36 also grab speed signal from the diff like the e30 does? I literally just split open an e30 and e36 diff - same speed sensor ring on the diff gear. Or is it not that simple? I thought the sensors in the wheels where exclusively for traction control/abs giving individual wheel speeds so the traction/abs module can see if a wheel is rotating faster/slower in relation to the other wheels
-
The 328i ECU MS41.1 has a single rev limiter built in, but the late E36 M3's MS41.2 software has a load vs speed rev limiter with multiple values.
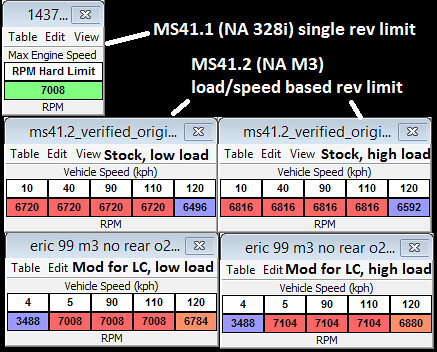
If you modify the tables from the upper M3 row to the lower M3 row, you'll lower the rev limiter for all speeds under 4kph to 3488 RPM
The MS41 ecu will interpolate, so you need to change the next value to 5 so you don't end up with some weird rev limit between 3488 and 7008 until 40kph.
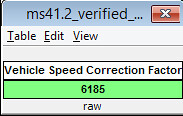
The issue with this, is the VSS signal the E30 diff spits out is like 5.3x lower than what the DME is expecting from the E36 chassis (I think it takes signal from the abs sensor) so that can cause issues with the rev limit if it changes based on speed, and issues with vanos activation (also speed/load based)
There's a value in the ECU that acts as a modifier for the incoming speed signal, but until recently it either wasn't known where it was (as far as romraider goes.) changing this value should correct for the different VSS the E30 wants to send to the DME. For the latest ECU definitions, this value is only mapped out on the M3 ECU.
Leave a comment:
-
I'm using one of these:

connected to one of these:

I also made a bench harness out of an old E36 DME connector, 20 pin connector, and an Xbox power brick, but you could just do this in the car with a charger on the battery like turner does for the shark injector.
I use Chipster's MS41 flash tool to read/write:
and Romraider(Free) to edit:
http://www.romraider.com/
+ Their forum for ECU definitions and loads of information:
http://www.romraider.com/forum/viewforum.php?f=42
I also learned a lot from the OpenMS41 wiki, but the guys who run it are now on the romraider forum and don't really update the wiki. The info for the bench flasher on this site is what I used for mine, (also bridged TXD1 and 2 on the 20 pin connector so INPA will work to pull codes, but that doesn't matter for flashing)
Leave a comment:
-
how are you modifying the ECU coding? I want to learn this stuff... it'd be nice to be able to code out emissions/ews or raise idle rpm etc.
also curious about the "launch control/VSS correction" - school me?Leave a comment:
-
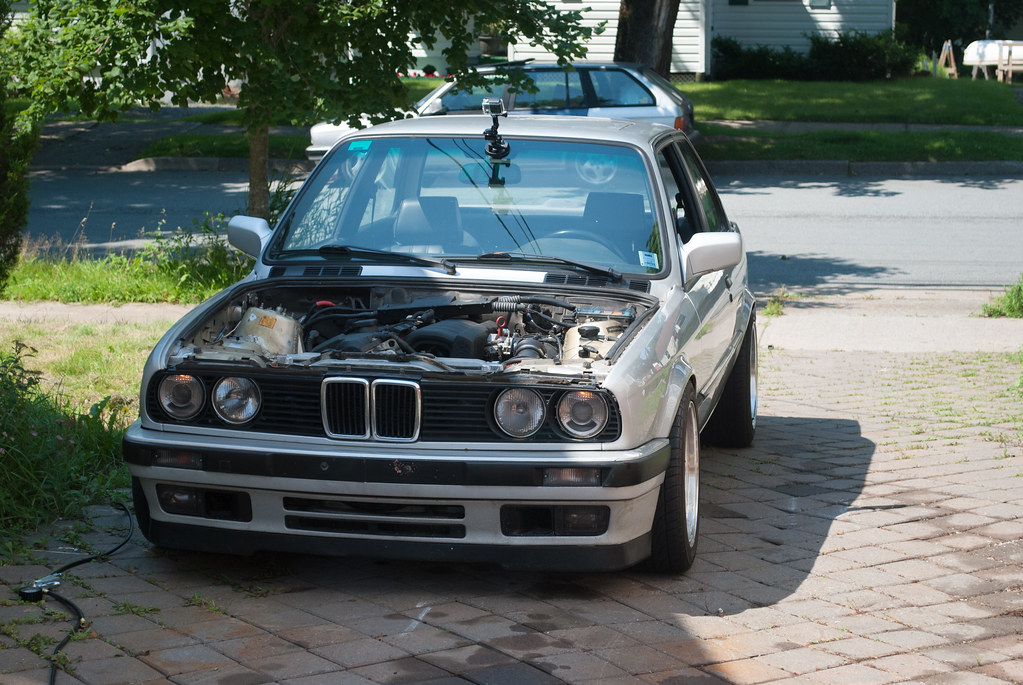
Well MVI went great, I've been to this shop before run by some experienced BMW/Porsche guys. New 911 turbo on the other hoist with the engine pulled. They have an S54 swapped E36 M3 GT3(I think?) racecar that we ended up watching qualifying videos of. An S54 revving to 8k+ sounds pretty godly.
Anyway, the bad news is that on the way there, the car threw the cyl 1 misfire code again. I cleared it with INPA when I got there, but as they brought it in they told me that the car is definitely misfiring. As soon as I pulled back onto the street afterward, it threw the code again.
I reached home, swapped Cyl1's coil to Cyl4, reset the codes and went for a spin. Car felt the same for 5 minutes or so before it threw the code again, so I went home and swapped the injector.
While putting it back together, I noticed the injector harness case was riding on the bent fuel rail tab. I don't think the original injector was even plugged in all the way.
Started it up and idled for a bit. Idle was noticeably smoother this time. Let it sit and kept checking for codes, but it didn't throw any (yet...)
Also while idling, the electric fan kicked in. I guess the switch isn't bad after all. The cluster does seem to read high though. The needle sits between 1/2 and 3/4, but INPA reads <80 degrees, so maybe the brown top sensor I have is just junk.
Current issues/wants:
M42 ECU bracket
2 Throttle cable end clips (How do new throttle cables not come with these???)
3 new guibo bolts (mine are mismatched, afraid of vibration/guibo life)
318 firewall cover
Trim engine bay wiring because it's hella long/everywhere
Idle is set at 700(I think) and I think it maybe should be higher with this flywheel.
iS lip clips... I broke like 3 putting it back on. I don't even know what to say, they were like a year old and OEM.
Make mount for cruise module in the engine bay.
Make mount for ricer cone/MAF. It's just zip tied now.
Also going to mess with MS41.2 tonight (M3 software) if I get a chance, just for launch control/VSS correction. This DME seems to work great, so I'll try this out on my spare.Leave a comment:
-
For the past few years, my hood wouldn't "pop" when opened, just sort of move upward 1/4". I figured that I could deal with that, as well as lots of small spots of rust before I put the hood back on.
I pretty much just drilled out the 10mm roll pins that were rusted solid, marked where the bits bolted onto the hood and removed them, and wire wheeled all the mating surfaces that were corroded, then prime/paint/clear it all. Reassemble with fluidfilm on the mating surfaces and threw a bolt with a self locking nut in place of the roll pin.
The hood pops properly now, and I don't have to mess with either hood alignment or the stupid spring system if I want to remove the hood now.
Also put the washer res back in once the hood was on. Apparently I ripped the connector for the pump off, so I had to splice a new connector on. Luckily the first connector I found was the right one, so everything worked out there.
N.S. "Motor Vehicle Inspection" is today...Leave a comment:
-
My buddy Scott came by and helped me bleed brakes this afternoon, so I went out again after that.
Here's a quick and dirty exhaust vid. Quick pull around 2:15, the rest is me just putting around trying to get used to the clutch and not get too many dirty looks.
Vid still processing as I post this...Leave a comment:
-
Congratulations on getting it running! Looks good and sounds goodLeave a comment:
-
Random notes/issues:
FX Stage 3 clutch/flywheel is definitely heavier, but isn't hard to engage or anything. I do need my clutch stop back.
Brake lights stay on. pedal sits barely too low for the switch to engage. I have a shim taped to the pedal right now to go out and test other stuff, but I need to actually fix this.
Brakes feel like crap. I bled the brakes but no air came out. I think they just need to be bled a lot more. I swapped out all the bleeder screws though, I'm surprised the old ones even came out.
I keep getting CEL, and wasted a day trying to read codes. My old Peake scan tool doesn't work on this engine or my bench rig, and neither does my ELM bluetooth OBD2 scanner. Eventually I geared up INPA and used the INPA cable/ADS adapter and read them...
I had a MAF code, fuel trim codes, Cyl 1 misfire, Bank 1 fuel trim limit and some other cat related codes. Cleared them and just had the cat efficiency codes, cyl 1 misfire, bank 1 fuel trim limit. Cleared those again and they haven't come back yet.
Car seems to run a little warm... I tried to bleed the coolant, seemed like it worked, maybe not. Aux fan won't come on, so either it's not as hot as it thinks, or the new fan switch doesn't work (Fan definitely works)
I need to reinstall the hood, washer res/system, mount the cruise unit, and get some throttle cable clips.Leave a comment:
-
No updates in a while because it has rained almost every day I'm off work. This summer has been really cruel with which days are sunny.
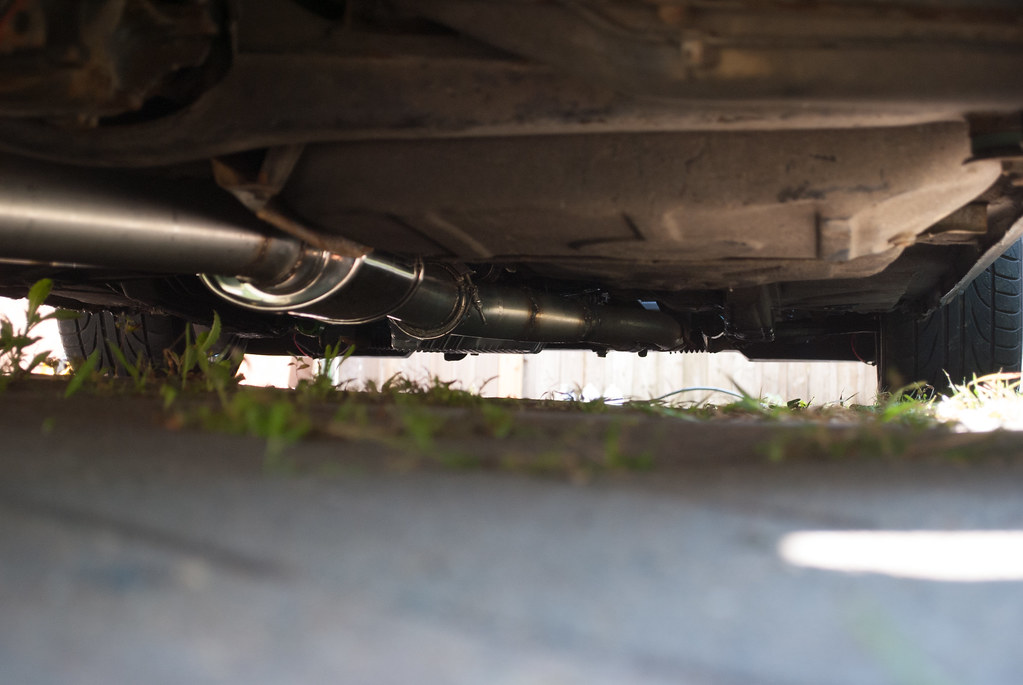
I think I finished the exhaust... for now.
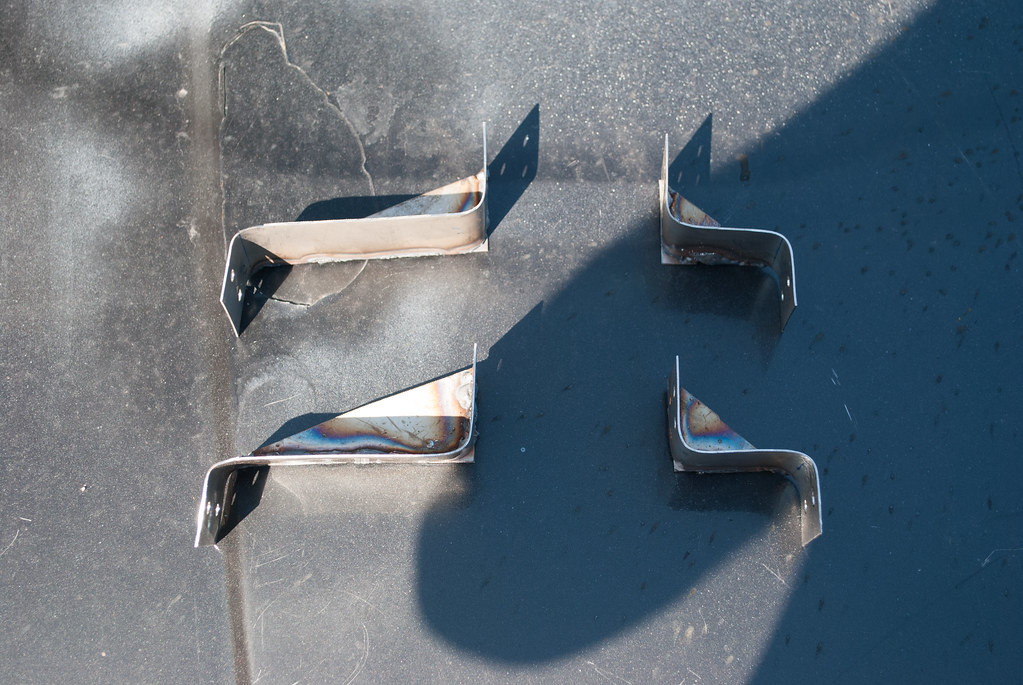
I didn't want to weld anything to the body of the car, so I made some brackets that bolt to the frame rail above the old muffler:
on the ends of these sit hangers which attach to the large t-bolt clamps. I should be able to shim the muffler left/right and rotate with this setup.
Front section:
Rear bit:
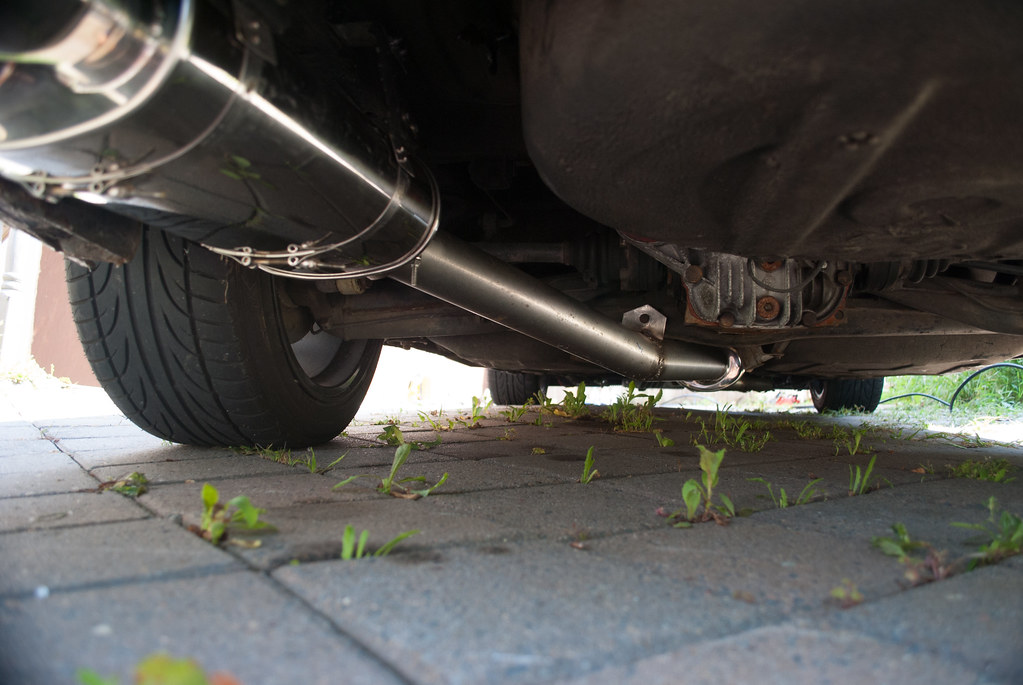
I don't hear any leaks so far. Fingers crossed.
It is much louder than I thought it would be though, and I could've saved a lot of money and effort by buying the regular vibrant 3" in/out muffler and mounting it with the stock hanger locations, then make tips out of the 3" stainless and spend that extra money on a borla proXS or other muffler instead of the little vibrant resonator I have.
Took it out of the drive way, flipped it around to try to bleed the coolant:

Back left corner of the car is getting pretty rough. I may need to buy a chuck of a car and bring it somewhere next spring/summer, since I'm definitely not going to have anywhere indoors to graft a new corner on.
I don't want to drive it too much because it still needs an inspection, although I don't know where to take it that won't just tell me everything is fucked and try to squeeze money out of me.
short lame vid incoming.Last edited by Northern; 08-16-2015, 11:00 AM.Leave a comment:
-
It does look nice, but I don't want to weld anything to the vibrant muffler or to the car if I can avoid it. Even with stainless wire, I feel like it may corrode or fatigue over time, and I am very paranoid about corrosion from living around here.
I'd be happier welding to the pipe, because that's cheap/easy to replace in comparison. I even found a decent sized sheet of T321 stainless in the scrap pile to use for hangers at the rear subframe.
I'm still thinking of using the two large t-bolt clamps (almost like these) to go around the muffler to hang it, but the stock hanger locations are too far forward/to the side to pick up unless I weld a huge length of metal to get there.
As far as updates go...
My new registration sticker showed up in the mail today. $200/2 years, plus I still need safety inspection somewhere where they won't fail me for dumb shit to try to make money.
Today's mission is to clear out a few hundred lbs of scrap that's accumulated in my back yard from this swap, Mazda suspension refresh, random work on roy's touring, and just general accumulation of spare E30 parts. I think I have 6 M20 intake manifolds and a bunch of old dual mass flywheels, and nobody wants that crap.Leave a comment:
-
This guy does some pretty clean work. H welded little plates to the muffler and then made some hangers to match his mounting points. You could use some chopped up bits from stock exhaust if the muffler and piping will allow it. Then it's stock rubber hangers and rock 'n roll.Leave a comment:
-
Not much progress to report really, but here's where we are:
Throttle cable bracket showed up from BMW.
Exhaust fit and tacked back to rear subframe
That's it.
Random exhaust section picture:

For anyone interested in details, I'm using a Lincoln Mig Pak 10 with Blueshield 6 (90/10 Ar/CO2) with .035" ER308L wire.
I'm cutting everything with a little Princess auto 7" chopsaw rig I got for free (I wish I had a full sized chopsaw because it would make things 10 times easier) and cleaning edges up with a flapper disc and half-round files.
I have a decent idea on how I'm going to do the hangers, modify the downpipes-to-G250 piece to bolt onto the holes in the ZF320, and fab up one to attach to the rear subframe.
The muffler is where I'm clueless. I have two large T-bolt clamps that I shortened to use as muffler straps, but I was planning on picking up the stock hanger locations, but that 100% won't work with the smaller vibrant muffler.
I'm thinking of either drilling sideways through the frame rail (one side is pretty much centered in the exhaust cutout) and semi-permanently attaching the T-bolt clamps to it via some rubber hanger material (read: old cut up tire) I don't have a 90 degree drill to do this, but I think this is my best bet.Leave a comment:
-
Also forgot to mention that I used a mishimoto puller fan, wired up as a pusher with the stock aux fan high speed wiring, and the 88 degree switch that seems popular for these swaps.
I made mounting brackets out of some scrap aluminum:

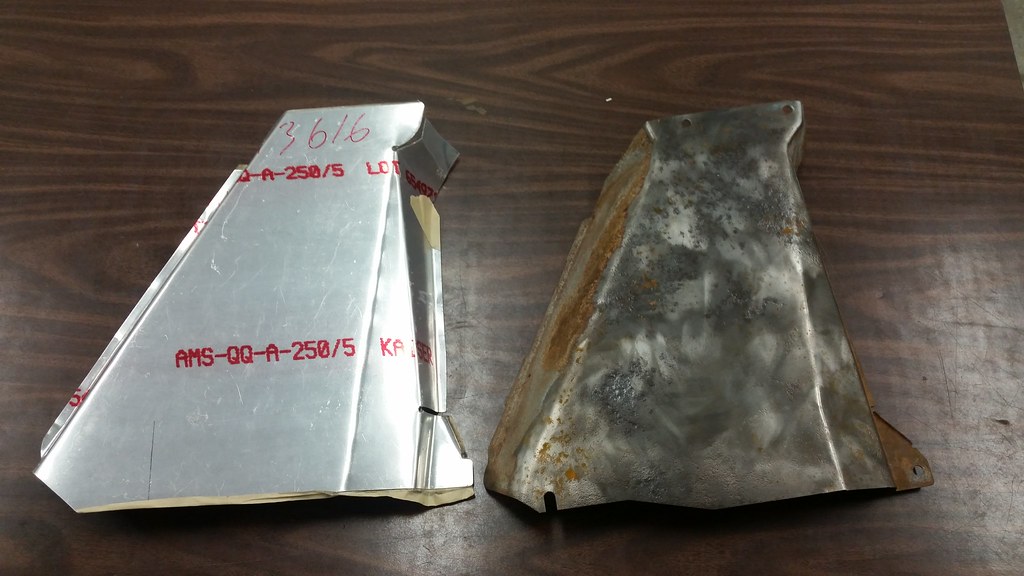
I also made a new heatshield for the rear of the driveshaft/gas tank before the subframe. The old one is thick, heavy, and very scaly/pitted, and I didn't want to spend any more time wirewheeling it.
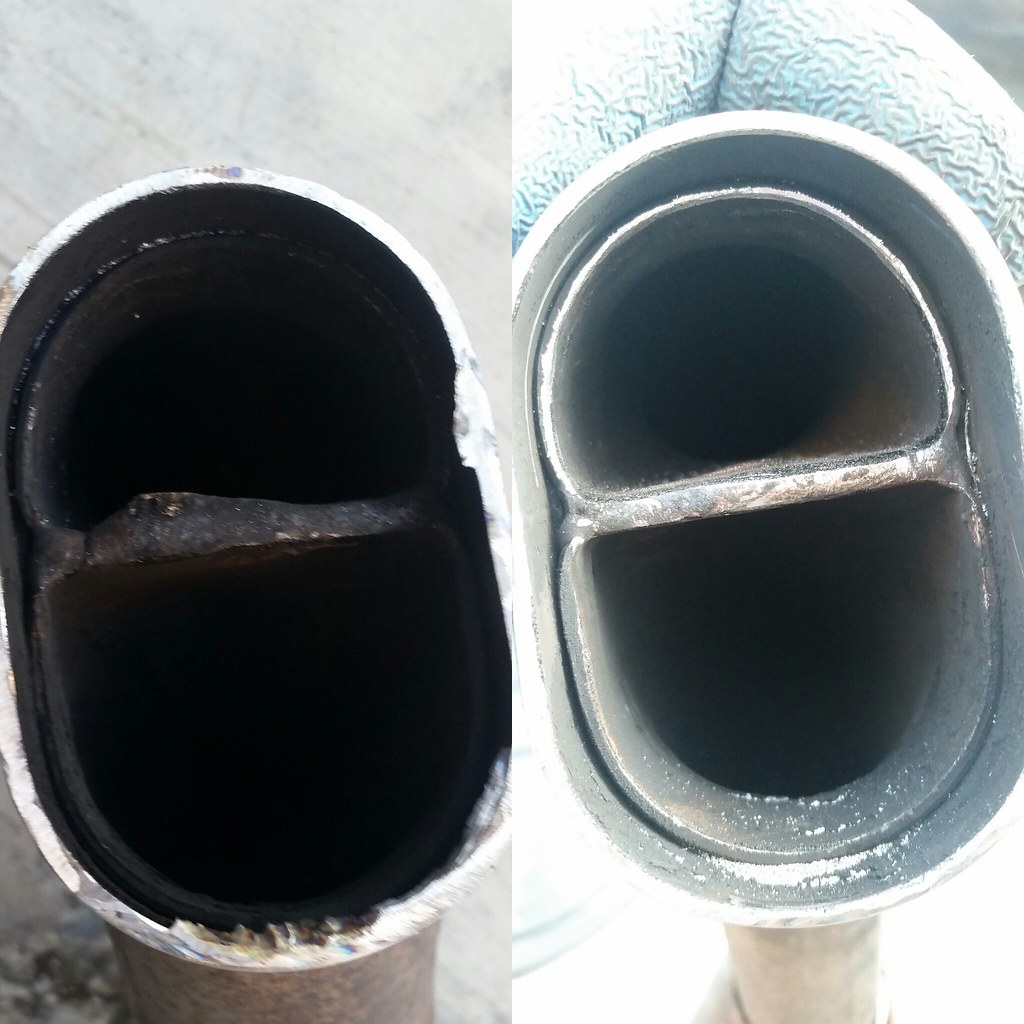
Last night, I started thinking about the exhaust. I started with some E36 OBD1 downpipes, and cut them off at the merge. I noticed that the merge isn't very equal between banks, but I don't think I can do anything about that now. I filed down a big blob of weld and opened up the end of the tube to hopefully equal it all out:
May be working on more exhaust stuff today. I need to either buy cutting wheels for the little metal chop saw I have, or buy a full size one.Leave a comment:


Leave a comment: